


1. Introduction
Destiny awaits us all. Welcome! The destiny that awaits you after you read this guide is one that is abundant in MMR and the tears of any opponents that dare face your Ember Spirit in patch 7.41b!
As with most heroes, people tend to jump on a set build for Ember that they follow every game, but that is a silly approach to one of the most versatile core heroes in Dota 2.
If you’re looking for a guide that will tell you to buy x items and level y skills so that you can thoughtlessly repeat the same thing, this guide is not for you. If you want to understand the hero well, learn about its different builds, and learn how to adapt to the game, then keep on reading.

Table of Contents:
1. Introduction
2. Characteristics & Statistics
3. Game Matchups
4. Skill Builds
5. Item Builds
6. Spell Use, Item Use & Combos
7. Playstyles & Tempo
8. What's next?

2. Characteristics & Statistics
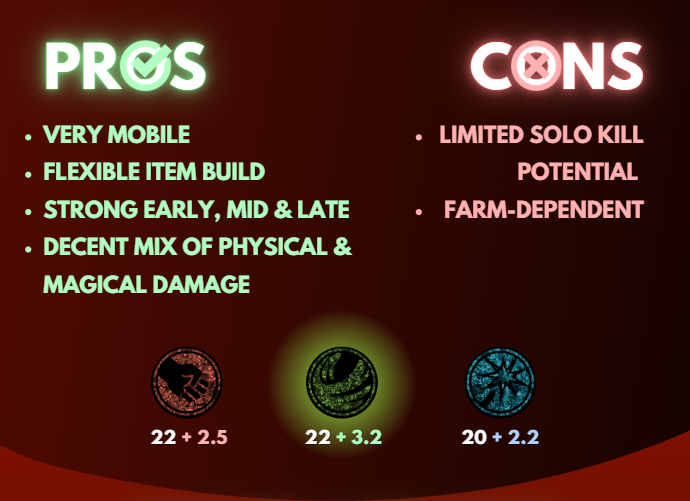 One word is sufficient to describe Ember's base stats & stat gain: decent. The usual 300 movement speed, the regular 100 base AS & 1.7 Base Attack Time, a decent 3.7 starting armour and 604 starting HP. His strength, agility and intelligence are all decent. Not amazing, but definitely not bad either.
Perhaps the only thing that stands out a bit is his turn rate; at 0.8, it is better than the majority of heroes, meaning that Ember can turn around just a fraction of a second faster than most.
His three basic spells and throwing out a Fire Remnant all have 0 cast time, making it easy to get them off quickly. Only activating a Fire Remnant has a 0.2s cast time, which is still speedy.

3. Game Matchups
Good Versus
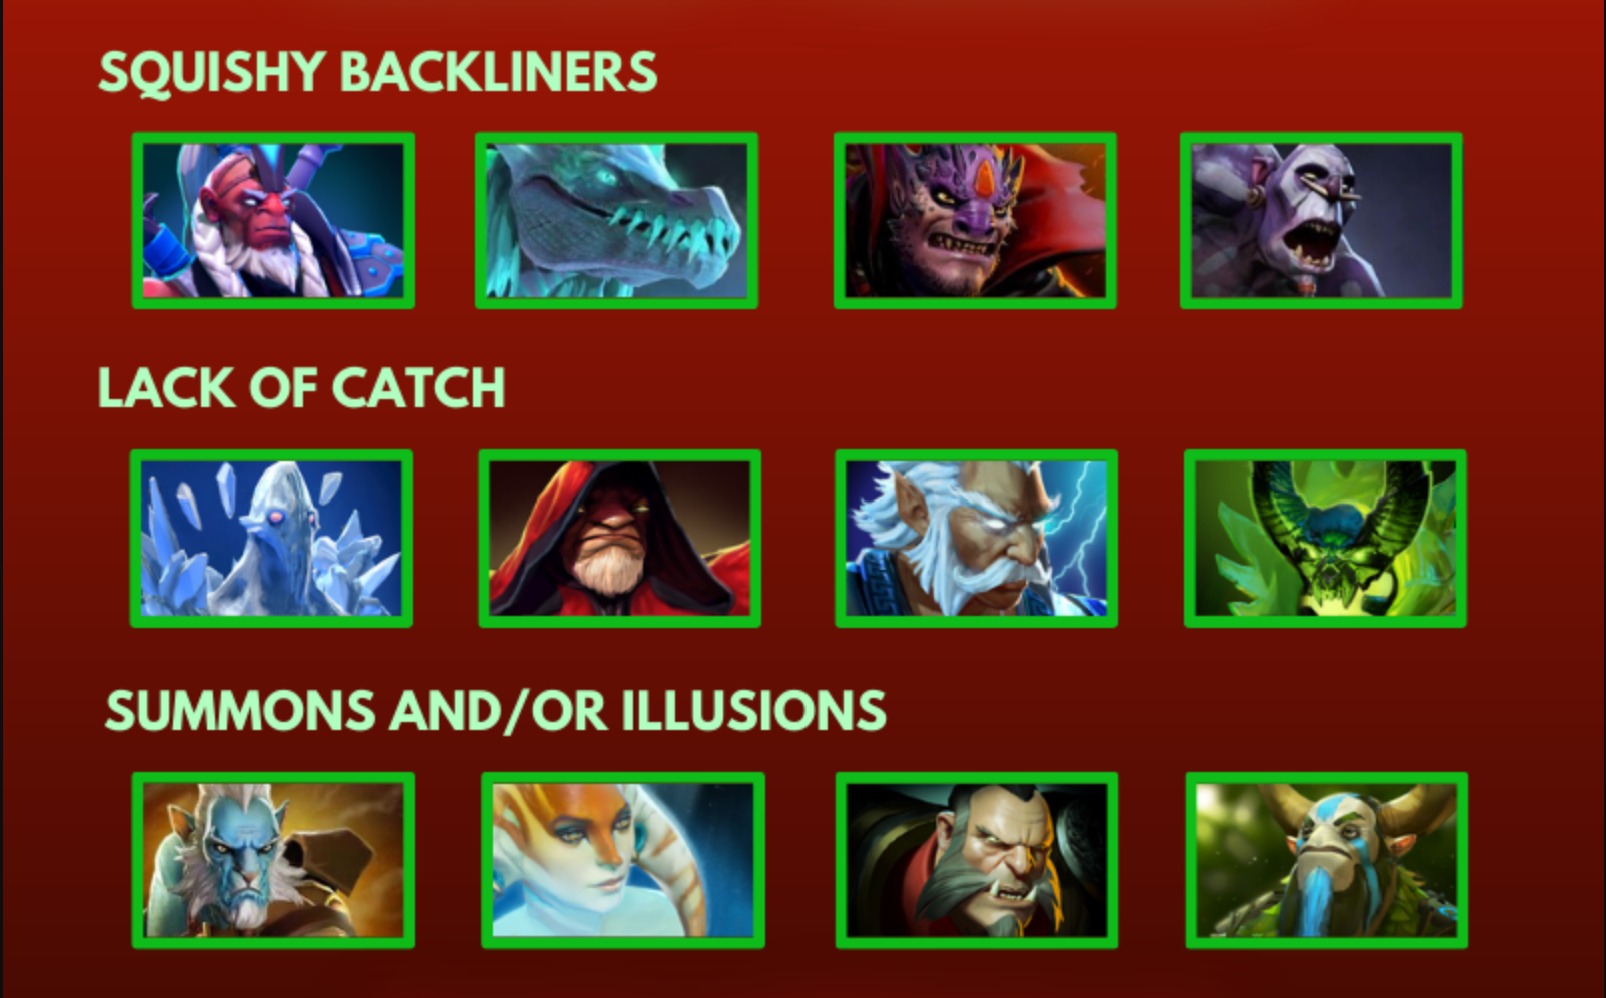 Squishy Backliners
Ember counters these by being very mobile and getting on top of them before they can react.
Apart from your ability to jump them, you can also Sleight of Fist -> Searing Chain them from up to 1250 range away.
Lack of Catch
If the enemy team has little disable, you can play highly aggressively without getting punished since you're one of the most mobile heroes in the game. As long as you have a defensive Remnant up, you can farm behind enemy tier 2's and even dive their base if you want to; no disables means you can simply press one button and fly away at any moment!
Summons and Illusions
No matter how many Sleight of Fist targets there are in its area of effect when you cast it, Ember Spirit will hit every single one!
If you have a Maelstrom, this becomes a significant advantage; more targets equal more chances for Maelstrom to proc.
However, even without a Maelstrom this is powerful because it means you are burning them with your innate and Flame Guard, effectively dealing AoE damage while invulnerable.
Bad Versus
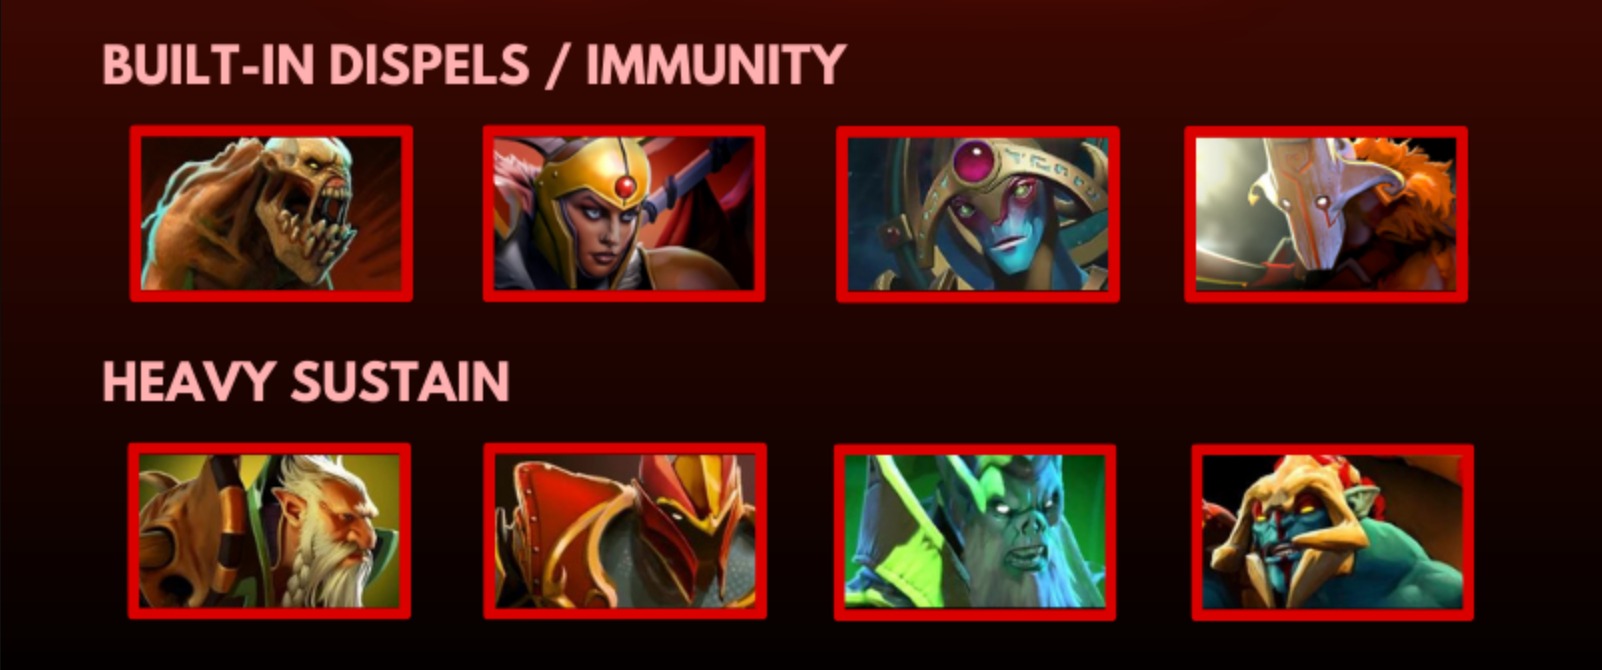 Built-in Dispels or Immunity
Heroes that have dispels or spell immunity as part of their kit can remove your Searing Chains from themselves or allies, which greatly reduces your ability to control enemies and deal damage.
Heavy Sustain
Ember excels at wearing the enemy's HP down while staying safe. His burst damage is mediocre, but his sustained damage is outstanding.
Durable opponents that can out-regenerate your sustained damage are tough to deal with because they usually don't care about your Sleight of Fist spam. Naturally, building a Spirit Vessel helps against this, but the enemy can of course counter it with any basic dispel (which they already have an incentive to buy in order to deal with your Searing Chains).

4. Skill Builds
Spell Scaling
Ember's skills interestingly scale in different ways and his skill builds can vary a fair bit, so it's important to be flexible and adapt to the game.
Searing Chains are a great harassment spell at level 1, dealing 125 damage for only 80 mana, but do not scale that well. Since the removal of the Chain Gang facet, this spell is not useful for farming and although it's Ember's main control tool, it can be unreliable if the enemy has any summons, which is why you should usually be maxing it last.
Sleight of Fist already gives you the ability to dodge spells at level 1, but its bonus damage nearly doubles from level 1 to 2, going from +50 to +90 against heroes. Also, people underestimate the fact that the radius increases significantly from 250 at level 1 to 550 at level 4, which not only means you can reliably hit the whole screen, but also that combined with the cast range you can reach enemies up to (650 + 550 =) 1200 range away once it's maxed (equal to Blink Dagger's cast range), as opposed to only 900 range away when it's level 1.
Flame Guard is an interesting spell, and when I say interesting I mean that at level 1 it is one of the worst spells in the game. It takes only an 86 magic damage nuke to break it, and even if it doesn't get broken, it deals a measly 20 dps (keep in mind your innate already deals 10 dps constantly, albeit in a smaller radius).
At level 2 it takes a 200 damage nuke to break it, which is significantly better since very few spells can break it in one cast at that level. Therefore, you want at least 2 levels in it, even if you are prioritizing Searing Chains.
Once Flame Guard is maxed and with the level 10 talent, it can block up to 664 magical damage, which is a ton. However, it is still dispellable so if you are facing enemies with spells that can offensively dispel and remove it (Invoker's Tornado, Largo's Lick, Oracle's Fortune's End, Enchantress' Enchant, etc.), you will probably want to consider a BKB at some point.
Lastly, since the removal of the Chain Gang facet, Flame Guard is once again a crucial farming tool for Ember Spirit, which means that maxing it relatively early is the safe play, and skipping it entirely is very risky.
Fire Remnant is no longer tied to the passive innate immolation, meaning that it is one of the worst-scaling ultimates and once again should not have more than one point in it until all basic spells are maxed out, since you're not using it for damage early and you're actually hurting yourself with the increased mana cost.
There is no single "good" build because of how Ember's spells scale and work. Keep an open mind and adapt to the game, since the strength of each spell is highly situational depending on the enemy lineup and what the enemy mid is, whether you can or even want to try and crush the lane, or whether you want to rotate and gank early, or farm more, etc.
With that being said, here are two sample builds:
The Flame Guard Build
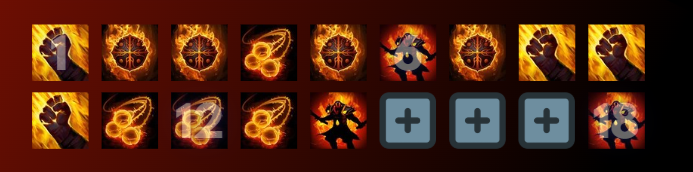
This is the safe skill build that allows you to farm a lot while also providing you with decent kill potential. It's powerful if the enemy has immobile heroes that cannot effectively fight back if you get on top of them with a maxed Flame Guard, and also cannot easily remove it. We're talking about heroes like Kunkka, Tidehunter, Slardar, Dragon Knight, Arc Warden, Lycan, Necrophos, etc.
However, keep in mind that it's a bad idea versus enemies with dispels that can remove your Flame Guard; you should use the SoF build against them instead.
You can take SoF at level 1 if the enemy has an easily dodge-able spell (Storm's remnant, QoP's dagger). Keep in mind some spells like Shadow Fiend's raze and Monkey King's Boundless Strike have no projectile / delay (unlike Storm's and QoP's), so a good player will easily be able to pump fake and bait your SoF, making this dodge less reliable.
The Sleight of Fist Build
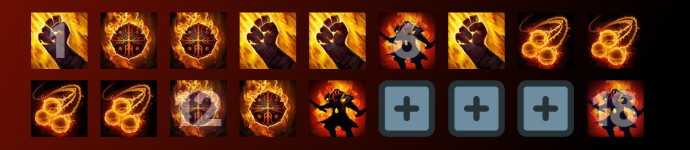 This skill build gives you the highest chance of having a good early game, since a maxed out SoF will make your lane easier and coupled with two levels in Flame Guard you can farm decently regardless of your match-up. If you go for this build you don't really want to rotate until you've hit level 8 and have at least once point in Searing Chains.
If you're facing a mid without any magic damage (e.g. Slardar, Alchemist, Timbersaw) you can even consider leaving Flame Guard level one, since they have no way of removing it.
Talents
Since the removal of the Chain Gang facet, Ember's talents have become relatively straightforward since Searing Chains is currently not a strong enough spell to warrant taking the talents for it. This means you almost always want to take the following:
Absorption at level 10
Flame Guard DPS at level 15
Sleight of Fist Hero damage at level 20
Sleight of Fist charges at level 25
Level 10 talent reasoning
Although 12 damage is okay, the bonus absorption talent represents a ~55% increase in barrier amount, which gives you not only survivability but also damage (keeping the Flame Guard up for longer). No-brainer choice regardless of your build.
Level 15 talent reasoning
Going from a 2.75 to a 3.55-second root with the Searing Chains talent is decent, but enemies facing you will often pick up dispels (Manta Style, Lotus Orb, BKB, Abaddon's shield, Oracle's Q and ult, etc.), meaning that the extra duration will not always come into play.
The Flame Guard DPS talent nearly doubles its damage, increasing your threat in fights massively as long as you can actually stay on top of enemies without getting it removed. Picking up a BKB at some point makes this very easy.
Level 20 talent reasoning
The SoF damage talent represents a ~30% increase on the bonus damage from the spell, realistically more like ~15% if we count your hero's attack damage as well.
The Searing Chains damage is also decent (see the damage calculation cheat-sheet by Liquipedia here:)
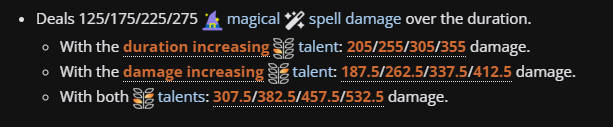 As we can see, taking the Searing Chains talents at both levels 15 and 20 nearly doubles their damage from 275 to 533, which obviously sounds more impressive.
However, Searing Chains can currently only hit 2 enemies while SoF has no limit as well as a much bigger radius, range, and shorter cooldown, making it the better damage talent choice.
Level 25 talent reasoning
Ever since Ember's Agh's Shard got introduced, the Remnant CD talent became incredibly weak compared to the 2 Sleight of Fist charges. By the time you reach level 25 you will definitely have the shard and possibly an Agh's as well, meaning you'll have plenty of Remnants to work with during fights. Furthermore, going from 35s to 23s restore time won't change anything during one fight, and at this point in the game that one fight can often decide the entire match.
The two charges on Sleight of Fist are overwhelmingly powerful; not only does it act like the equivalent of a 50% CD reduction on the spell, but it also allows you to use it twice in a row, meaning you can either burst enemies harder or become invulnerable for a very long time (as long as there are enough enemy units around). Combined with Octarine Core or any other CDR, you can easily be invulnerable for half the fight.

5. Item Builds
Starting Items
 This is the cookie cutter approach to go for when you're not sure what to buy.
With that being said, you can sometimes start with a Magic Stick instead of a Quelling Blade vs heroes that spam spells and do not have the highest base damage like Puck, Batrider, Leshrac, and Storm.
There's also the Blight Stone strat to punish particularly low armour enemies like Puck and Skywrath, but once again, I don't recommend these unless you really know what you're doing.
Early Game
 Magic Wand is a must since you will be up in enemy heroes’ faces and get many charges. Bottle is good because you make great use of runes and will be running around a lot, and Urn of Shadows is simply a powerful item with great stats right now (especially since the patch where all Urns always get charges, regardless of how many there are on the team), giving you a little extra oomph for kills as well as additional sustain.
Core Items
 Phase Boots are awesome because activating them before shooting a Remnant makes it fly significantly faster, since its speed is 2.5x your current movement speed.
Let's talk about Spirit Vessel. One of the most common mistakes people make is always upgrading Urn to Vessel on autopilot without thinking about whether it's worth it or not. There's no doubt that Vessel is very powerful and can effectively deal more damage than a Dagon over its duration, while also having an easy build-up and providing amazing stats. It is generally perfect versus teams with tanky heroes, lots of healing and regen, and no convenient ways to dispel it, like Centaur, Kunkka, Magnus, Winter Wyvern, Enchantress, Chen, Io, etc.
However, there are games where it simply doesn't make sense. Versus heroes with built-in dispels like Largo, Oracle, PL, Abaddon, LC, Jugger, etc. the item is not going to accomplish much. Also, there are games where you'll need other items faster, and it's a matter of opportunity cost. If you're facing Silencer and someone that rushes Orchid, for example, you'll probably want to prioritize a defensive item instead.
Then there's the Mage Slayer. When playing against certain heroes with heavy spell damage, this item becomes a must on Ember, especially since he's one of its best users, being able to quickly apply it to everyone from a huge distance thanks to SoF. This video explains Mage Slayer in detail.
Of course, you may sometimes want to buy both Vessel and Mageslayer, if it's a good game for both.
Lastly, Kaya & Sange is just an incredibly cost-efficient item with an easy build-up that allows you to never run out of mana, increases all your magic damage, and makes you tankier. Not many items can compete.
Luxury / Situational
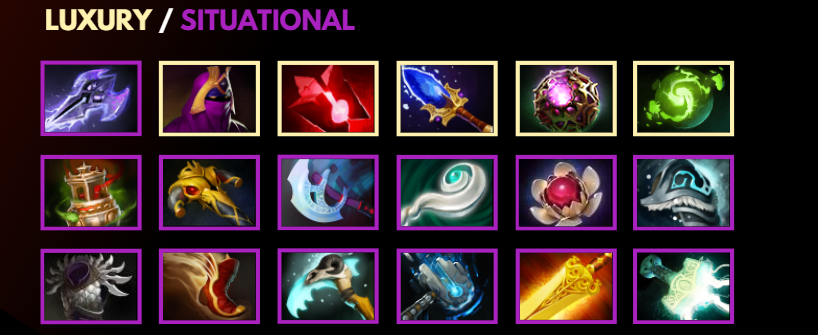 Though it may seem strange, Black King Bar is not a defensive item on Ember but an aggressive one. It's easy to dodge spells with slow missile speed using Sleight of Fist and Fire Remnant. You are only vulnerable to instant disables such as hexes or long-range stuns, against which a BKB does not help much, because if you couldn’t get your SoF/ult off, you probably wouldn’t get off the BKB either.
In those cases, you would instead get an Octarine / Bloodstone for the HP boost or a Eul’s / Manta / Linken’s / Lotus for more elusiveness.
The purpose of a BKB on Ember is to enable you to charge headfirst into fights, which magic immunity allows only versus line-ups with low physical damage (teams with Zeus, Spectre, Skywrath, AA, Disruptor, etc.) Do not buy this as your second item unless you are far ahead and able to force fights with it, because if it does not get you kills, it will heavily slow down your item progression.
Bloodstone is now the upgrade of Veil of Discord, and although Ember is not exactly keen on spell lifesteal, the magic resistance reduction aura is just incredibly powerful and more than enough of a reason to pick this item up. Keep in mind that while Veil applies a single debuff that can be dispelled, Bloodstone provides an aura that always works and cannot be dispelled.
Aghanim's Scepter is great for games where your main job is to jump backliners that can keep a significant distance - think Sniper, Zeus, Rubick, Oracle, etc. By doubling your Remnant range from 1500 to 3000 and increasing its flying speed, you're better able to get on top and stay on top of them.
Octarine Core is amazing for late-game Ember – It increases your damage output more than most items by virtue of decreasing the cooldown of your four spells, which all deal damage. The large HP & Mana boosts are also welcome for survivability and spell & item spamming. How early you get this depends primarily on whether you desperately need other items first. The more active items you have, the more valuable its CD reduction becomes.
Refresher Orb used to be amazing until they nerfed Fire Remnant to have a 0.5s cd, making the continuous Fire Remnant spam less reliable. Still, the item can be powerful as a sixth-slot, allowing you to basically spend an entire fight in invulnerability as you spam SoF and Fire Remnants.
Eul’s Scepter is situationally a good pick-up as it is not only the cheapest source of self-dispel, but also another disable. Normally people can simply TP out between Chain casts, but if you have a Eul’s they can’t – this is absolutely huge when it comes to catching an enemy split-pusher and setting them up for your team.
Keep in mind you can cast it not only while flying to a Remnant but even during SoF, meaning that (provided you have vision) with quick fingers you can get it off from a very far and safe distance.
Manta Style can be a greedier alternative to Eul's Scepter, providing less utility and a longer-cooldown self-dispel, but much better stats and right-clicking capability, which is something to consider in games where you need to deal tower damage.
Similarly, Meteor Hammer is inferior to Kaya & Sange in almost all ways, but it is cheaper and also gives you tower damage for those games where nobody picked a building-hitter.
Lotus Orb might seem like a peculiar pick-up but there are games where it is simply one of the best items, and Ember doesn't mind buying it at all. It can really turn the tide in some games, making certain heroes (Doom, Batrider, Winter Wyvern, Beastmaster, etc.) panic and hesitate before targeting you.
Blade Mail is certainly an interesting item deserving of its own article, but whether it is good or not really mostly depends on the enemy team's heroes. If they have lots of uncontrollable AoE damage like Leshrac, Gyrocopter, Luna, QoP, etc. then the item can be very powerful.
The new Shiva’s Guard is still good but now situational on Ember. It increases your teamfight presence and helps you survive and catch, but the biggest strength of this item on Ember is that you can reliably hit everyone with it since the blast follows you as you Remnant or SoF and jump around. It's particularly useful for the flying vision it provides, helping you stay on top of and burst squishy backliners that like to hide in the trees.
Desolator can situationally be nice with SoF applying it to all enemies, allowing your team to benefit from it as well. In practice, however, if you already have physical damage cores on your team, the enemy team is likely to build armour; this means that you going for magical damage will probably be more effective.
Daedalus is situationally a good late-game pick-up when all you need is simply more burst damage. It really shines once you have the level 20 and level 25 talents for Sleight of Fist - there are usually better choices before that.
Scythe of Vyse can be the perfect game-winning tool if you are having trouble locking down elusive heroes that are able to escape your root. While it’s nice that your chains keep the polymorphed unit in place, they are dispelled by even weak dispels, whereas Scythe is not. Definitely a good 5th/6th slot pick-up.
Some more situational items are Radiance, Linken's Sphere, Mjollnir, Aeon Disk, and Boots of Travel. There are generally better options, but sometimes the game calls for these - don't be afraid to experiment!

6. Spell Use, Item Use & Combos
 Searing Chains hits a maximum of 2 targets within the radius with completely random priority. To land them reliably on an enemy hero, you need to make sure there is no more than 1 creep in the radius. While you should get very familiar with the radius over time, it can still be useful to hover over the skill or use alt+right-click to permanently have the cast range circle on the ground in order to get those tip-of-the-edge chains.
  Sleight of Fist should be spammed whenever it's off cooldown, 90% of the time starting from the laning stage all the way through the mid-game. Think of it as replacing your basic attack; you only use it once every 7 seconds, but it hits everybody with bonus damage in a massive radius with up to 1250 range.
The only times when you don't want to spam it are when:
Your Searing Chains will be up in 2-3 seconds and you want to combo with them as soon as possible
You're smoked or trying to sneak up on somebody
You can wait until the enemy casts a spell and then dodge it
 In its first few levels, Flame Guard is easily broken by 1-2 enemy nukes, so if you want to get any damage out of it you want to use it after the enemy has used their nukes. Once it's maxed out and boosted by the level 10 talent, it can absorb quite a lot and should therefore be used early in the fight to make you tankier.
 The Sleight of Fist -> Searing Chains sequence is the most basic combo you need to reliably hit if you want to play Ember. It is not difficult; just go into demo mode, practice it 20 times and you’re golden.
Landing the combo on someone in the fog is slightly more difficult since the Searing Chains need vision to latch, and Sleight of Fist on a single target will only give you vision for a short duration, meaning that if you mess up the timing the Chains will miss.
The main "trick" is that you need to wait around a tenth of a second after SoF and before using Chains, unlike when you have vision on the target and you can simply press Chains as fast as possible after the SoF. Once again, however, a few attempts in a lobby and the consistency with which you land it will get a lot better.
 When using Fire Remnant to chase (i.e. throwing it and jumping into it), make sure that you wait a bit before you dive into it. This is because moving into a close-range Remnant will be done with an MS of 1300, always faster than the 2.5x your base MS that the Remnant will be flying at. The Fire Remnant has a casting range of 1500. If you want to jump all the way to the maximum 1500 range, you need to wait about half a second before jumping into it after throwing it.
 Sleight of Fist -> Fire Remnant
Fire Remnant’s travel speed is equal to 250% of your current movement speed, as established earlier - this means that if you are very slowed down in the middle of a teamfight and need to remnant out, shooting it will be ineffective as it will take far too long to reach where you want it to. However, if you use your Fire Remnant during a Sleight of Fist, you will fire it from a SoF position, potentially allowing you to get away.
 Sleight of Fist -> Activate Fire Remnant
If you want to get out of a bad situation with a previously placed Remnant (for example during a teamfight or when split-pushing) keep in mind that despite the near-instant cast you still need to turn and face your Remnant before you can jump to it, which with Ember’s turnrate takes about 0.12 seconds for 180°. To avoid this, you can use SoF in front of you which will go off instantly as you won’t need to turn, and then Remnant out during the SoF.
Lastly, if you are about to die and have Remnants left, always drop one before you die. It’s very important to make this a habit. In the early game, if you respawn in less than 45 seconds you can travel back to the Remnant and immediately be in a good position to farm or fight, without using a TP scroll.
Furthermore, you always have the option to buyback and get into the fight again instantly by jumping into the remnant.
Since you can pick up items while travelling to a Remnant, it can be a very safe way to take runes without putting yourself at danger. Keep in mind that Remnants can be targeted through the minimap, making long-distance jumps easier to manage.

7. Playstyles & Tempo
 Here are some general tips to keep in mind when it comes to Ember's place in a typical match of Dota:
Ember is great at many things, but taking objectives is not one of them. Ideally, you have a harder carry on your team (e.g. Terrorblade, Morphling, Medusa, etc.) that can take towers while your goal is to make space and be the secondary damage dealer. This gives you more freedom to pressure the enemy – naturally, you should still avoid deaths because you are extremely difficult to kill as long as you use your spells well.
Because leaving Remnants behind is such a huge safety net, you should look to farm more dangerously past the river, freeing up the safer farm for your team. Of course, doing this does require solid map awareness and reflexes.
Try to figure out what your job is in the game. If you need to be the one catching and killing the enemy backline supports, you'll probably want items like Aghanim's Scepter, BKB, Nullifier, etc.
If your team lacks damage and you need to deal as much of it as possible, you can consider items like Mjollnir, Radiance, Bloodstone, etc.
If your team has enough catch and damage but you're all simply dying too fast, Ember can situationally also pick up defensive items like Lotus Orb and even Crimson Guard.
Make sure you clear waves and push lanes! Do that as much as you can. Pushing waves is what Dota is all about. By clearing creep waves and pushing a lane you create space for your team, keep your towers alive, and get information on the whereabouts of the enemy team (if they are defending - you see them, if they’re not defending - you know they’re up to something).
Ember is one of, if not the best and safest wave-clearer and creep-skipper in the game. If you get good at pushing waves consistently without dying and while managing to keep your mana, HP and TP ready for potential fights, I guarantee you’ll climb MMR in no time.

8. What's next?
Thank you for reading. As a reward for getting this far, you can use promocode: EMBER to get 50% off on my itemization course.
You have finished the article and are already likely to see an improvement in your gameplay and MMR—but make sure to also share it with your friends so that you can play better Dota together!
To improve further, take the following steps:
I hope you found this guide informative and I look forward to hearing your feedback!
Thanks for getting this far, and remember:
Always make the enemy react to you, instead of you reacting to the enemy!