


As developers, we often find ourselves working on large projects consisting of multiple subprojects. For example, I am thinking of a simple project consisting of a backend and a frontend.. but sometimes we may find ourselves working on much larger projects.
The bigger our project is, the more turning on the PC and start working is a pain in the ass: since this requires to open several terminals to execute several commands.
In this article I will show you how to automate these tasks, just by using VSCode’s “tasks”.
We will start with a simple case and then move on to more complex situations for which we would be obliged to use up to 5 terminals. We will see how VSCode tasks can make our lives much easier.
A simple case
In the first case we analyze, we have a simple, very common situation: a backend and a frontend: in the ./backend and ./www directories, respectively
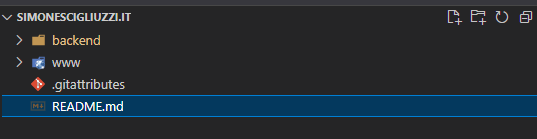
Specifically, the backend is developed with Strapi: and is then started via the command
strapi develop --watch-adminwhich is executed by the “serve” script already included in the package.json of the backend project.
The frontend, on the other hand, is an SPA developed with NuxtJS, and is then started via the command
SET NODE_ENV=development && nuxtwhich is executed by the “serve” script already included in the package.json of the frontend project.
So, what I should do every time I start working on this project would be.
open two terminals
in the first one I should type the commands
cd backend
npm run serve
in the second one I should type the commands
cd www
npm run serve
and wait...
Let’s see how to automate these tasks so that I can perform both (in parallel) with one command or one click!
Creating the Tasks
Let’s create the .vscode folder in our project’s root. Don’t forget the dot in its name, ’cause this is pretty important. Inside the .vscode folder, create a tasks.json file.

If you've created that file right now, you'll need to restart VSCode so it can load it the right way.
Now edit the tasks.json file. First of all, let’s create the tasks base structure
{
   "version":"2.0.0",
   "tasks":[

   ]
}
This will tell VSCode we’re using the tasks.json version 2, and our tasks will be defined within the “tasks” array.
Now let’s create our first task, by adding it inside the “tasks” array
{
   "version":"2.0.0",
   "tasks":[
      {
         "label":"2. Run Backend",
         "type":"shell",
         "hide":false,
         "command":"npm run serve",
         "options":{
            "cwd":"./backend"
         },
         "presentation":{
            "reveal":"always",
            "panel":"new"
         }
      }
   ]
}
That task is called “2. Run Backend”; it uses a shell type; itsn’t hidden (we learn in a few minutes what does it mean); has “./backend” as working directory; and it consists in the command “npm run serve”.
Let’s do the same thing for the frontend, by adding
    {
      "label": "3. Run Frontend",
      "type": "shell",
      "hide": false,
      "command": "npm run serve",
      "options": {
        "cwd": "./www"
      },
      "presentation": {
        "reveal": "always",
        "panel": "new"
      },
    },
Well, we can now create a group of task, allowing us to run both the projects with a single command. Add the next “task” object at the beginning of the “tasks” array
{
   "label":"1. Run the whole Project",
   "dependsOn":[
      "2. Run Backend",
      "3. Run Frontend"
   ],
   "presentation":{
      "reveal":"always",
      "revealProblems":"never",
      "panel":"new"
   }
}
This one is a little different from the previous ones. Here we have no command, no working directory, no console type... We only have dependency information. And this is it! This task will execute the other two: with their configurations, each one in a dedicated terminal.
Getting our first Task started
With no need to restart VSCode, nor to re-opening the project, we can type CTRL+Shift+P, search “Tasks: Run Task”, and clickin’ on that, we’ll see the following

A menu to quickly access to our tasks!
In fact, by clicking on “1. Run the whole Project”, VSCode will start the two commands in two different terminals

Tasks depending on each others
Let’s examine another case. It sometimes happens that we have to run a task that predates ours: perhaps to clear the build cache, before we run the application.
In the example case seen above, both the frontend and the backend have in their package.json a script
"clean": "npx rimraf .cache && npx rimraf build"So, what we want to achieve is for our Task to clear the two caches before starting frontend and backend. Let’s add the following tasks to the “tasks” array
    {
      "label": "Cleanup Backend",
      "type": "shell",
      "hide": true,
      "command": "npm run clean",
      "options": {
        "cwd": "./backend"
      },
      "presentation": {
        "reveal": "always",
        "panel": "new",
        "close": true
      }
    },
    {
      "label": "Cleanup Frontend",
      "type": "shell",
      "hide": true,
      "command": "npm run clean",
      "options": {
        "cwd": "./www"
      },
      "presentation": {
        "reveal": "always",
        "panel": "new",
        "close": true
      }
    }
Here we’re using two new task properties
hide=true avoides the task appearing in the list upon clicking CTRL+Shift+P
presentation.close=true results in the terminal being closed automatically, once the command is executed.
Let’s now edit the two tasks “2. Run Backend” and “3. Run Frontend” by adding the dependency on the related “clean” task
    {
      "label": "2. Run Backend",
      "type": "shell",
      "hide": false,
      "command": "npm run serve",
      "options": {
        "cwd": "./backend"
      },
      "presentation": {
        "reveal": "always",
        "panel": "new"
      },
      "dependsOn":["Cleanup Backend"]
    },
    {
      "label": "3. Run Frontend",
      "type": "shell",
      "hide": false,
      "command": "npm run serve",
      "options": {
        "cwd": "./www"
      },
      "presentation": {
        "reveal": "always",
        "panel": "new"
      },
      "dependsOn":["Cleanup Frontend"]
    },
Now, we can type CTRL+Shift+P, and click “1. Run the whole Project”
The two cleanup scripts will run in parallel, within two different terminals. Once completed, each of the two terminals will close to make way for the next script: the startup script.

Additional Tasks
In the previous example, we know that the Stripe dashboard automatically opens in our Web browser when the application starts. What if we want the frontend to also open in the Web browser at startup? What if we want to open the backend Swagger documentation as well?
Well, since we know that the frontend runs on port 8008, while the Strapi backend runs on port 1337, and Swagger is pointed to the /documentation path, all we will have to do is add two hidden/auto-closing tasks to our “task” array
    {
      "label": "Open Frontend",
      "type": "shell",
      "hide": true,
      "command": "start http://localhost:8008/",
      "presentation": {
        "reveal": "always",
        "panel": "new",
        "close": true
      }
    },
    {
      "label": "Open Swagger",
      "type": "shell",
      "hide": true,
      "command": "start http://localhost:1337/documentation",
      "presentation": {
        "reveal": "always",
        "panel": "new",
        "close": true
      }
    },
Please note: to open a link in the browser we will need to use the “start” command on Windows, or the “open” command on MacOS.
Now edit the main task
    {
      "label": "1. Run the whole Project",
      "dependsOn": ["2. Run Backend", "3. Run Frontend", "Open Frontend", "Open Swagger"],
      "presentation": {
        "reveal": "always",
        "revealProblems": "never",
        "panel": "new"
      },
    },
Now, we can type CTRL+Shift+P, and click “1. Run the whole Project”
The two “cleanup” scripts are executed in parallel, in two different terminals. The two “open” scripts will also be executed at startup, although the frontend and backend will not be running until the cleanups are completed and before they are started. Our web browser will then immediately open the two urls http://localhost:8008/ and http://localhost:1337/documentation, and these will initially be unreachable. No problem! Once both backend and frontend are running, our two web browser pages will refresh automatically.
Up to here, do we have advantages?
Up to here we certainly have advantages. Just think of how many clicks, how many commands, how many terminals and how much waiting we have saved ourselves with this approach!
This task is executed with just two clicks. Without it, we would have had to
open two terminals
start the backend cleanup
start the frontend cleanup
once its cleanup was finished, we would have had to start the backend
once its cleanup was finished, we should have started the frontend
finally we should have opened the browser on Swagger
and open another browser page to view the frontend
An even complex case
For the company I work for, I am developing a project as a full-stack programmer. In this project we have: a backend consisting of AWS Lambda developed using Typescript, 3 MySQL databases — one local and two on AWS, for staging and production — In addition to this we have two frontends: one for administrators and one for platform users.
Now try to imagine: being a full-stack developer, how many terminals do I have to open, each morning, when I get start working?
At least 5 is the anwer! :-o
Since Lambdas are developed in Typescript, the 1st terminal is needed for its hot-reload. A 2nd terminal is needed to run the local MySQL Database or to keep opened an SSH tunnel used to connect the DB over AWS. The 3rd terminal is needed to serve the APIs. The 4th to serve the frontend, and the last one to serve the second frontend.
Besides that, the project includes many tests: unit tests and e2e tests. So, the combination of activities that I do on a daily basis is very large.
Now, thanks to these tasks, I can do all these things with just one click!

We’re done for today!
I hope this article is useful for you.
If you have any questions or suggestions, please feel free to contact me.
Finally, if you liked this article, a "coffee" will be appreciated ;-)
If you like it, take a look at my website https://www.simonescigliuzzi.it