
This is my beginners program. It is a full body, 3x a week program to focuses on low volume and heavier loads. This is EXACTLY what I recommend everyone who is a beginner starts with. I recommend they follow this program for 4-6 months straight and then evaluate their progress before moving onto a more advanced program based on their desired physique goals.
I really don't have much else to say about this program as far as an introduction is concerned.
If you are looking for a more advanced program, check out the RMFit Program Directory article.
Required Equipment:
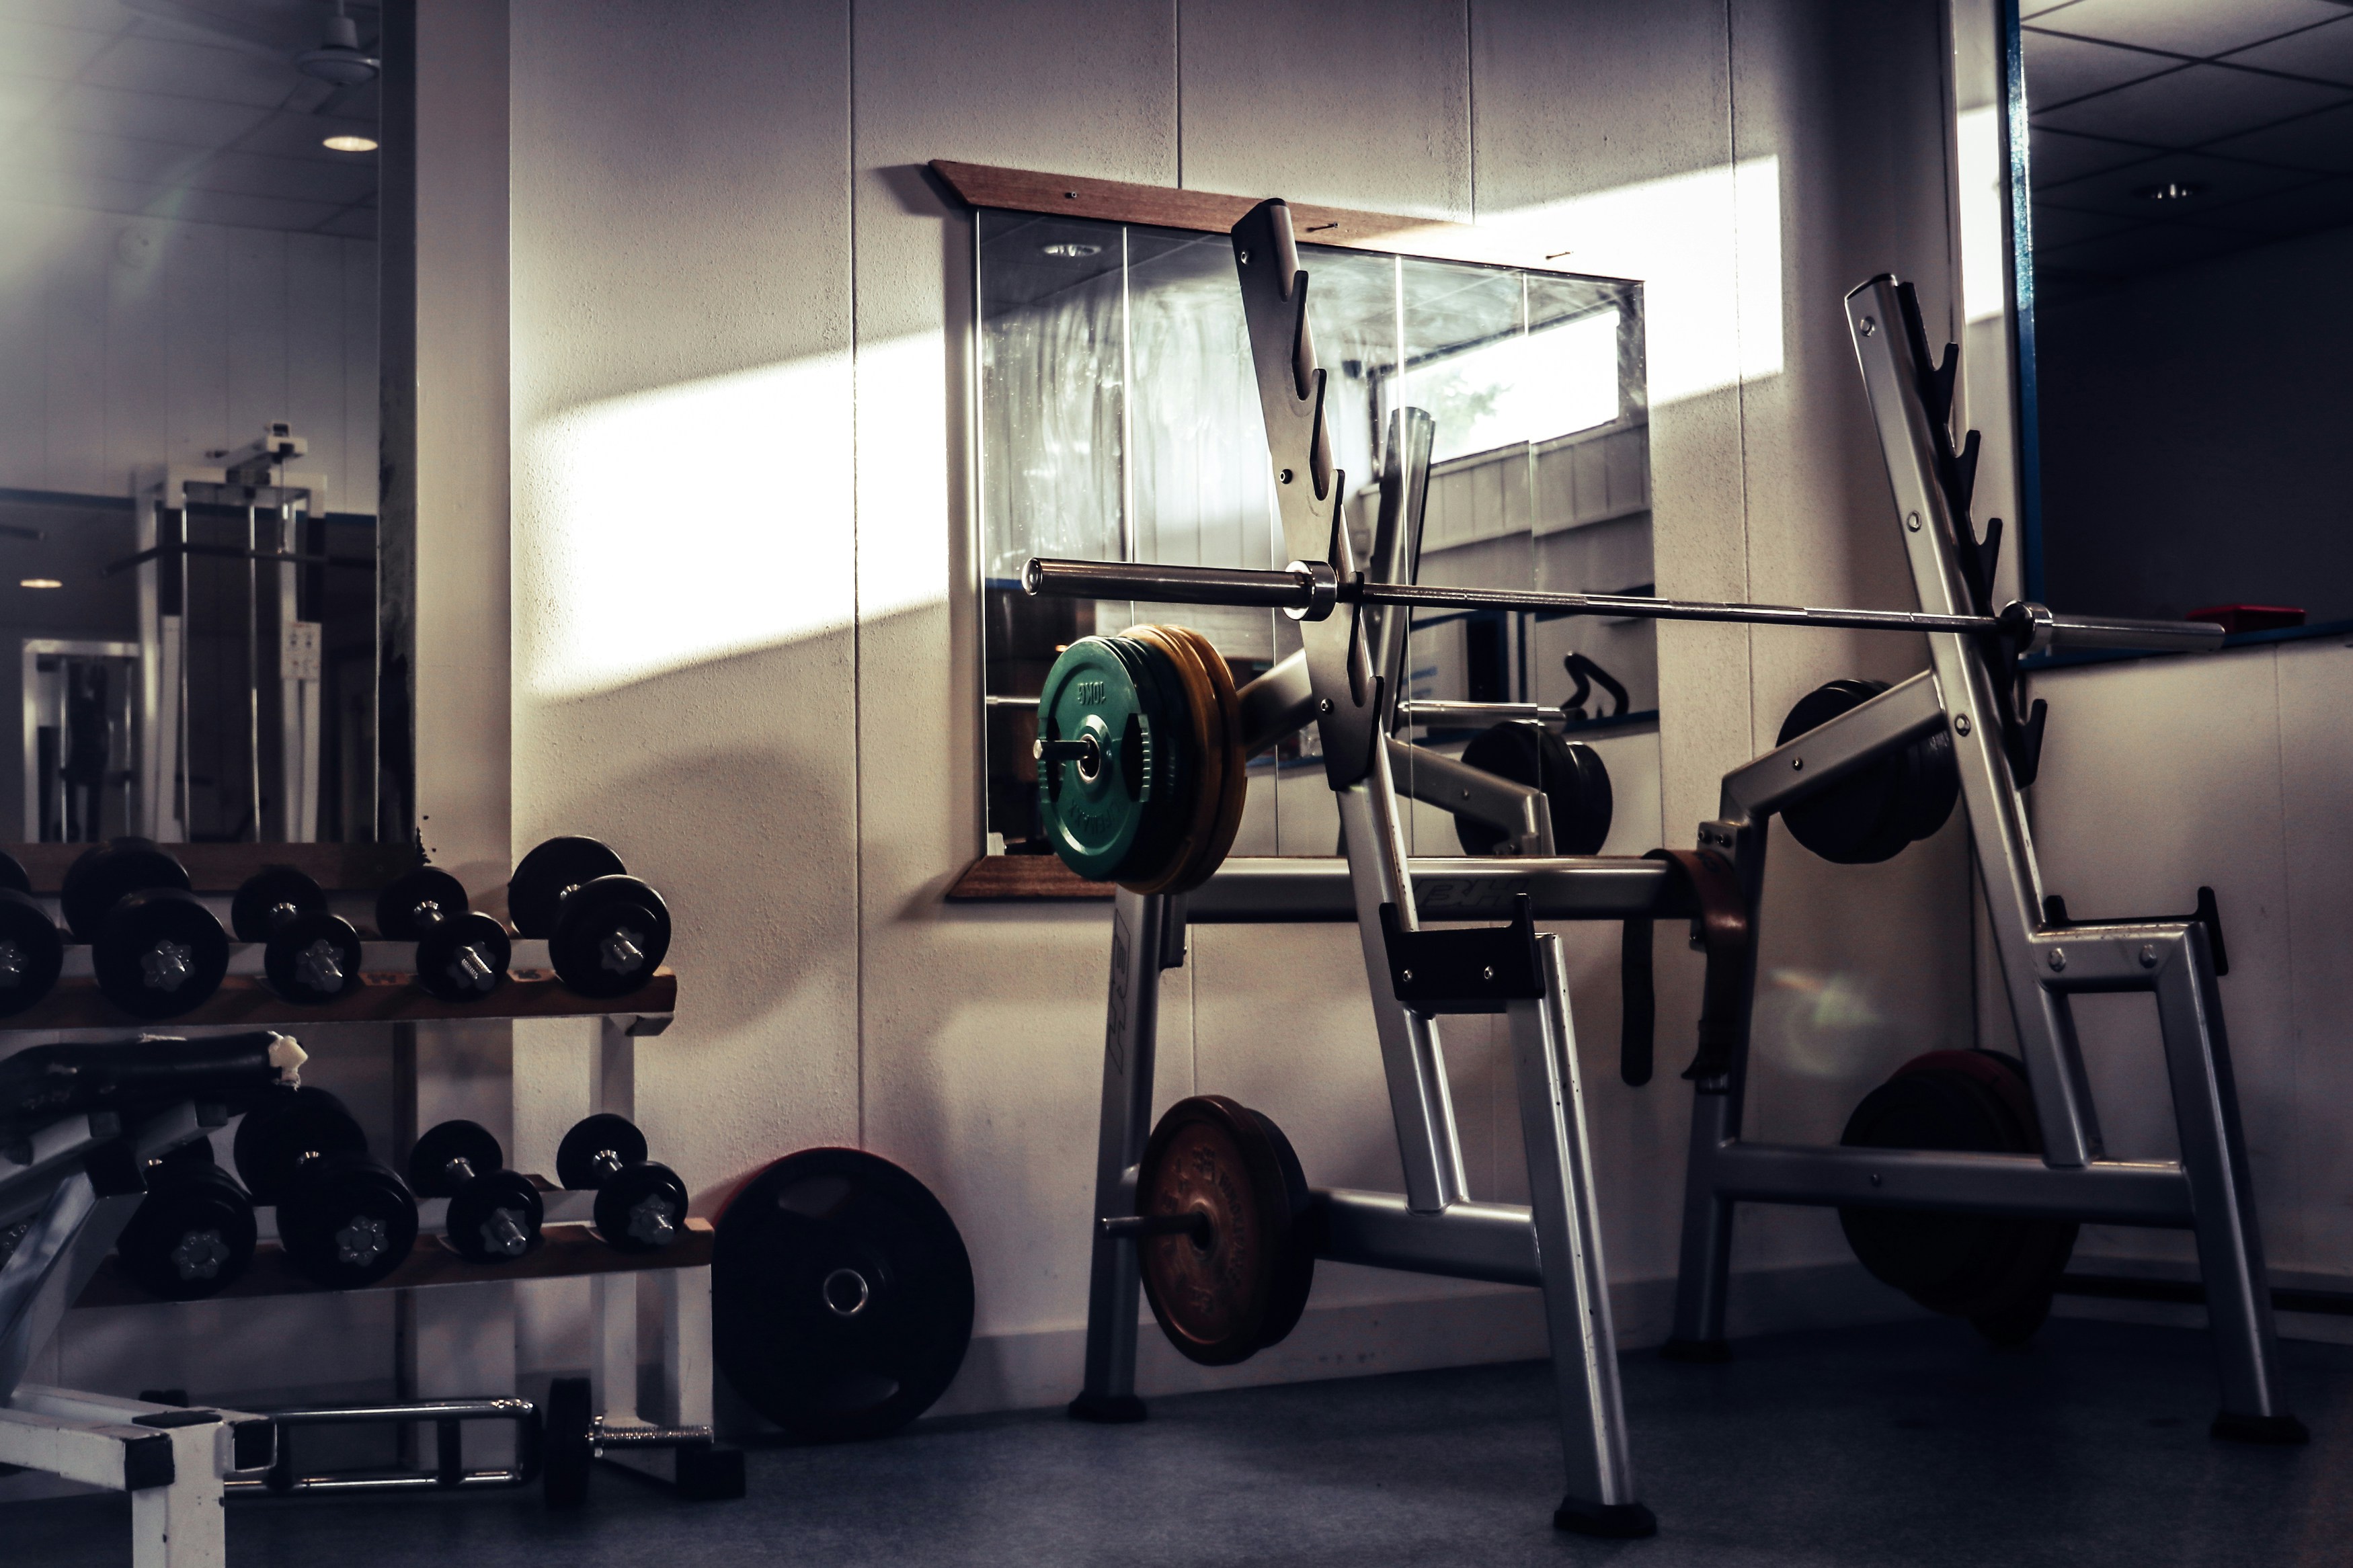
You don't need much equipment for this program. It really is a minimalist program. You can complete this at any commercial gym except for Planet Fitness. You really only need a rack, barbell, weight, and some resistance bands if you want to complete the program at home. You can also, over time, add other items to your kit which will allow you to use other more convenient movements.
You will need these to complete the program:
1 Squat Rack
1 Barbell
1 Adjustable Bench
2 Safety Collars
Assortment of Weight Plates
Set of Resistance Bands
Dip Belt
You might want these as you become more advanced:
Pair of Heavy Adjustable Dumbbells
Pulley System
Pair of Solid Squat Wedges
Adjustable Squat Belt
Microplates
Barbell Pad
You can find links to all the equipment that I recommend and use in the Fitness Minimalist Home Gym Guide (coming soon!) article. I don't currently have any affiliate relationships with any of these companies, but I might in the future. Just know that I may get a small cut of your purchase for referring you to the products you find in that article.
Schedule Options:
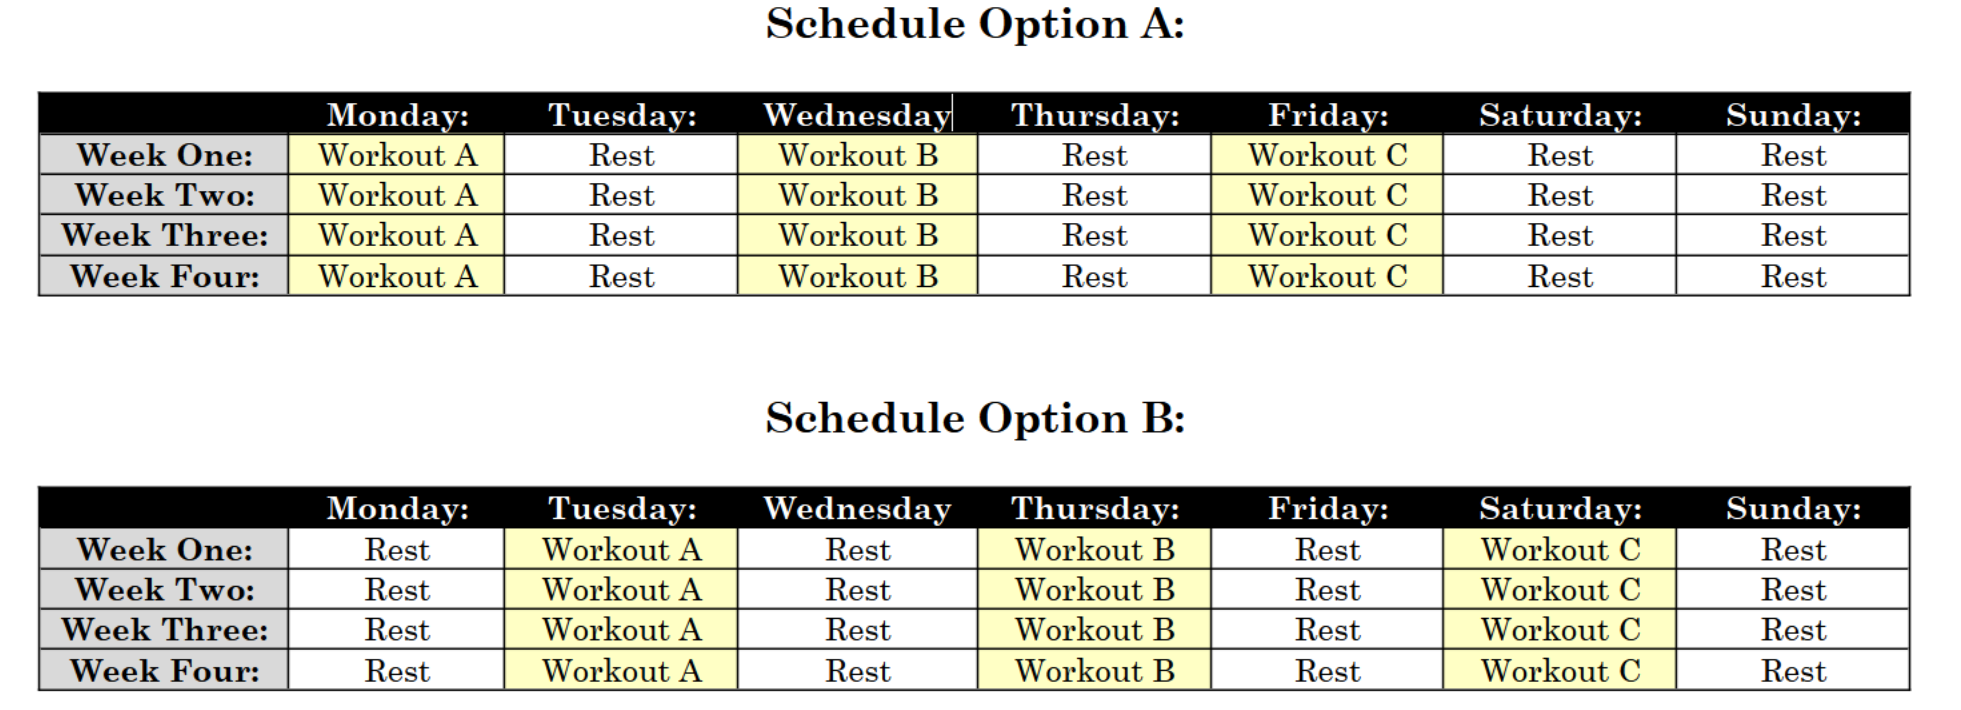
You will complete your workouts on non-consecutive days. Every third workout you will take 2 rest days. This means you will need a full day off in between each workout and two days off before returning to workout A. I recommend one of the following schedules:
Schedule 1: Monday, Wednesday, Friday
Schedule 2: Tuesday, Thursday, Saturday
It doesn't matter which schedule you choose. Just make sure you stick with whichever one you decide on.
Workout A
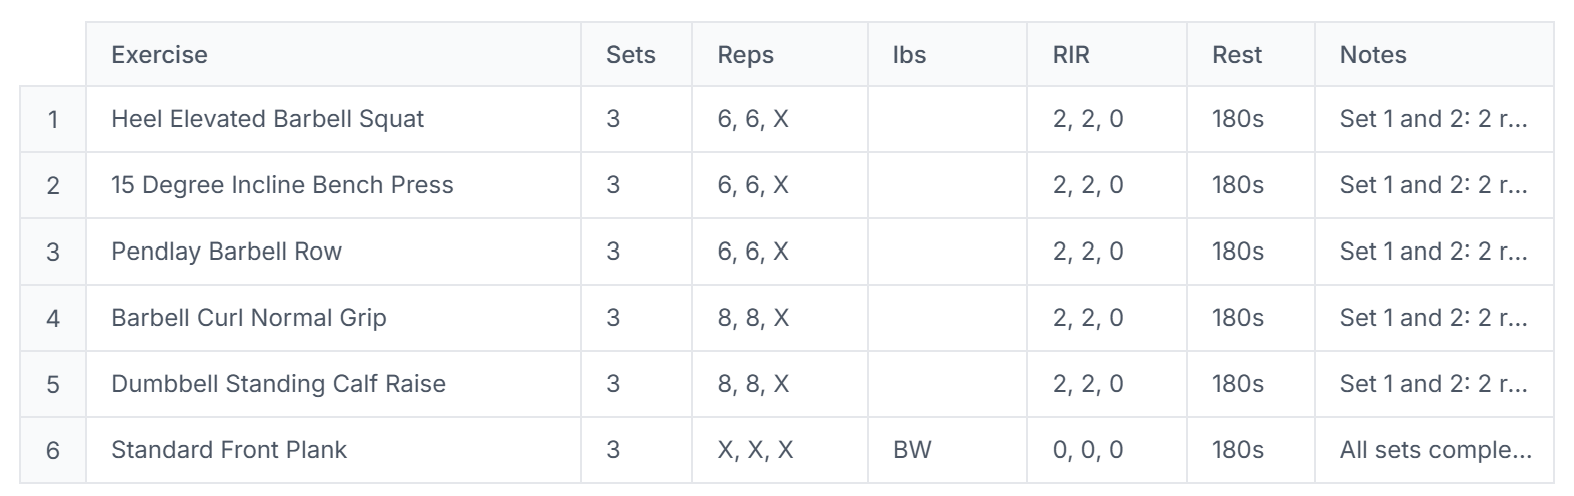
Here is the most popular configuration that is made available on the coaching app. Don't worry! We will cover all the basic movements below and we will give alternatives for those that have extra equipment.
You can either use 5 pound plates under your heels or Squat Wedges to help bias the quads. Take a high bar stance (bar high on the shoulders) and make sure to squat deep while maintaining control.
Alternate Movements:
There are none.
This is a Barbell Fundamentals Program.
Just Squat.
15 Degree Incline Bench Press:
This will usually be the first or second setting on an adjustable bench. You probably wont find a fixed bench with this angle. I don't recommend propping a flat bench on a 45 pound plate to create an incline. It is not stable enough.
Alternate Movements:
Take a medium stance and grip the bar outside of your stance. Pull directly to chest and lower under control. Keep a flat back. Limit body language.
Alternate Movements:
Take a medium grip and don't use too much body language during execution.
Alternate Movements:
You will likely find that you need more than just your bodyweight to complete these for the required reps and RIR. I prefer the dumbbell variation but the barbell variation or the dip belt variation may be required as you get stronger.
Alternate Movements:
Make sure your body stays rigid. Remember that the goal of this exercise is to resist movement.
Alternate Movements:
None
Workout B:
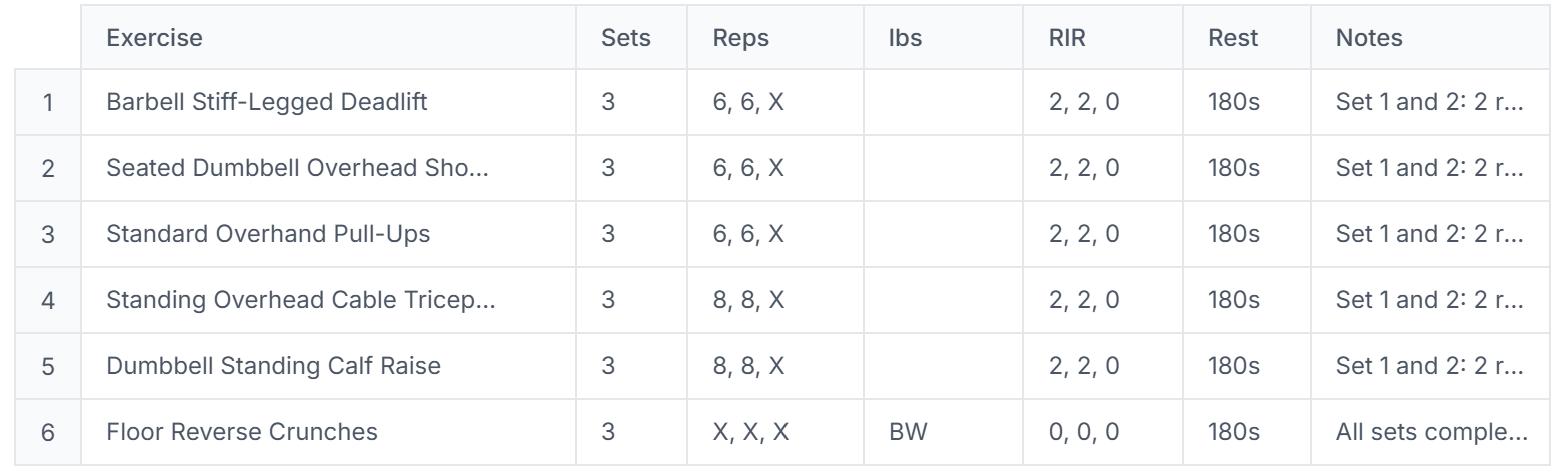
Barbell Stiff Legged Deadlift:
Don't bend knees while performing this movement but don't lock knees out either. Only go as low as you have the mobility to go. Do not touch the ground between each rep. If your mobility requires you to touch the ground, complete exercise while standing on bumper plates.
Alternate Movements:
None
This can be completed standing or seated. I generally prefer seated. This is also a movement that I often prefer to use dumbbells for.
Alternate Movements:
Keep strict form during this movement. NO KIPPING! If you can't complete a Pull-Up, follow the pullup progression system outlined below.
Alternate Movements:
None
Make sure the band is the same length on each side. Try to keep a fairly upright posture.
Alternate Movements:
You will likely find that you need more than just your bodyweight to complete these for the required reps and RIR. I prefer the dumbbell variation but the barbell variation or the dip belt variation may be required as you get stronger.
Alternate Movements:
You can do these from the ground or from a bench.
Alternate Movements:
None
Workout C:
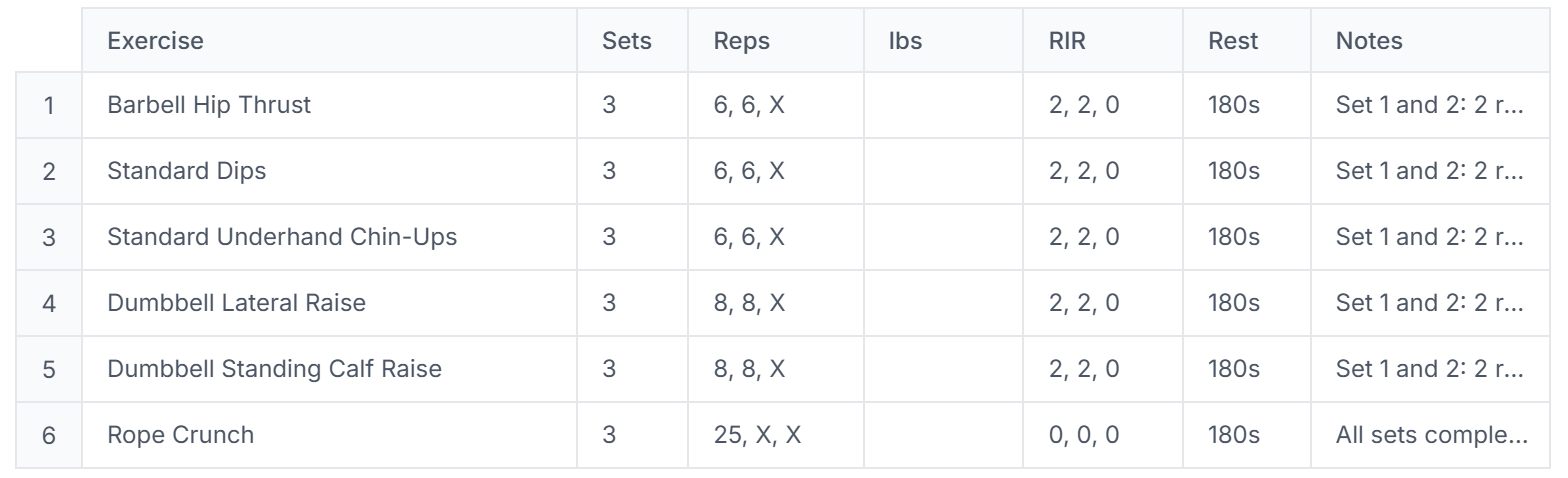
Use a hip thrust bench f you have one available. Most people will want to use a barbell pad or wrap a bath towel around the bar to help make the movement more comfortable.
Alternate Movements:
None
If you are unbale to do unassisted Dips, use the the Dip Progression system outlined below.
Alternate Movements:
None
If you are unable to do unassisted Chin-Ups, use the Chin-Up/ Pull-Up Progression outlined below.
Alternate Movements:
None
Make sure the band is equal length on each side. I like to stager my feet while performing these.
Alternate Movements:
You will likely find that you need more than just your bodyweight to complete these for the required reps and RIR. I prefer the dumbbell variation but the barbell variation or the dip belt variation may be required as you get stronger.
Alternate Movements:
This a fairly limited range of motion. Keep your hip angle locked and make sure movement is initiated by the abs.
Alternate Movements:
Rope Crunches
Dip Progression:
You may not be able to complete unassisted dips when you begin this program. That is fine! You can either do Bench Dips or Band Assisted Dips until you can get 6 reps unassisted. Generally, I recommend doing Bench Dips until you can get 4-8 Band Assisted Dips with the heaviest band you have. Then when you can get 9 reps with your heaviest band, switch it out for the next lighter band until you can get 6 reps without assistance.
When you can get more than eight unassisted reps, you will need to begin adding weight to your dips through the use of a Dip Belt (this is the kind I like). Just add a 5 or 2.5 pound plate every time you hit 9 reps on your AMRAP set.
Chin-Up/Pull-Up Progression:
Chin-Ups and Pull-Ups are generally a bit harder for people to progress on so I have a system that I like to use to help people get their first Pull-Ups. The idea being that Pull-Ups are the more difficult exercise and that those who can do a Pull-Up can do a Chin-Up but the reverse may not be true. You start with level one and once you can get 5 sets of 20-30 second holds, you move onto the next level. Once you can complete 5 sets of 8 with Negative and Scapular Pull-Ups, then move onto the next level. Once you can do all the reps for level 3 you move onto the next level. By the time you finish with this progression system, you should be able to get four unassisted pull-ups and will be ready to start adding more reps and then more weight to your pull-ups.

When you can get more than eight unassisted reps, you will need to begin adding weight to your pull-ups through the use of a Dip Belt (this is the kind I like). Just add a 5 or 2.5 pound plate every time you hit 9 reps on your AMRAP set.
Workout Metrics:
Workouts metrics are simply the instructions that you will follow when you begin any workout. Think of this a bit like the language of a fitness program. If you are using the Training App, this will all be included in each workout. If you are simply following the workout using this page, this section will be much more helpful.
Lets take a look at Workout A and we will go over all the metrics you will need to know.
Sequence:
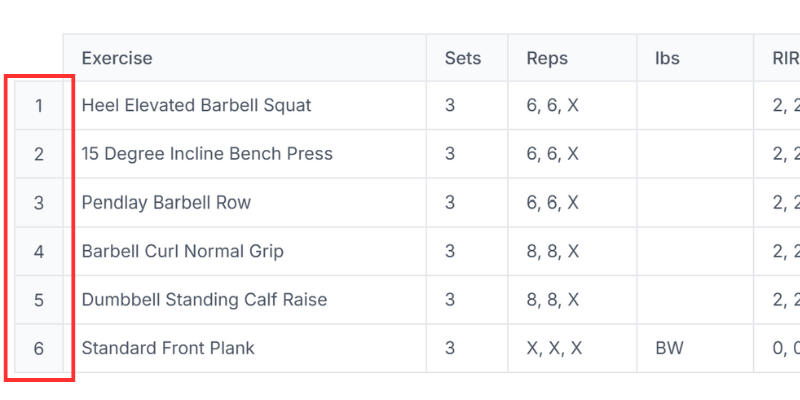
Sequence is the order of exercises in a given workout. In a well made program, this sequence matters. For this program, we begin with large compound movements, and then move onto more isolation movements, before moving onto calves and abs which I view as optional but often helpful for beginners.
For this program you will be working from Exercise 1 to Exercise 6 in every workout.
A note on abs: I don't think I have done direct ab work in almost 15 years. To be honest, I am returning from some fairly severe injuries and will likely be using this program (although I may just create a new program and release my individual workouts as a weekly series of articles) to do so and will be completing all the calve and ab work as well as some rehab work.
Exercise:
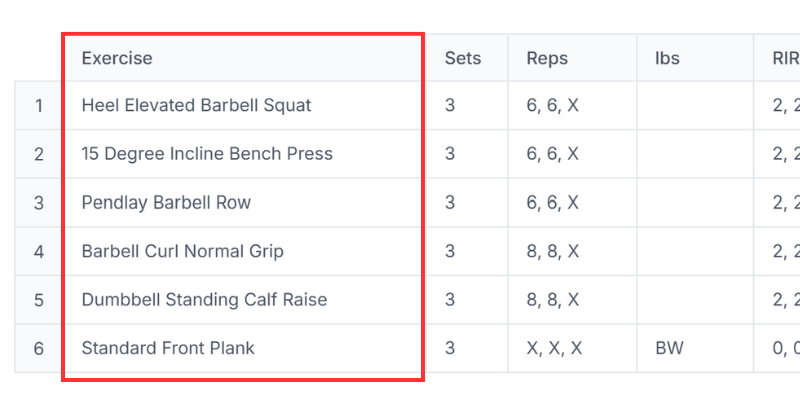
These are the exercises that you will be completing during the workout. Remember that I have provided you alternative movements when appropriate in the individual sections for each workout. Each movement in these sections is linked to a video to show you how to complete them properly. If you are using the workout app, the videos are also all available there.
Sets:
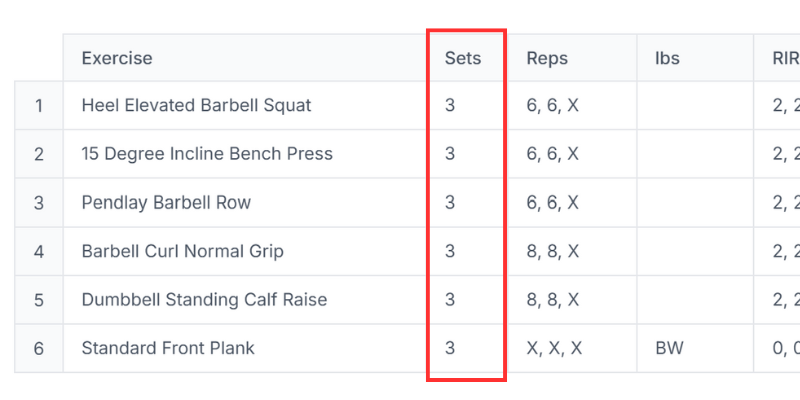
These are the sets you will complete for each individual movement. This does not include any warm-up sets. These are simply working sets. This program is very simple (most good programs are very simple) and you will be completing 3 working sets for each movement. All sets will be completed with the same working weight. Your first two sets will be completed 2 reps short of failure. Your final set will be completed for As Many Reps As Possible (AMRAP) and we will be using this final set as a way to set our working weight for next weeks workout.
Reps:
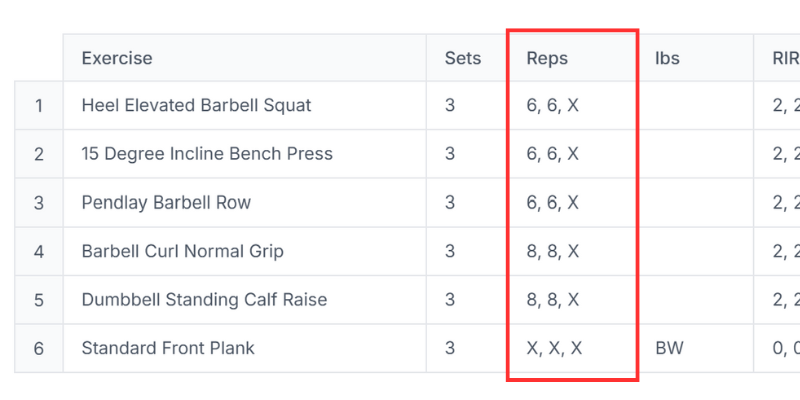
These are the Reps we will be completing for each set. As you can see the only numbers in this section are 6, 8, and X (and X isn't even technically a number). This is on purpose. By the way, "X" means "failure" or As Many Reps As Possible. The only movements you should do for higher reps is your abs movements which I recommend keeping between 15 and 25 but it doesn't really matter.
Load:
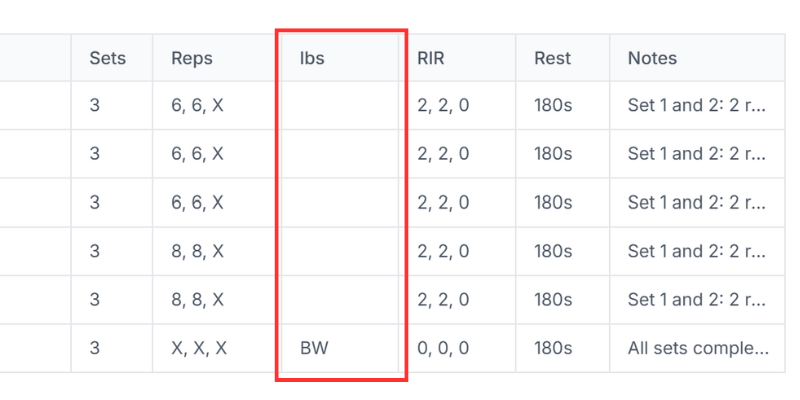
This is the weight we will lifting for each movement. Like I said before, we will be using the same working weight for each set and we will be adjusting working weight each week as needed. Your goal for this program is to continuously add weight as you move through the program. You will very likely spend the first few weeks figuring out your initial working weights to start from. By week 4, you need to have this figured out.
RIR:
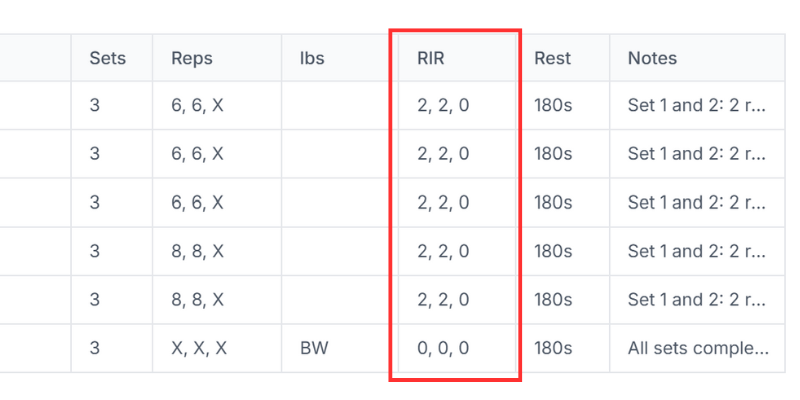
RIR (Reps In Reserve) is your proximity to failure. It is simply how many reps you have until you can no longer complete another rep. This is called failure. Here is a video that will help give you a better idea of what failure actually looks like. RIR is the most important metric for this program.
Rest:
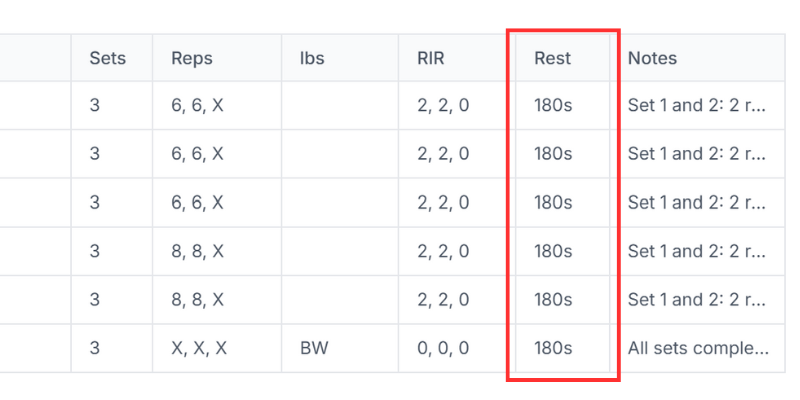
This is simply how long you rest between each set in your workout. This rest may be a little longer as you transition between movements, but just make sure you are getting the prescribed rest in for each set. Use a stopwatch or an interval timer to make sure you are getting in adequate rest. For this program the rest is set at 3 minutes (180 seconds) between each set. Rest is the second most important metric in this program.
Notes:
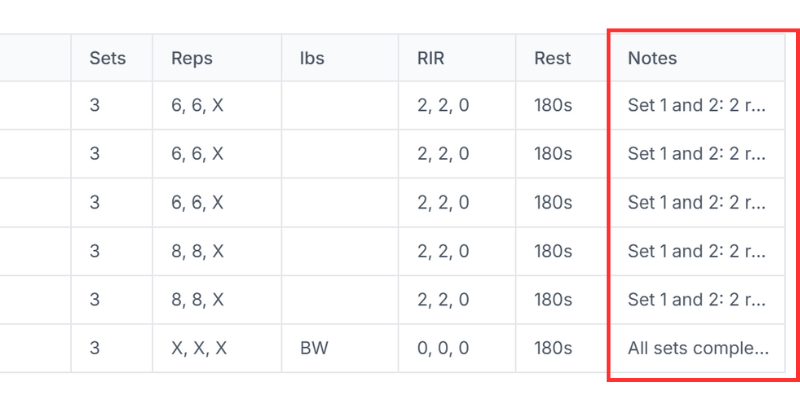
These are the notes for each movement in the program. This program is simple. For all movement except abdominal movements the note reads: "Set 1 and 2: 2 reps shy of failure. Set 3: AMRAP. Full Rest Between Sets!" The note for abdominal movements reads: "All sets completed for AMRAP."
Warm-Up Sets, Working Sets, and Progression.
I wrote a whole article on this topic because it is very similar across all programs and I am a bit of a lazy boy. Be sure you open this another window and read through it before continuing. Warm-Up Sets, Working Sets, and Progression.
The only thing not covered in this article is how to track you workouts. For this all you really need is notebook. For this I prefer graph paper notebooks but you can really use anything you like. Simply fill it out like I have done with the workouts above. Just remember to date the session and record all your weights. You could also choose to make this in a program like google sheets or excel. If you would like the convenience of having it all recorded on your phone. You can also choose to purchase access to the training app for this program for a one time payment of $10. You can find a link to do that here.
Nutrition and Diet:
There is no prescribed nutrition or diet plan to accommodate this program. You should modify your nutrition based on your goals. I recommend you follow the guidelines prescribed in my "What is Fitness Minimalism?" article. Do everything recommend in this article and you will be golden.
But wait, I have a few questions!
Questions are always welcome, so feel free to ask away in the comments. Until then, here are a few questions that I get asked pretty often that might help you out. Keep in mind that I will be updating this article to include new helpful questions I am asked.
Anyway, here's the Q&A:
Q: Does this work for women too?
A: Yes, for beginners (and by beginners, I mean people who haven't yet done anything on this list) this I where I recommend everyone start.
Q: Can I do this while working out at home?
A: If you have decent home gym setup you sure can. To see what I recommend for a home gym, check out the Fitness Minimalist's Home Gym Guide article (coming soon).
Q: How do I get access to the Training App?
You can choose to purchase access to the training app for this program for a one time payment of $10. You can find a link to do that here.
Like I said, as I get good questions I will update this page to include them.
Anyway...
That about wraps this up. If there is something I forgot I will be sure to update this article in the future. Like I said, If you have any questions, feel free to ask via a message or in a comment below.
As always, if you found this article helpful, consider buying me a beer.
Stay Jacked,
-Coach Ryan