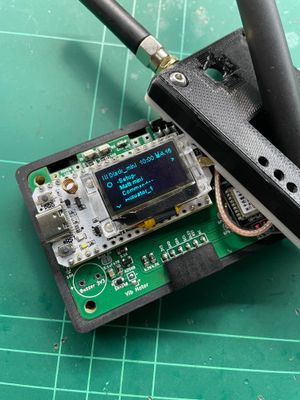


This is a setup guide for the 'R2 Beta Kit', which you can freely download here: https://buymeacoffee.com/ripplebiz/e/261403
At present you need to run the two device types (repeaters and pagers) on the Heltec V3. This can be either of:
Contents of ZIP File
The ZIP file has two Android apps (.apk files), and four device firmwares (.bin files). The 'R2 Messenger' app is a chat app for use with a paired 'pager' device. The 'R2 Commander' app is for administrators who setup and monitor repeaters, and also involves using a paired 'pager' device. (this will likely catch up to the classic Ripple Commander app in the future, and also be for monitoring remote sensors, trackers, and admin on things like Group Chats, etc)
There are two 'R2-Pager...' firmwares: one for 433Mhz-band sx1268 radios, and the other for the sx1262 radios (all other bands).
There are two 'R2-Repeater...' firmwares, similarly for sx1268 or sx1262 radios.
Please refer to this previous post on how to flash firmware .bins: https://buymeacoffee.com/ripplebiz/flashing-firmware-bin-esp32
Installing the Android Apps
You have to install the .apk files directly, and this is fairly straight-forward, but you do need to allow a special permission 'Allow Unknown Sources'. This is usually under Settings > Security, or Settings > Apps > Sepcial app access. (varies from handset/tablet manufacturers)
Refer to this article for more help: https://www.lifewire.com/install-apk-on-android-4177185
R2 Messenger
The first thing to try is setting up at least two Android tablets/handsets with the R2 Messenger app, and flash some 'pager' Heltec devices. You don't need repeaters to do this, so is a relatively easy thing to try.
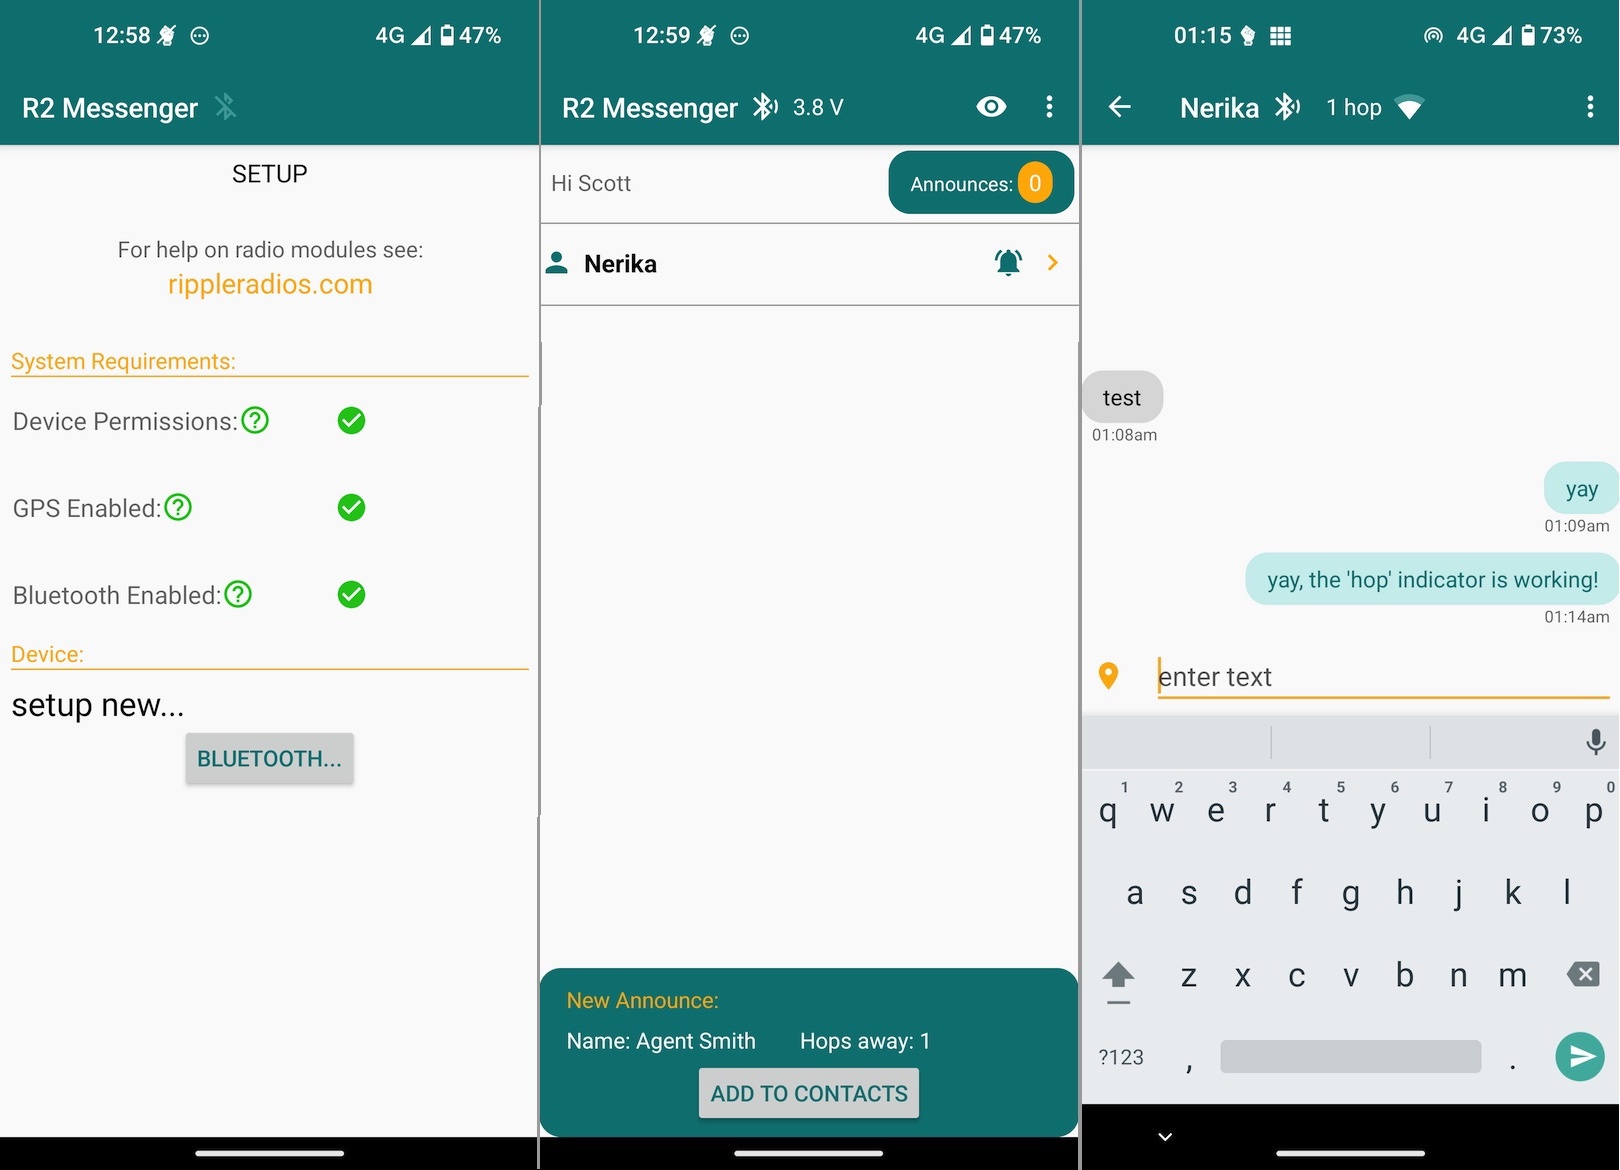
The first screen is just a summary of the permission/settings required. You will also be prompted with system dialogs to enable various permissions. When completed, tap on the 'Bluetooth...' button to then select the R2 Pager device from a list (power up the pager via USB first). You will be prompted for the Bluetooth pairing code (6 digit number). You should have received this via email (if not, just message me).
After selecting the R2 Pager device, the app goes back to the startup screen, then just tap the 'DONE' button.
You should then see the main contact-list screen ('home' screen). The first thing you need to do is to set a 'callsign' for yourself.
NOTE: during the selection of the R2 Pager device, a new encryption key-pair will have automatically created, and the public key sent to the Android. This is your ID, and is exchanged with other users automatically. Your private key never leaves the pager device!
About the Toolbar
In all screens, the toolbar will show a Bluetooth icon showing the state of the connection with the R2 pager device. It is grayed-out when disconnected, then turns to solid white when connecting, then also shows the battery voltage (eg. "3.8 V") when connection is complete.
Other Setup
Select the 'Set Callsign...' menu item from the toolbar menu, then enter something (up to 31 bytes long) as your display name. The 'eye' icon on the toolbar is for toggling your callsign 'visibility' to the public. When you select the 'Send Announce' menu item, your public key and callsign are broadcast, and this setting hides the callsign from being included.
When another user's device sends an Announce broadcast, you will see the popup at the bottom with their callsign, and 'Add to Contacts' button. This is the main mechanism to setup contacts. (QR codes will also be added in near future). You can view past Announces by tapping on the button (with orange counter) at the top.
NOTE: the other user must also add YOU to their contacts to be able to message them.
About 'Announces'
Announces are actually a low-level protocol mechanism, not just for discovering new users. They are critical for establishing routing paths within the mesh to the various devices. When your pager device sends out an Announce, the various 'transport' nodes, ie. repeaters, build up their routing tables, and forward the packet onto other nodes. These should be kept to a minimum, to avoid network congestion, but for now you will need to manually select the 'Send Announce' menu when you are roaming. If you are in a new location, and have a different set of repeaters that are now in line-of-sight, you will need to manually select 'Send Announce', otherwise you will not receive messages!
This will change in the near future. I have some ideas on making this automatic, ie. for the device to be smarter and detect when it's in a new location, and automatically send a new Announce broadcast.
About 'Transport' Nodes
At present, the 'pager' devices are NOT transport nodes, ie. they do not forward packets on behalf of other nodes. For R2 to really scale it is important to move that responsibility to dedicated repeater nodes. Ideally, Transport nodes should be stationary, while the pager nodes can roam.
However, as you should be able to observe with the Messenger app, pagers can go up to 1 hop to a peer device. So, you still can potentially be many km's from each other, but with line-of-sight be able to message each other.
About Radio Settings
By default, the pager devices will use a centre frequency of 915MHz (for sx1262 radios), and 433Mhz (for sx1268 radios), and default to Spreading Factor 9. You can customise these, if you wish, but note that all of your repeaters, and pagers, will also need to have the same settings! In R2 Messenger, simply select the 'Settings...' menu item from the toolbar in the home screen.
R2 Commander
When you first run the R2 Commander app, you will be presented with a 3-page setup wizard, where you can select the centre frequency and spreading factor, and (importantly) select the pager device that you will be using to monitor your repeaters.
NOTE: when selecting the pager (which I refer to as the 'home' radio), you can use one already used with the Messenger app, although you must reboot it first! When selected, the pager device will automatically create separate profiles for use with R2 Messenger and R2 Commander. (key-pairs, contacts, etc, are kept separate)
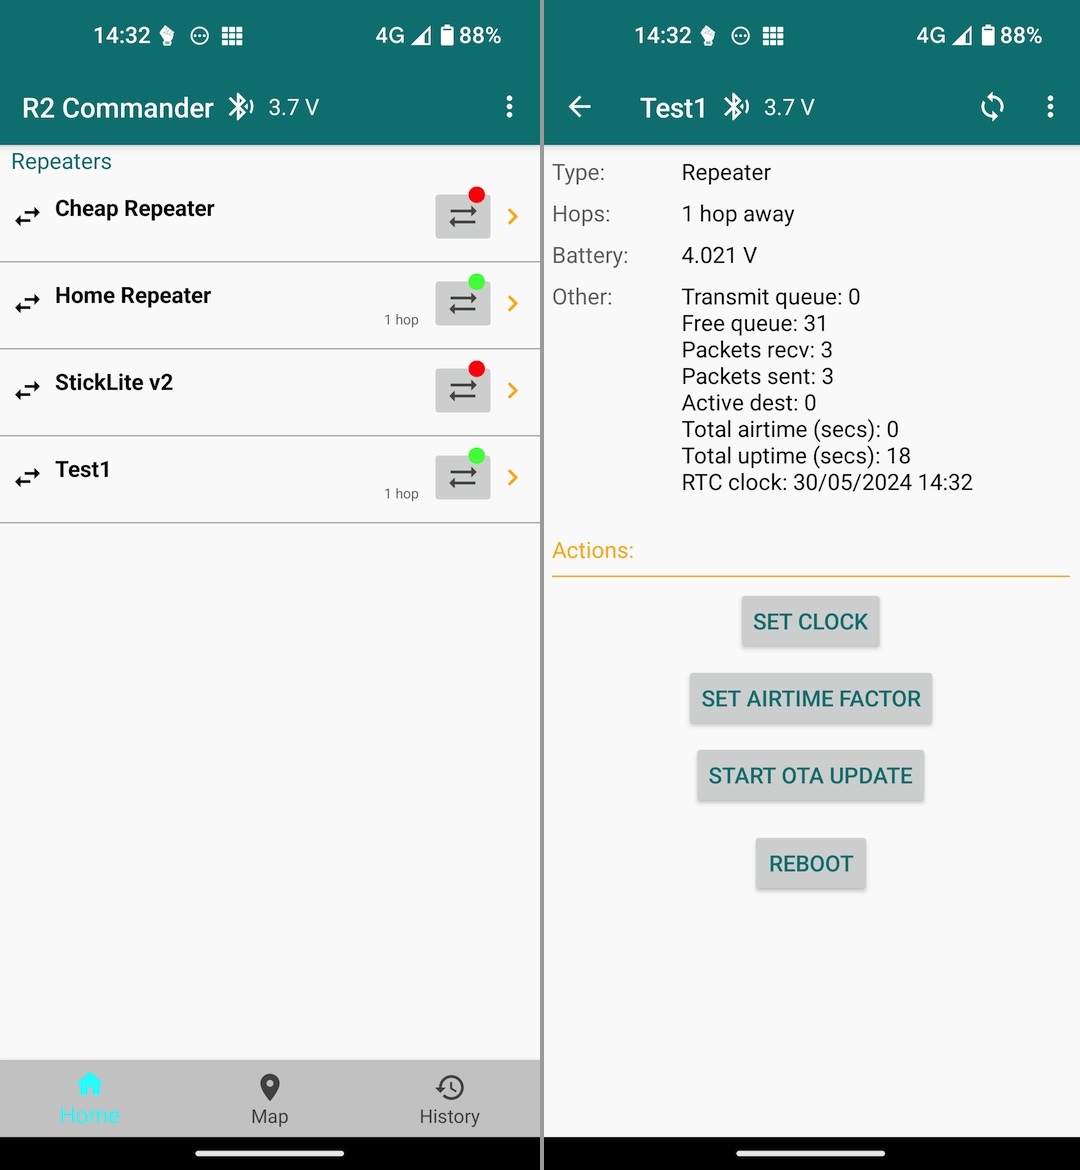
The main screens, after the setup wizard, should look like so, (but the main list will be empty of course):
Adding a New Repeater
Select the toolbar menu item 'Pair New Device...'. Power up the repeater device via USB. You will be prompted to select the device from a list, then enter the 6 digit pairing code (you should have received this via email).
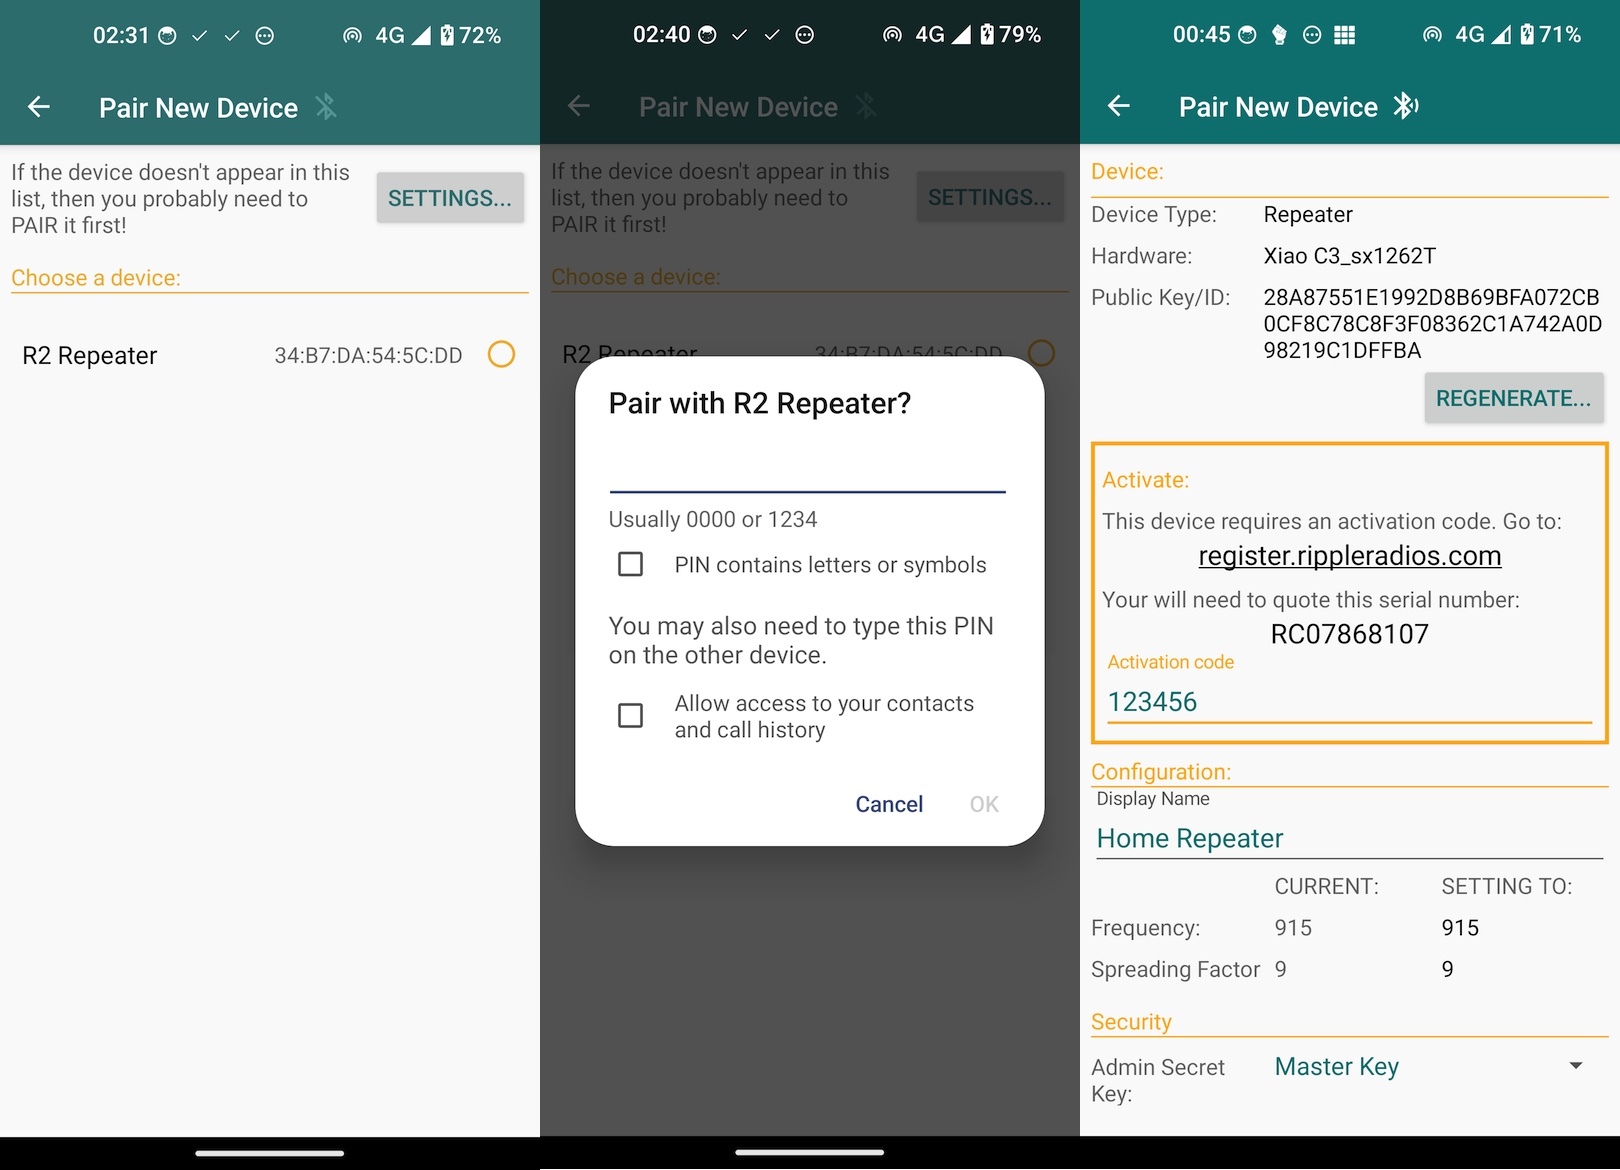
In the final screen, you will need to enter an Activation Code to enable the repeater. These are a one-time purchase from here: https://buymeacoffee.com/ripplebiz/e/261059
The only other thing you need to enter is some descriptive Display Name for this repeater.
For ongoing monitoring and remote configuration of the repeater, the device will need to have an 'Admin Secret Key' uploaded to the device. You can opt for the default, 'Master Key', which is automatically one-time created when you installed the R2 Commander app. Or, you can select '- Create New Key -' to assign a unique key to this particular repeater.
It is important to not lose these keys. These are stored in the Android app's sandbox. In a future release, you will be able to back these up manually to wherever you like, or be able to share them with other admins, and have them import to their copy of the R2 Commander app.
Click the 'Save & Reboot' button to finalise.
NOTE: make sure the 'home' pager radio is on at this stage, as the app will now attempt to add the new repeater details to its local storage. During the repeater setup, the home pager radio's Bluetooth is temporarily disconnected, but back at the main screen, re-connected and the new repeater info downloaded.
The Main Screens
You should now see the new repeater in the list. Tapping on the item should then go to the details screen (as shown in screen shots above). The 'refresh' is automatically selected on entering this screen, but you can tap the toolbar icon to the right to view the latest stats and battery reading, etc.
IMPORTANT: after rebooting or powering-up the repeater, is important to select the 'Set Clock' action/button. This will copy the system time from your Android device to the repeater device.
Repeater Stats/Diagnostics
In the repeater details screen, you will see various counters when the 'refresh' occurs. Below is a bit of a primer on what these values mean:
Transmit queue: this is how many outbound packets are waiting to be transmitted. If this number gets high, then it is experiencing a high load/traffic. You can try decreasing the Airtime Factor as an experiment.
Free queue: this is how many 'spare' packets are currently available in the packet pool. If this gets near to zero, then the repeater is experiencing a lot of stress/load. Report if you encounter this, as a fix will invariably mean a new/improved repeater firmware release.
Packets recv/sent: should be fairly self descriptive. Totals since last reboot.
Active dest: This is how many 'Destinations' were active in the past 24 hours, and are currently in the repeater's routing tables.
Total airtime: the total seconds of transmit time this repeater has used (since last reboot).
Total uptime: how long, in seconds, the repeater has been running since last reboot.
RTC Clock: the current time per the repeater's (volatile) RTC clock.
Over-The-Air Firmware Updates
The repeaters can have their firmware remotely updated (OTA). This is initiated with the 'Start OTA Update' action/button, ie. is triggered over the LoRa mesh. This causes the repeater to go into a special mode where it creates a WiFi SSDI of 'R2-OTA', which you need to connect to with your laptop. So, you need to be within WiFi range to do this, but this should save you from having to climb ladders, etc, if the repeater is mounted up in a high location that is hard to get to.
If successful, the repeater should have replied with a message which is shown in an alert in the Commander app, eg. "http://192.168.0.4/update" which is the URL you need to navigate to with your laptop.
The web page shown should be pretty easy to follow, and you just select the new '.bin' file to upload.
If you want to cancel the OTA update, just select the 'Reboot' action/button in the Commander app repeater details screen. Select 'Reboot into Normal Mode'. There is a 'Reboot into Program Mode' option here, if you want to go through the 'Pair New Device...' UI again, eg. to change the Frequency, or Admin Secret Key, etc.