

Investing in Developer Experience (DX) is essential to improve productivity and efficiency. One powerful way to achieve this is by building custom plugins and extensions that automate repetitive tasks or add helpful capabilities to our tools.
JetBrains IDEs are a perfect playground for this — they’re built entirely around a modular plugin architecture. In fact, IntelliJ IDEA itself wouldn’t function without its core plugins.
Before diving into the story, you can always jump to the second part first if you'd prefer to get the basics out of the way — it might make following the rest of the journey easier.
Part 1 - REX: Starting IntelliJ Plugin Dev (Yes, without learning Kotlin)
My journey with IntelliJ plugins started about a year and a half ago. At the time, I was working on a Spring Boot project using Flyway for database migrations. We were a relatively large dev team, and we kept running into the same problem: migration version conflicts. You know the drill — you pick a version, push your code, and then realize someone else picked the exact same version five minutes earlier. Chaos. Merge conflicts. Annoyed teammates. The usual.
At some point I just thought: There has to be a better way.
What if something could keep track of the versions for us and suggest the next one automatically? Back then, I didn’t even know much about IDE plugins — it was just an idea.
Idea Flow: New Migration file => suggests next version => checks for conflicts => file created
My first instinct was to experiment in an environment I already knew, so I tried building a prototype as a VS Code extension. That gave me enough playground space to validate the idea. Once the MVP was working, it was clear I needed to bring it to IntelliJ — because let’s be honest, for Java developers, that’s home base.
So I did what everyone does: searched “how to build an IntelliJ plugin.”
I followed the docs and tutorials… and then surprise: I couldn’t write it in Java. Everything was in Kotlin. And as you may understand, I've never used it before.
Too motivated by the idea, too lazy to properly learn Kotlin, I decided to cheat a bit: write everything in Java and rely on IntelliJ’s “Convert to Kotlin” feature. And honestly, it worked surprisingly well. I would write my classes in Java, hit Convert to Kotlin, and let IntelliJ do the heavy lifting while I slowly adapted to Kotlin’s syntax.
Soon enough, the language was no longer a blocker, so I moved on to the next challenge: the ecosystem itself. Still, I kept going. I slowly got familiar with the SDK: learning what actions are, what extensions do, and figuring out which of those pieces I’d actually need for my plugin. In my case, the requirements were simple on paper:
an action to create a new migration file (instead of relying on the default New File),
and another action to mark a folder as a migration root.
Inside those two actions lived all the business logic.
Actions represent any interactive UI element — menu items, toolbar buttons, context menu entries, or keyboard shortcuts — that trigger a specific behavior when activated. Almost everything you click in the IDE is an action: Refactor, New File, Run, and countless other recurring operations.
The result would be something like this:
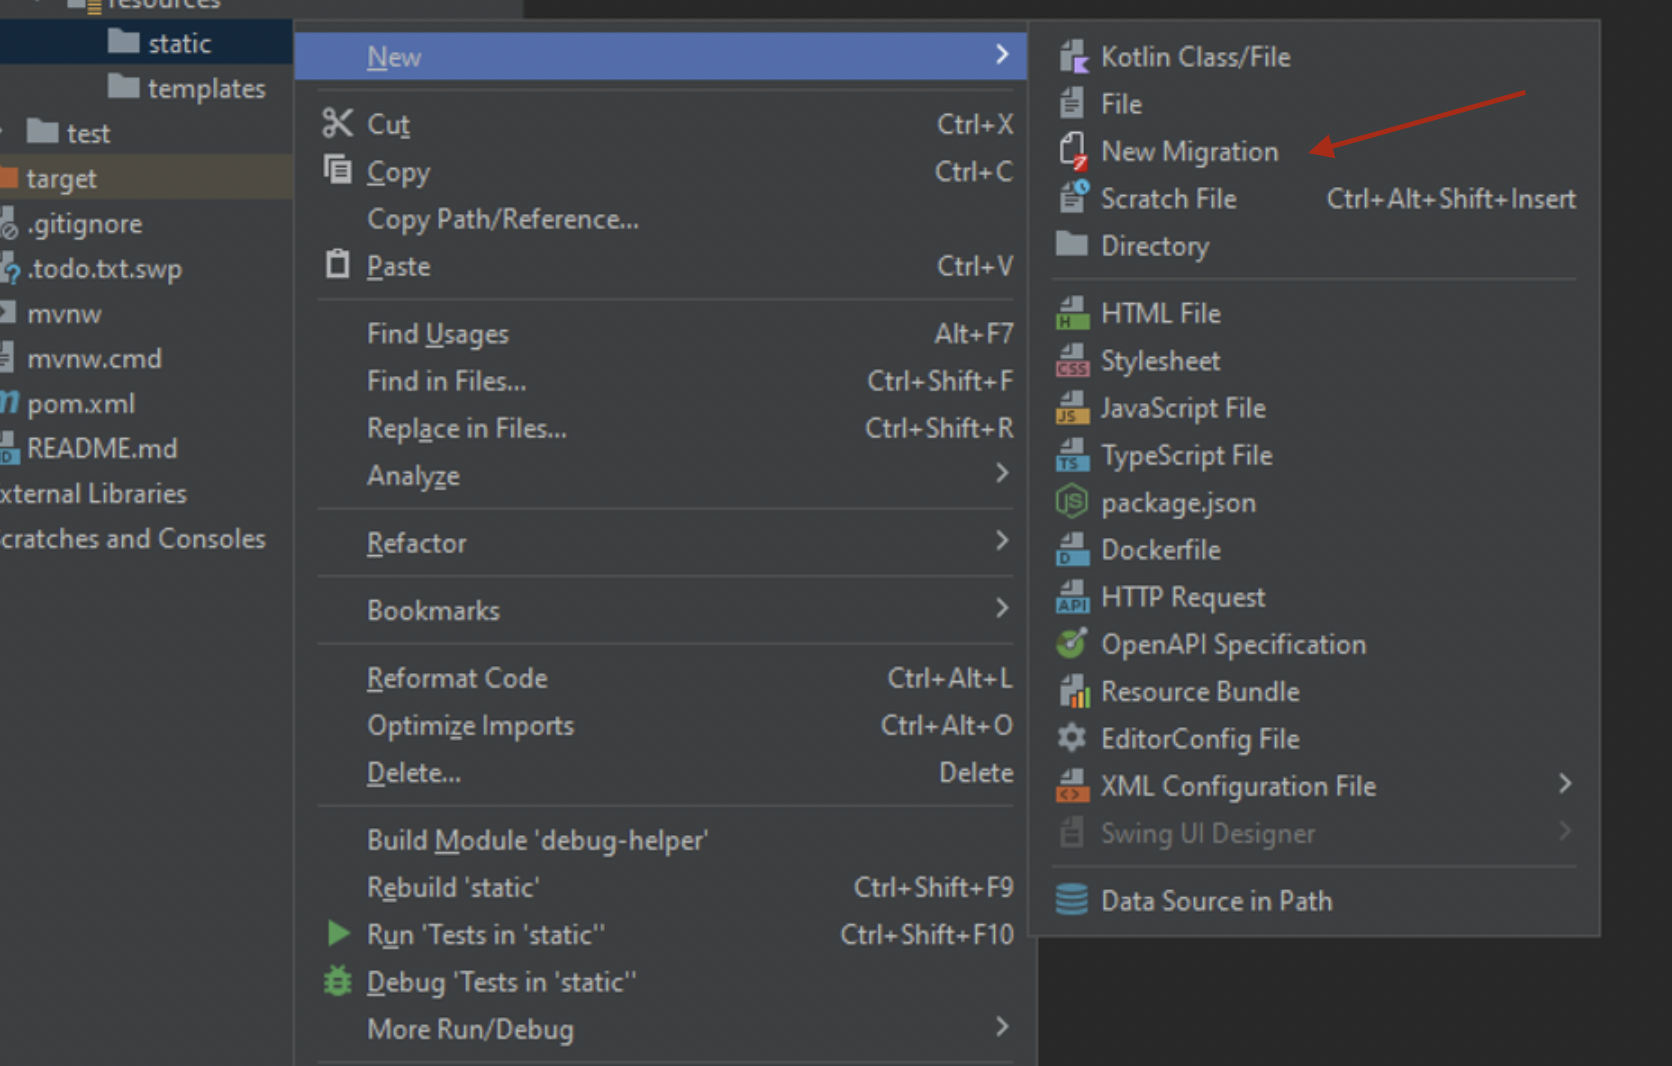
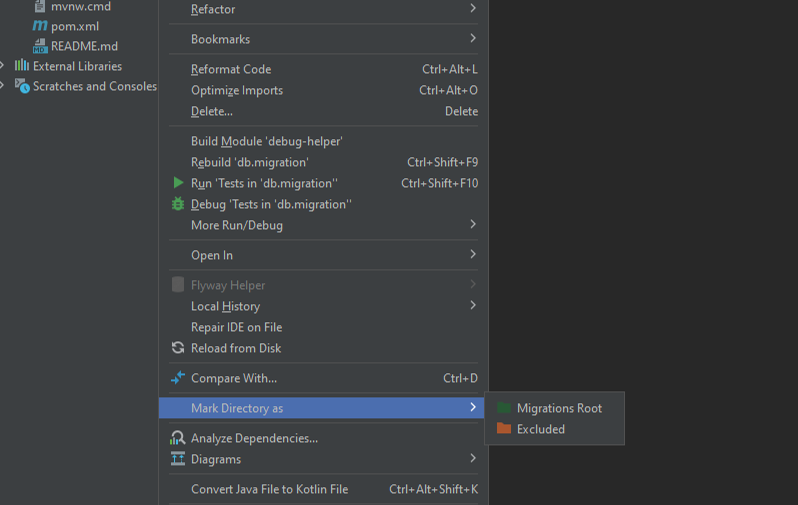
As the journey continued, I inevitably had to work directly with files — creating new ones, reading existing migration versions, updating contents, etc. That meant diving into PSI, Virtual Files, and the Document API. These APIs, part of the SDK, are incredibly powerful, each operating at its own layer of abstraction: PSI for code structure, Virtual Files for the filesystem, and Document for text editing.
But, still, there is a tricky part: in IntelliJ, there are often multiple ways to achieve the same result. I kept running into moments where I wasn’t sure which API to use, or worse, moments where I didn’t even know if some built-in helper function already existed. So in my moments of doubt, I did what every developer does nowadays: I asked ChatGPT.
Not gonna lie — it helped a lot, especially since IntelliJ plugin resources on the internet are quite limited. However, ChatGPT had its own issue: hallucinations. Understandable though, considering how niche the topic is.
In the end, what really saved me was going straight to the source — reading the actual SDK code, interfaces, and implementations. And honestly? That turned out to be the best part. Everything became clearer, more concrete. Instead of guessing what a method might do, I could see it directly.
Now that the playground was finally clear — after spending enough time getting familiar with the SDK — I could focus on the part I was actually excited about: building the algorithm that would generate the Flyway versioning template and suggest the correct next migration version.
It was tougher than I expected, but honestly, it was fun. The idea was to build an algorithm that scans the existing migration files, figures out which versioning pattern the team is using — whether it’s something like 0.01.002, or a simpler style like 0.003, or anything in between — and once the template is identified, automatically suggest the next correct version.
Of course, this came with plenty of edge cases I hadn’t expected. But over time things started falling into place, and eventually I reached that moment where I could confidently say: okay, the plugin actually works.
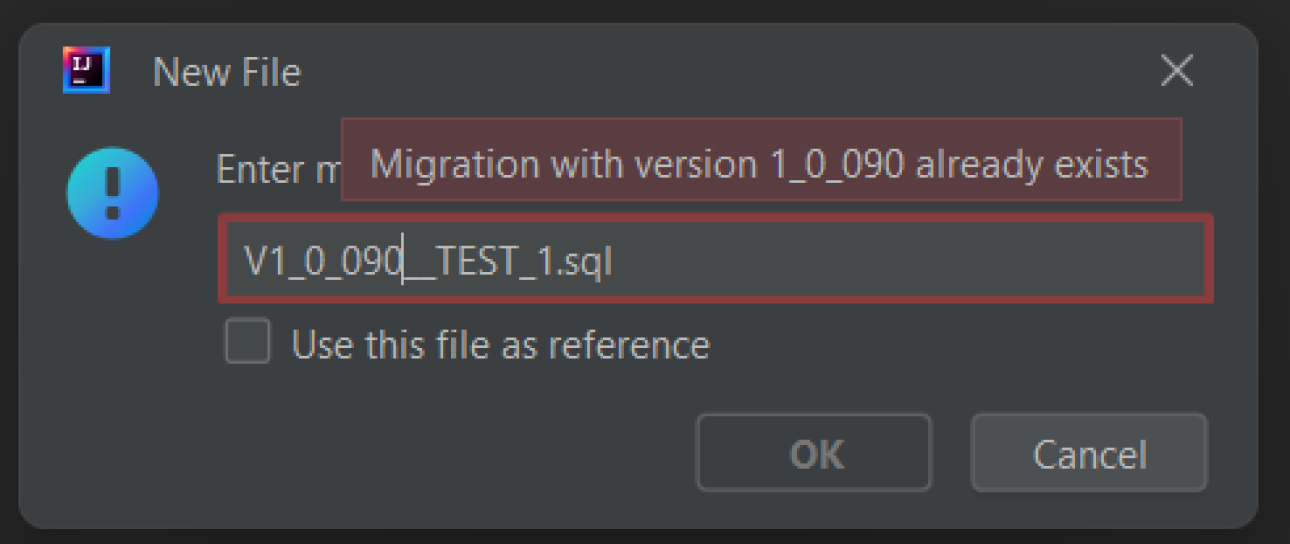
Once it was stable, I had to move to the final step: publishing it.
You can publish to a custom repository, but in my case, I pushed it to the JetBrains Marketplace. Publishing mainly means: build the plugin, take the resulting ZIP, upload it on the JetBrains platform, and fill all the required info — name, description, screenshots, videos, a README, etc.
To build the plugin you can simply use the buildPlugin Gradle task, or — if you want a signed version — use signPlugin. Signing depends on the project, but in general it helps ensure the plugin hasn’t been tampered with while going through your publishing pipeline. When a user installs the plugin, IntelliJ extracts the certificate embedded inside and verifies the signature using it. If the author doesn’t sign the plugin (or uses a revoked certificate), the IDE will show a warning during installation.
The signPlugin task requires three parameters: the password, the private key, and the certificate.
signPlugin {
    	certificateChain.set(providers.environmentVariable("CERTIFICATE_CHAIN"))
    privateKey.set(providers.environmentVariable("PRIVATE_KEY"))
    password.set(providers.environmentVariable("PRIVATE_KEY_PASSWORD"))
}
More details about generating and using these parameters can be found in the IntelliJ docs:
https://plugins.jetbrains.com/docs/intellij/plugin-signing.html#gradle-integration
One last thing I forgot to mention, the plugin has to be uploaded manually the first time. But after that, you can automate it using the publishPlugin task. Which was super helpful as I used it in my CI/CD so that whenever I merged into main, the plugin would automatically build and publish itself.
If you're curious to try the plugin I built during this journey, you can find it here:
→ Flyway Plugin – JetBrains Marketplace
Part 2: Getting started with IntelliJ Plugins
The Entry Point: plugin.xml
Every JetBrains plugin begins with a configuration file called plugin.xml.
This file defines how your plugin integrates with the IDE — including its metadata, dependencies, available actions, and any extensions it provides.
Here’s a minimal example:
<idea-plugin>
    <id>com.example.myplugin</id>
    <name>My Plugin</name>
    <version>1.0.0</version>
    <vendor email="[email protected]" url="https://example.com">Your Name</vendor>

    <description><![CDATA[
        <p>your description.</p>
    ]]></description>

    <depends>com.intellij.modules.platform</depends>

    <extensions defaultExtensionNs="com.intellij">
    </extensions>

    <actions>
        <action
            id="com.example.myplugin.HelloAction"
            class="com.example.myplugin.HelloAction"
            text="Say Hello"
            description="Displays a friendly greeting">
            <add-to-group group-id="ToolsMenu" anchor="last"/>
        </action>
    </actions>
</idea-plugin>
Key Elements in plugin.xml
id– The unique identifier of your plugin, typically written in reverse-domain format (e.g.,com.company.pluginname).name– The display name shown in the IDE and Marketplace.version– The plugin’s version number.vendor– Information about the author or organization behind the plugin.description– A short summary of what your plugin does, displayed in the IDE’s plugin manager.depends– Lists the IntelliJ modules your plugin relies on (e.g.,com.intellij.modules.javafor Java support).extensions– Defines your plugin’s integrations with the IDE (listeners, tool windows, inspections, etc.).actions– Declares custom actions such as toolbar buttons, menu items, or shortcuts.
Bringing It to Life: Your First Action
Among the primary ways plugins integrate with the IDE are actions.
Actions represent any interactive UI element — menu items, toolbar buttons, context menu entries, or keyboard shortcuts — that trigger a specific behavior when activated. Almost everything you click in the IDE is an action: Refactor, New File, Run, and countless other recurring operations.
Earlier, we registered our action inside plugin.xml. This is where we instruct the IDE which class implements the action and how it should appear in the user interface:
<actions>
    <action
        id="com.example.myplugin.HelloAction"
        class="com.example.myplugin.HelloAction"
        text="Say Hello"
        description="Displays a friendly greeting">
        <add-to-group group-id="ToolsMenu" anchor="last"/>
    </action>
</actions>
Each attribute has a specific purpose:
id— A unique identifier for the action.class— The fully qualified class name that contains the action’s logic.text— The visible label shown in the menu.description— A short explanation shown in tooltips or action search.add-to-group— Defines where in the IDE UI the action will appear. Here, it’s added to the Tools menu.
With the configuration in place, we can now implement the class referenced by the action:
package com.example.myplugin

import com.intellij.openapi.actionSystem.AnAction
import com.intellij.openapi.actionSystem.AnActionEvent
import com.intellij.openapi.ui.Messages

class HelloAction : AnAction() {
    override fun actionPerformed(e: AnActionEvent) {
        Messages.showInfoMessage("Hello from My Plugin!", "Greeting")
    }
}
Running the IDE in sandbox mode (./gradlew runIde) loads your plugin and adds a new Say Hello entry under Tools. Selecting it triggers the actionPerformed method and displays a dialog with your message.
Actions aren’t the only integration point. IntelliJ plugins can also hook into the IDE through listeners, tool windows, or even more advanced interfaces. You can go as far as drawing directly on the editor canvas, and in some cases, people have built full games inside IntelliJ — if you’ve seen Alexander Chatzizacharias’s talks, you know how fun and creative this can get. (eg. Devoxx Belgium talk => https://www.youtube.com/watch?v=JD159YnGoPw)
What's next!!
Now, knowing that all of these interaction points exist, the next logical question is:
“Okay, inside an action or a listener, what can I actually do?”
This is where the JetBrains SDK really shines. It exposes a set of powerful APIs that allow you to interact deeply with the IDE. Examples include:
PSI (Program Structure Interface): lets you read, navigate, and modify source code in a language-aware way.
Virtual Files: the abstraction layer for interacting with files inside the IDE, regardless of their source or storage.
Editor API:
Insert text, highlight ranges, playing with carets, add inlays.Document API:
Work with file contents safely with undo/redo support — IntelliJ tracks everything for you.Inspection & Highlighting API:
Create custom inspections, quick fixes, intentions, and automated code improvements.Indexing API:
Access pre-indexed, searchable structures such as symbols, classes, files, and references at scale.UI & Swing Utilities:
Build dialogs, popups, custom components, notification bubbles, wizards, or settings pages.Run Configurations API:
Create your own run/debug configurations or modify existing ones.Completion & Language Injection API:
Add custom auto-completion, reference resolution, or DSL injections inside other languages.
These APIs define the level of control your plugin can have — from inspecting code to reshaping it, from analyzing the project structure to generating new files — essentially, what transforms a simple button into a genuinely smart IDE feature.
If there’s one message I want you to walk away with, it’s this: don’t wait for the “perfect” idea or the “perfect” moment. Start with one annoyance, one repeated action, one missing shortcut. Turn it into something small that solves a real problem. Your future self—and maybe your whole team—will thank you.