
I spent a lot of time in prepress and film photography where reproducibility of complex steps is vital. At my prepress job we would create "cheat sheets" that served as guides that everyone would follow to try and make consistent results. My current VR180 workflow is similar for the time being, it has enough steps that it is nice to have a specific flowchart to follow. I have no doubt in six months this will be a single step, but I offer my current "cheat sheet" first as something for me to follow, second as a point-in-time snapshot of process, and third as something for you to try out, or pick apart!
First step is to take all my side-by-side footage, lay it out in Davinci and rough cut it. I also convert from lens space (fisheye) to view space (equirectangular) using KVRSuperSTMap. I don't want to burn CPU/GPU cycles converting all my raw footage to final format.
Next is to uprez using Topaz Video AI. I found a neat trick that you can run the Topaz GUI once and get an FFMPEG command that can be repeated. I've setup a separate machine that just converts video, and it is much easier to open a Powershell window and run a command than to open the Topaz GUI every time!
Here's is the core of my Powershell script, let me know if you want the full script:
& "$ffmpegPath" -hide_banner -nostdin -y -strict 2 -hwaccel auto `
-threadqueuesize 512 -i "$InputFile" `
-c:v prores_ks -profile:v 3 `
-pix_fmt yuv422p10le `
-colorprimaries bt2020 -colortrc smpte2084 -colorspace bt2020nc `
-r 60 -threads 16 `
-filtercomplex "tvaiup=model=prob-4:scale=0:w=12000:h=6000:preblur=0:noise=0:details=0:halo=0:blur=0:compression=0:estimate=8:blend=0.2:device=0:vram=0.75:instances=1,scale=w=12000:h=6000:flags=lanczos:threads=0" `
-c:a pcm_s24le `
"$outputFile"
Step 3 is to take the rough footage, add music, titles and finalize the timeline. Here is an extra step that shouldn't be necessary, I need to get the footage in H265, but Davinci on Windows doesn't like the Apple Vision Pro final size of 8640x4320 and generally will not render it out. I'm pretty sure this is because the NVidia encoder maxes out at 8192. One alternative would be to output separate left/right files, but it is just as easy for me to jump over to my Mac and output there (Apple Mini M3 has no problem with 8640 file)
Finally the file needs some metadata, for output to DeoVR and Youtube traditional spatial metadata using the Google Metadata injector is sufficient. For viewing on Apple Vision Pro (now possible in the native File app as of VisionOS 26) and in particular viewing on a webpage with Safari, APMP data needs to be added. This is a new tagging system that was outlined at WWDC 2025 and there isn't a built-in app, but there is this Xcode project that I compiled and have been using. The ProjectedMediaConversion app makes it very easy to set FOV, format, IPD to be picked up by Apple's viewers. Likely all the apps will support this shortly including (hopefully) Mike Swanson's spatial utility.
So there you have it, I've optimized this for my workflow but I'm sure there are some ways to make it even better, so let me know what you are doing differently, or if you like this content!
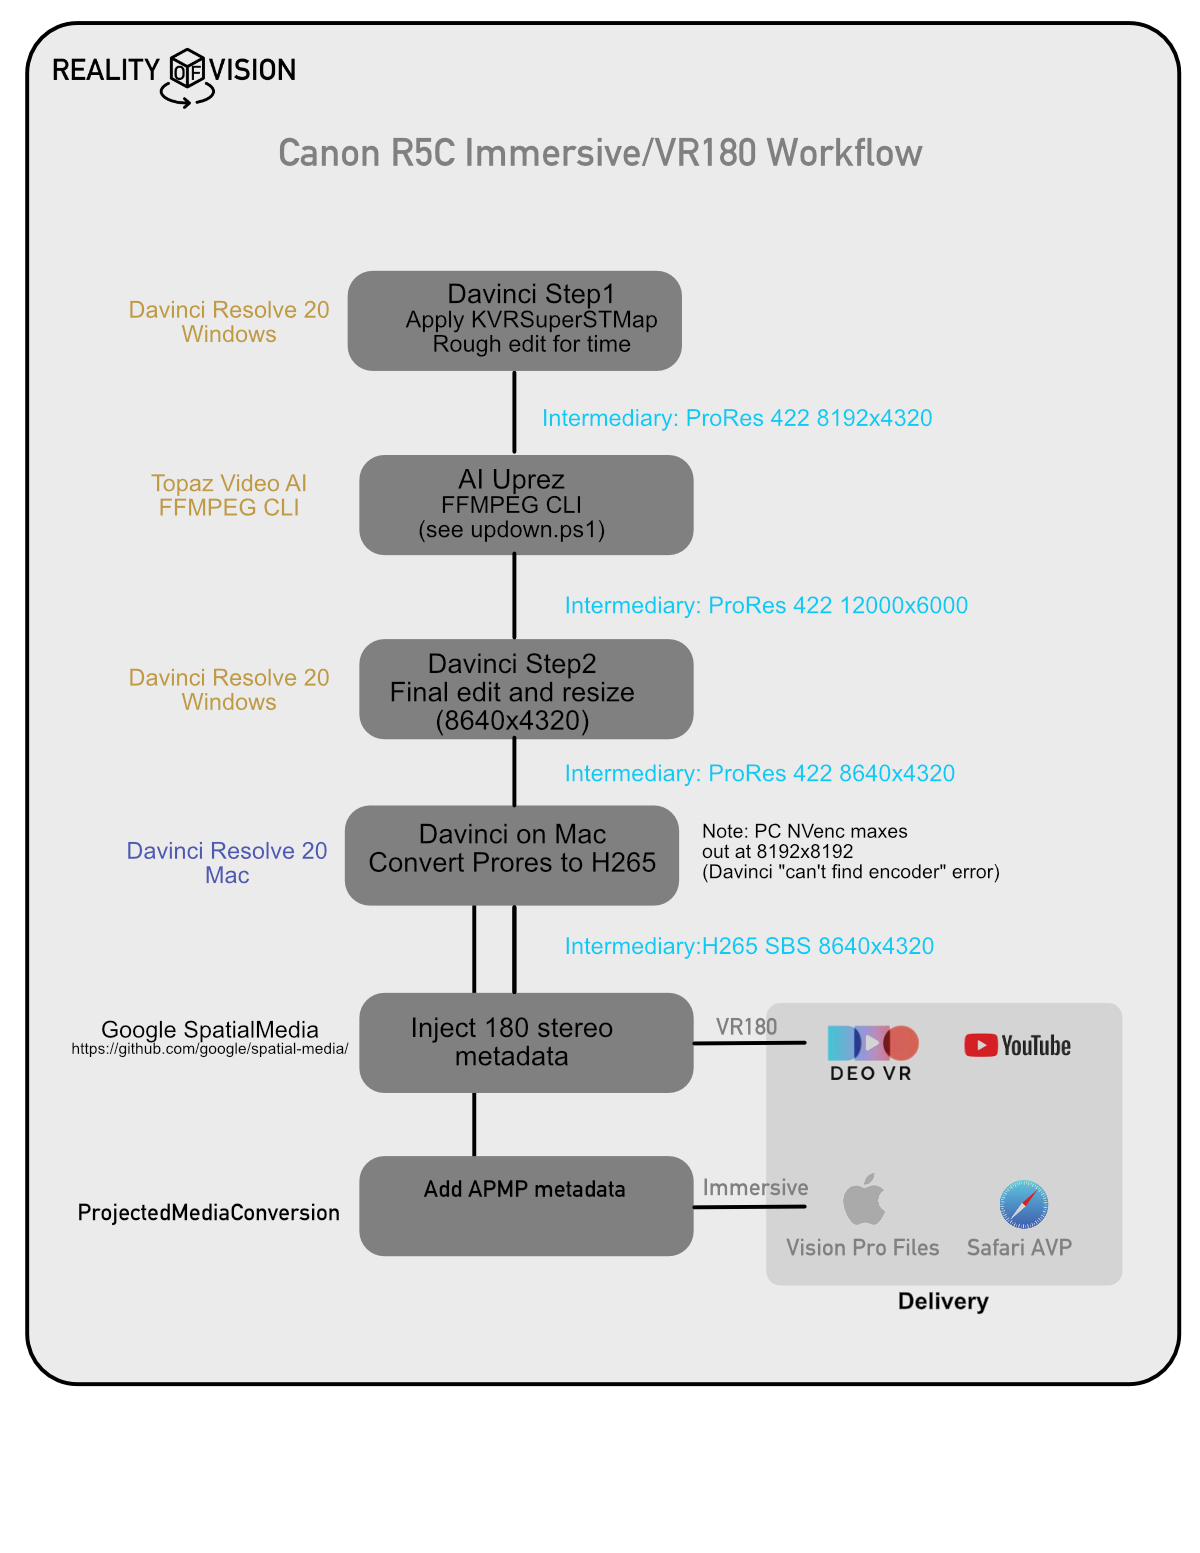 PNG of VR180 flowchart: buymeacoffee.com/realityofvision/e/432863