

Tailwind CSS is a powerful utility-first CSS framework that speeds up UI development. In this step-by-step guide, I’ll show you how to integrate Tailwind CSS into your LynxJS project. By the end, you’ll be ready to build stunning interfaces with ease. Let’s get started!
Watch the video to follow along:
Step 1: Install the Required Packages
First, open your terminal in the root folder of your LynxJS project and run the following command to install the necessary packages:
npm add tailwindcss@3 rsbuild-plugin-tailwindcss @lynx-js/tailwind-preset -D
Here’s what each package does:
tailwindcss@3: The core Tailwind CSS framework (version 3).
rsbuild-plugin-tailwindcss: A plugin to connect Tailwind CSS with Rsbuild, the build tool used by LynxJS.
@lynx-js/tailwind-preset: A pre-configured Tailwind setup designed specifically for LynxJS projects.
The -D flag installs these as dev dependencies, perfect for development tools like this.
Step 2: Add the Tailwind Plugin to lynx.config.js
Next, configure your LynxJS project to use Tailwind CSS by updating the lynx.config.js file in your project root. Replace its contents with the following:
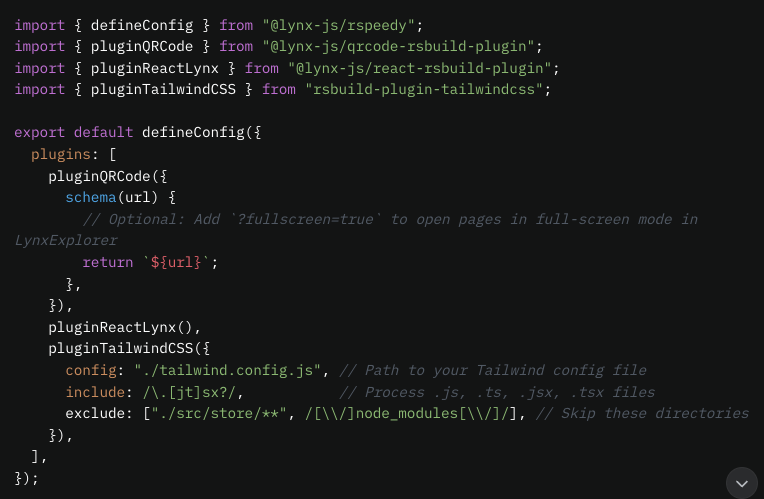
This setup:
Imports the required plugins.
Adds pluginTailwindCSS with options to specify the config file and file patterns to include or exclude.
Step 3: Create a Custom Tailwind Configuration
Now, create a file named tailwind.config.js in your project’s root directory. Add the following code:

Key points:
mode: 'jit': Enables Just-in-Time compilation for smaller, faster CSS output.
presets: Uses the LynxJS preset for a tailored setup.
content and purge: Define where Tailwind looks for classes and removes unused styles. Adjust the paths if your project structure differs.
theme: Adds a custom color palette you can use with classes like bg-blue or text-purple.
Step 4: Set Up PostCSS Configuration
Tailwind CSS relies on PostCSS, so create a postcss.config.js file in your project root with this content:
export default { plugins: { cssnano: process.env["NODE_ENV"] === "production" ? {} : false, }, };
What this does:
Enables cssnano in production to minify your CSS, reducing file size.
Disables it in development for easier debugging.
Step 5: Import Tailwind CSS in Your Entry File
Finally, update your entry file (typically src/index.tsx) to include Tailwind’s utility classes. Here’s the updated code:
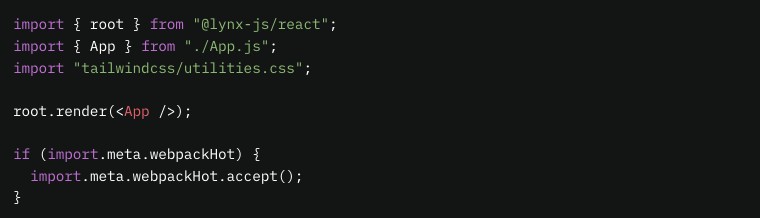
This:
Imports Tailwind’s utility styles via "tailwindcss/utilities.css".
Makes all Tailwind classes (like flex, mt-4, or bg-green) available in your project.
Step 6: Test Your Setup
Run your LynxJS project (e.g., with npm run dev) and test it out! Try adding Tailwind classes to your components, like this:
<div className="bg-blue text-white p-4 rounded"> Tailwind CSS is working! </div>
If you see styled output, congratulations—Tailwind CSS is successfully set up!
Wrapping Up
That’s it! You’ve now integrated Tailwind CSS into your LynxJS project, unlocking a world of utility-first styling. Whether you’re building a sleek UI or prototyping quickly, Tailwind has you covered.
If this guide helped you, I’d love it if you’d buy me a coffee to support more tutorials like this. Happy coding, and enjoy your newly styled LynxJS app!