

If you own a website, you have probably noticed that browsers now show a warning on sites without HTTPS. That little padlock next to your web address tells visitors your site is safe. Without it, people may leave before they even read your first sentence.
The good news: you can get an SSL certificate for free, and you do not need to be a developer to do it. This guide walks you through the DNS verification method using SSLChange.com, step by step, in plain language.
What is DNS verification, in simple terms?
Before anyone gives you an SSL certificate, they need proof that you actually own the website. Think of it like a landlord asking for ID before handing over the keys.
DNS verification is one way to prove it. You add a small piece of text to your domain's settings, and the certificate provider checks that it is there. If the text matches, they know you control the domain, and your certificate is issued.
Why choose DNS verification over file upload?
There are two common ways to prove ownership. The other method asks you to upload a file to your website. DNS verification is often the better choice because:
It is the only option for wildcard certificates. A wildcard certificate secures your main domain and every subdomain at once (blog.yoursite.com, shop.yoursite.com, and so on) with a single certificate.
You do not need file access. No FTP, no cPanel file manager, no server login required.
It works even if your site is not live yet. Useful when you are still building.
The one tradeoff is patience. DNS changes take a few minutes to spread across the internet, so this method is slightly slower than uploading a file.
What you need before starting
A domain name you own, such as yoursite.com
Login access to wherever you bought your domain (GoDaddy, Namecheap, Cloudflare, Hostinger, and similar) or wherever your DNS is managed
An email address you can check
About 15 minutes
That is it. No coding, no command line.
Step 1: Open SSLChange.com
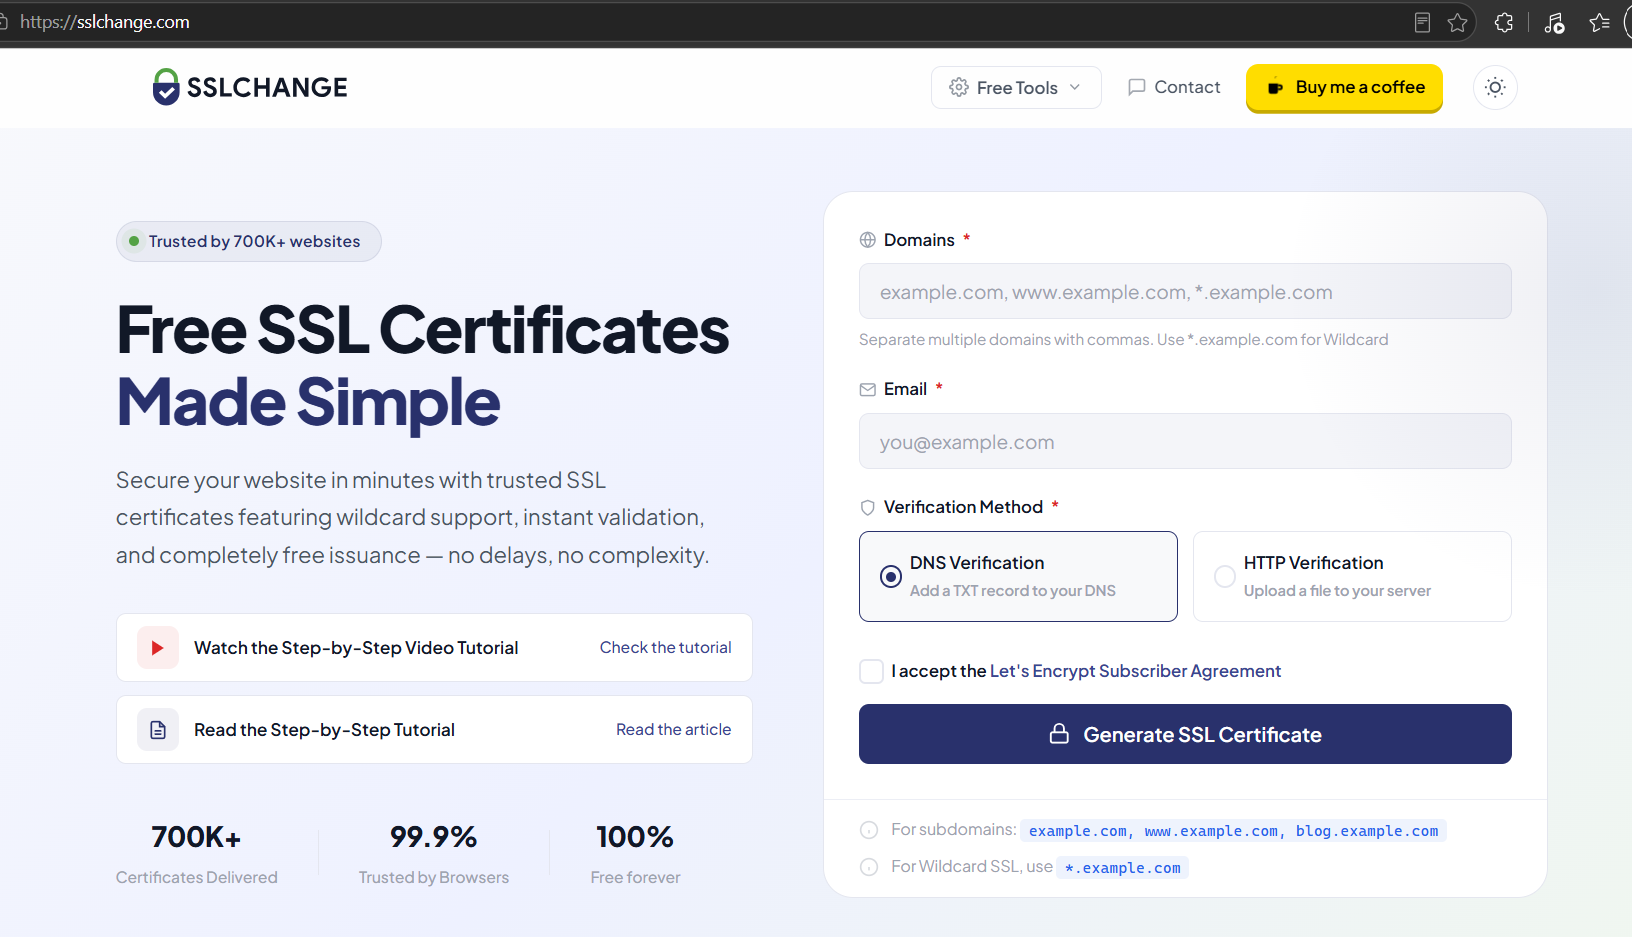
Go to https://sslchange.com in your browser. You will see a simple form. Everything happens on this one site, so there is nothing to install.
Step 2: Enter your domain name
Type in the domain you want to protect.
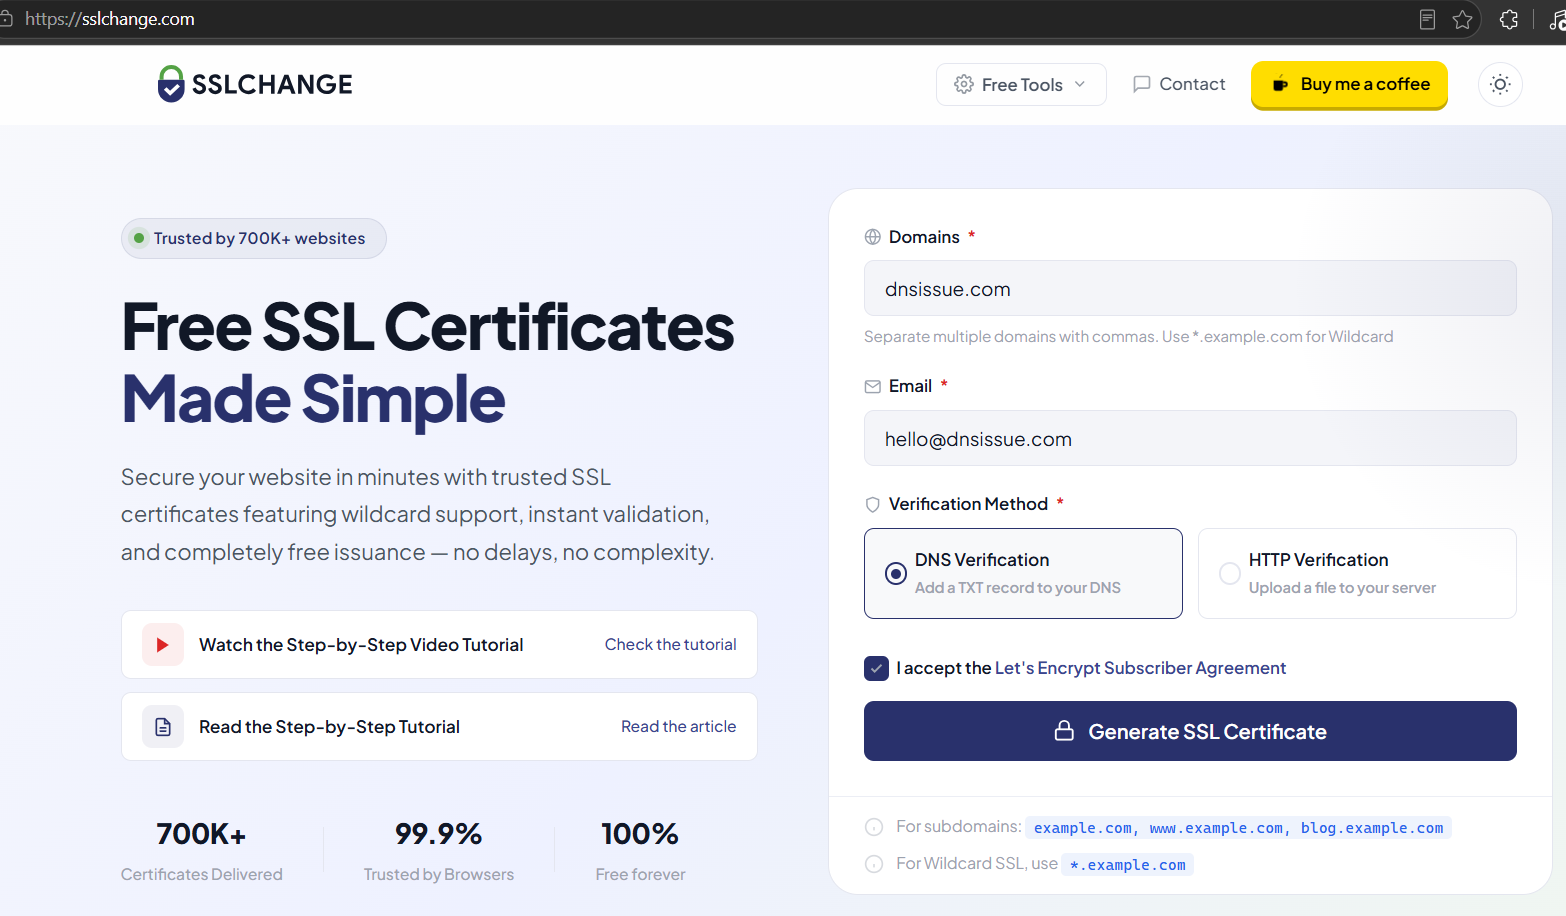
For a normal certificate, enter both versions of your domain:
yoursite.com and www.yoursite.com
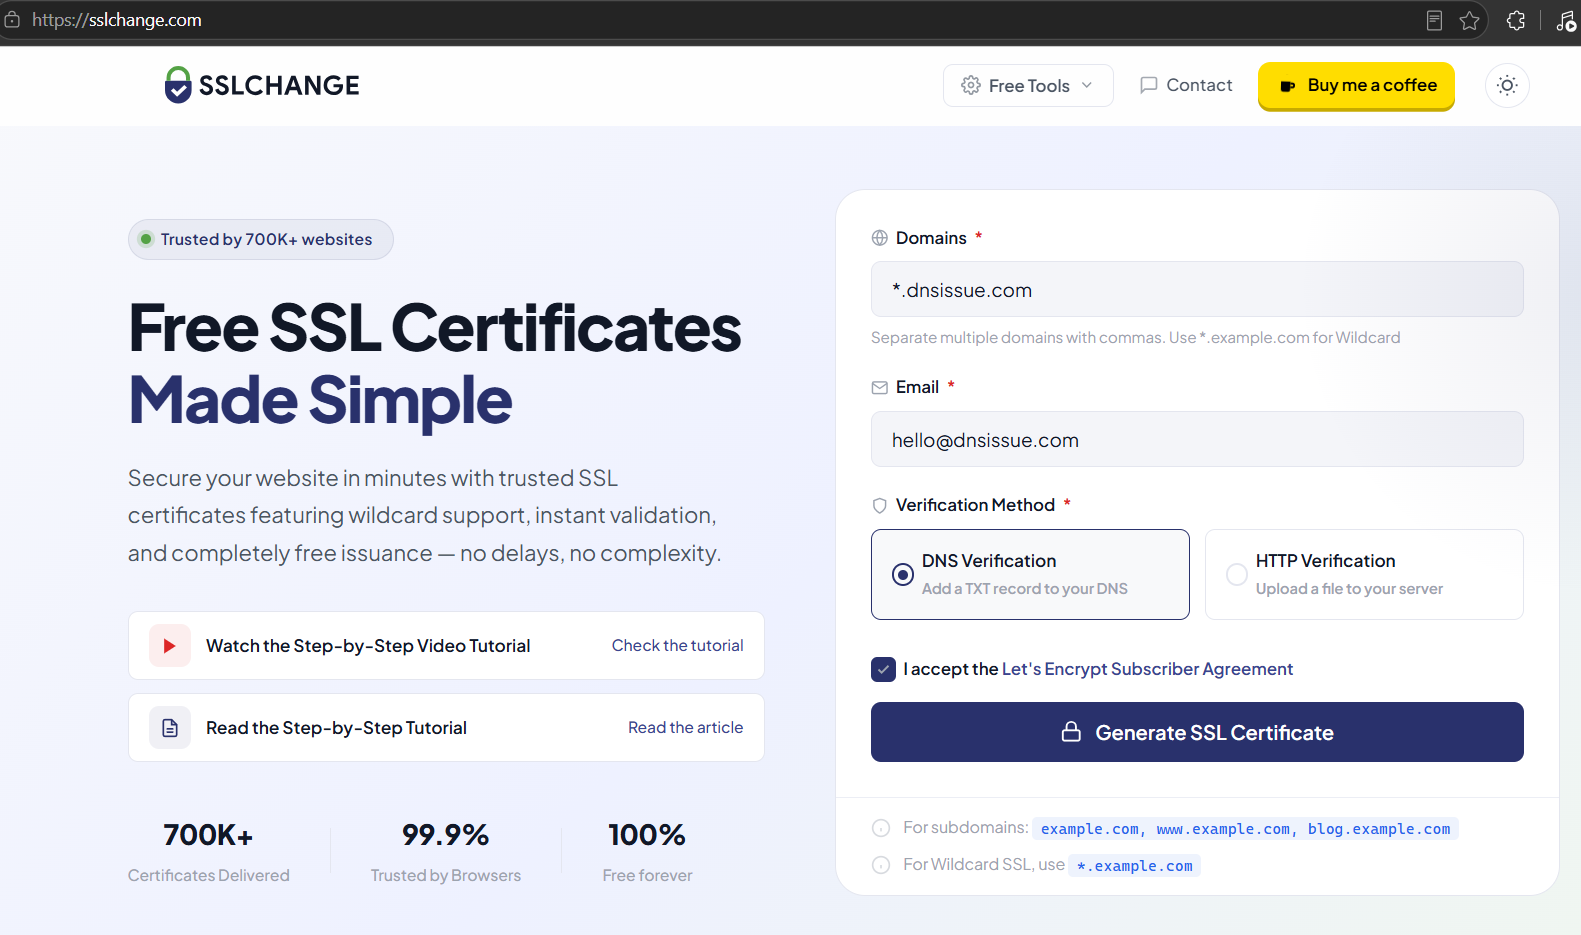
For a wildcard certificate that covers every subdomain, put an asterisk and a dot in front:
*.yoursite.com
A quick tip: if you want the wildcard to cover your main address too, enter both yoursite.com and *.yoursite.com. The wildcard on its own covers subdomains only.
Step 3: Add your email and pick DNS verification
Enter an email address. This is used for certificate expiry reminders, which are genuinely useful, so use an inbox you actually check.
When you are asked how you want to verify ownership, choose DNS Record Verification. If you entered a wildcard domain in the previous step, this will be your only option anyway.
Then tick the box to accept the Let's Encrypt Subscriber Agreement and click the button to continue.
For a normal certificate
 For a wildcard certificate
Step 4: Copy the TXT record you are given
SSLChange will now show you a special code and tell you where to put it. It will look something like this:
Field
Example value
Type
TXT
Name / Host
Value
a long random string of letters and numbers
Leave this page open. Do not close it or refresh it. You will come back to it in a moment.
Copy the value carefully. The easiest approach is to select it and copy it rather than typing it by hand, since a single wrong character will cause the check to fail.
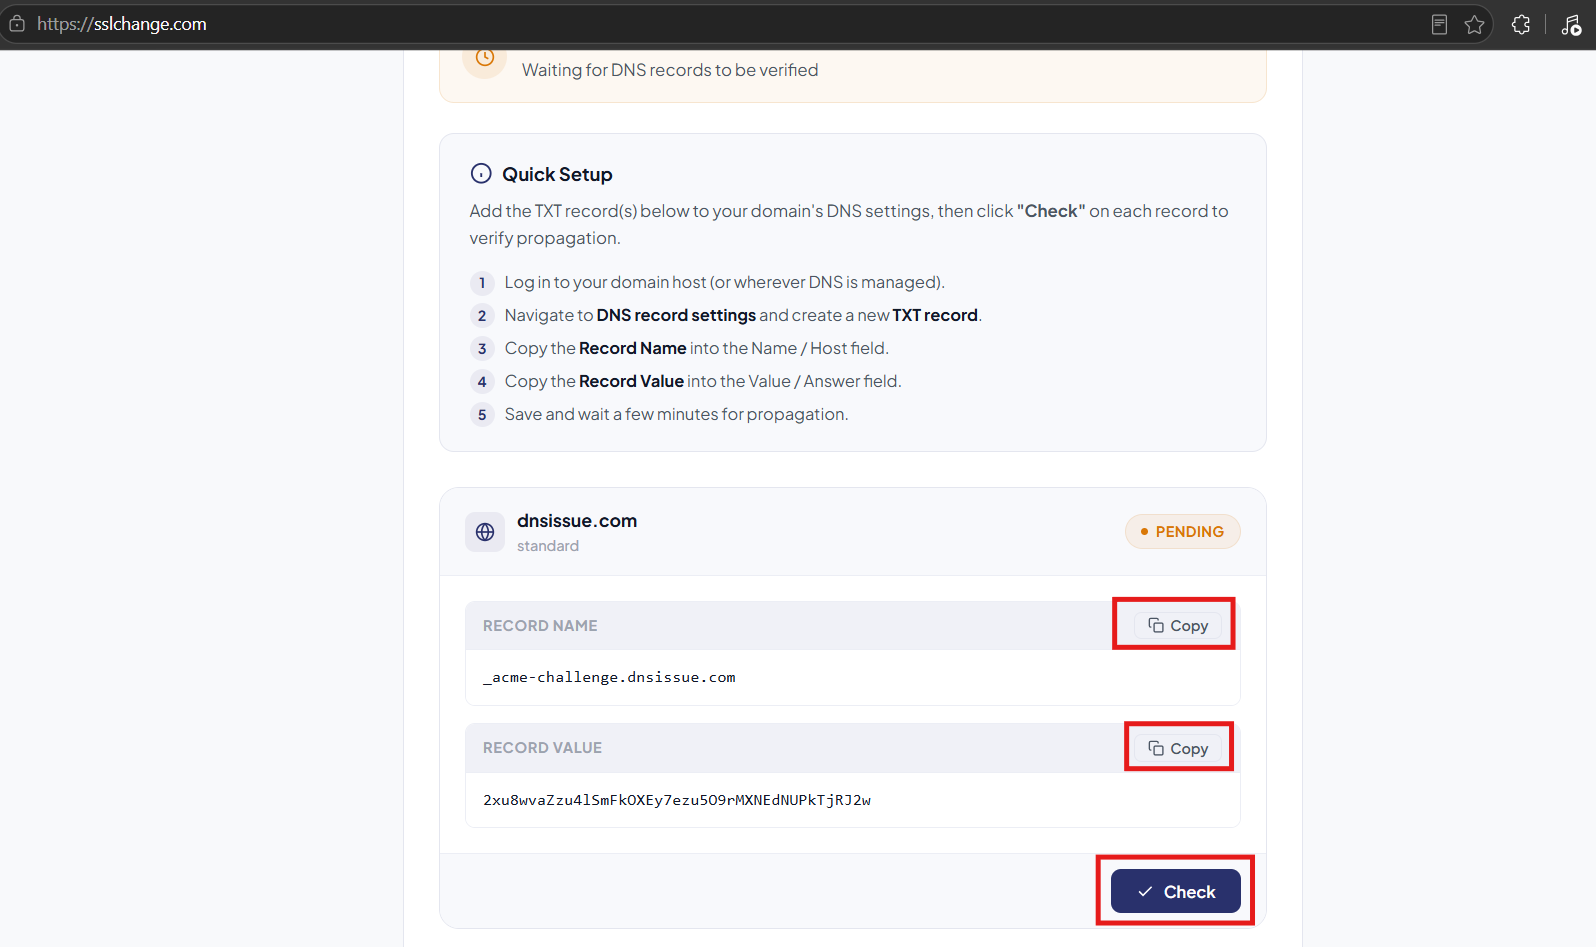
Step 5: Add the record in your domain settings
Now open a new browser tab and log in to wherever your domain is managed. This is usually the company you bought the domain from.
Look for a menu item called DNS, DNS Management, DNS Records, or Advanced DNS. Every provider may name it slightly differently, but you’ll usually find it in your domain settings. In my case, I’m using Cloudflare as my DNS provider.
Once you are there:
Click Add Record or Add New Record
For Type, select TXT from the dropdown
For Name or Host, paste what SSLChange gave you
For Value or Content, paste the long random string
Leave TTL on its default setting, or choose the lowest number available if you want the change to apply faster
Click Save
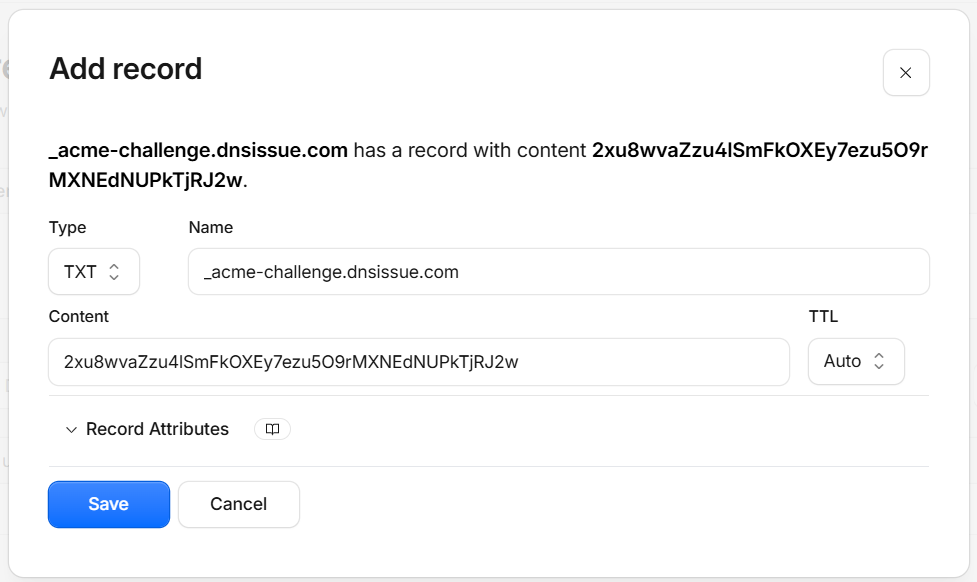
If you are requesting a wildcard certificate that also covers your main domain, you may be given two TXT records with the same name but different values. Add both. This is normal and not a mistake.
Step 6: Wait a few minutes
DNS changes need time to spread across the internet. Usually this takes 2 to 10 minutes, though it can occasionally take longer.
Grab a coffee, then go back to your SSLChange tab.
Step 7: Click verify
Back on SSLChange, click the button to Check or continue.
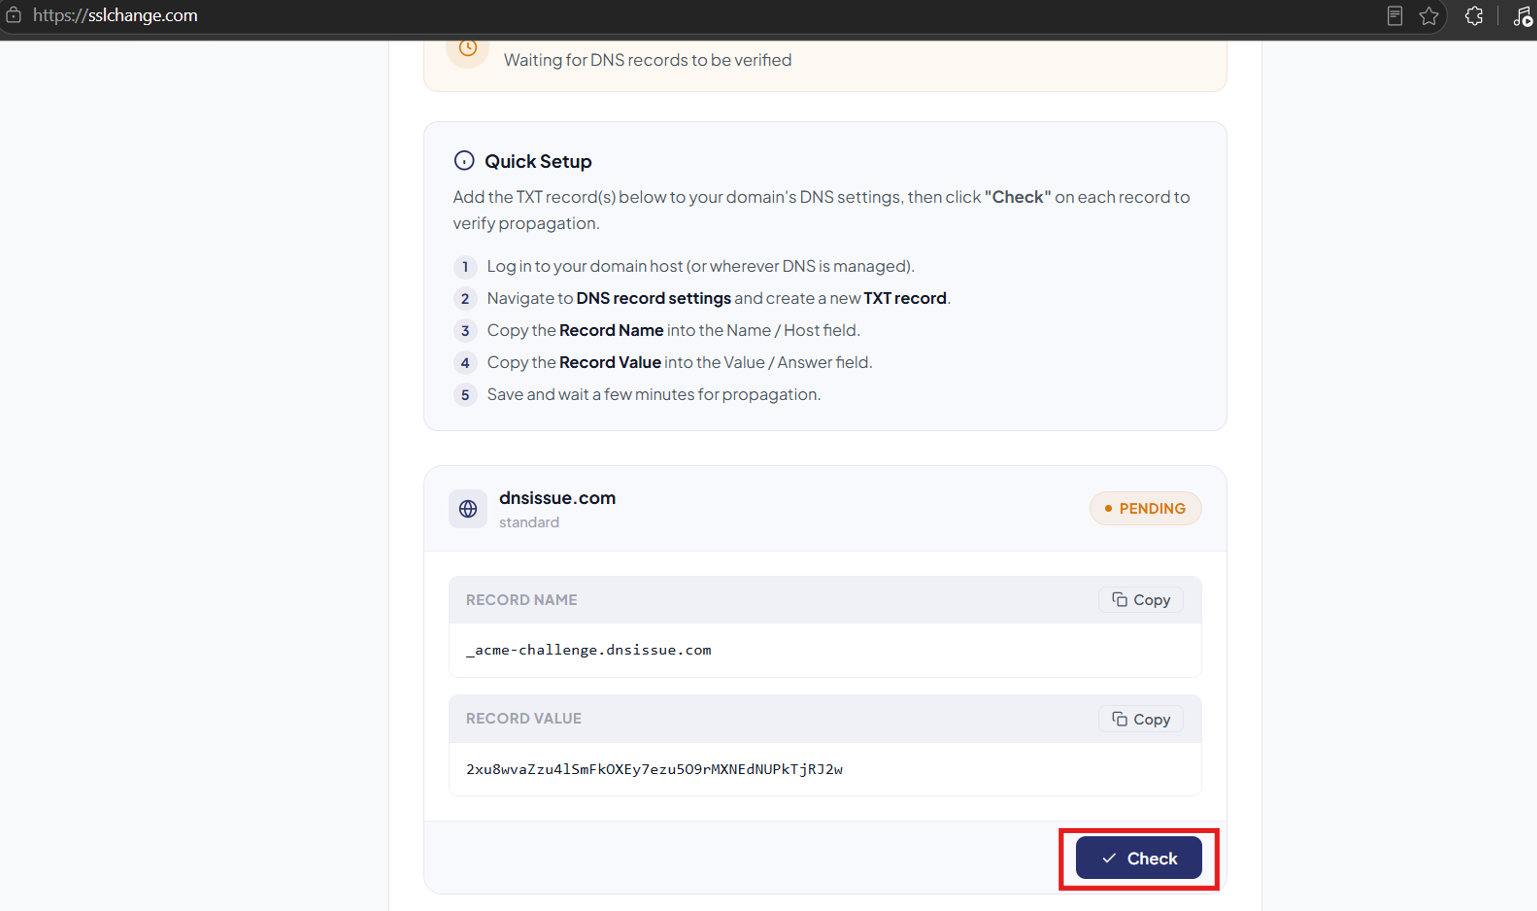
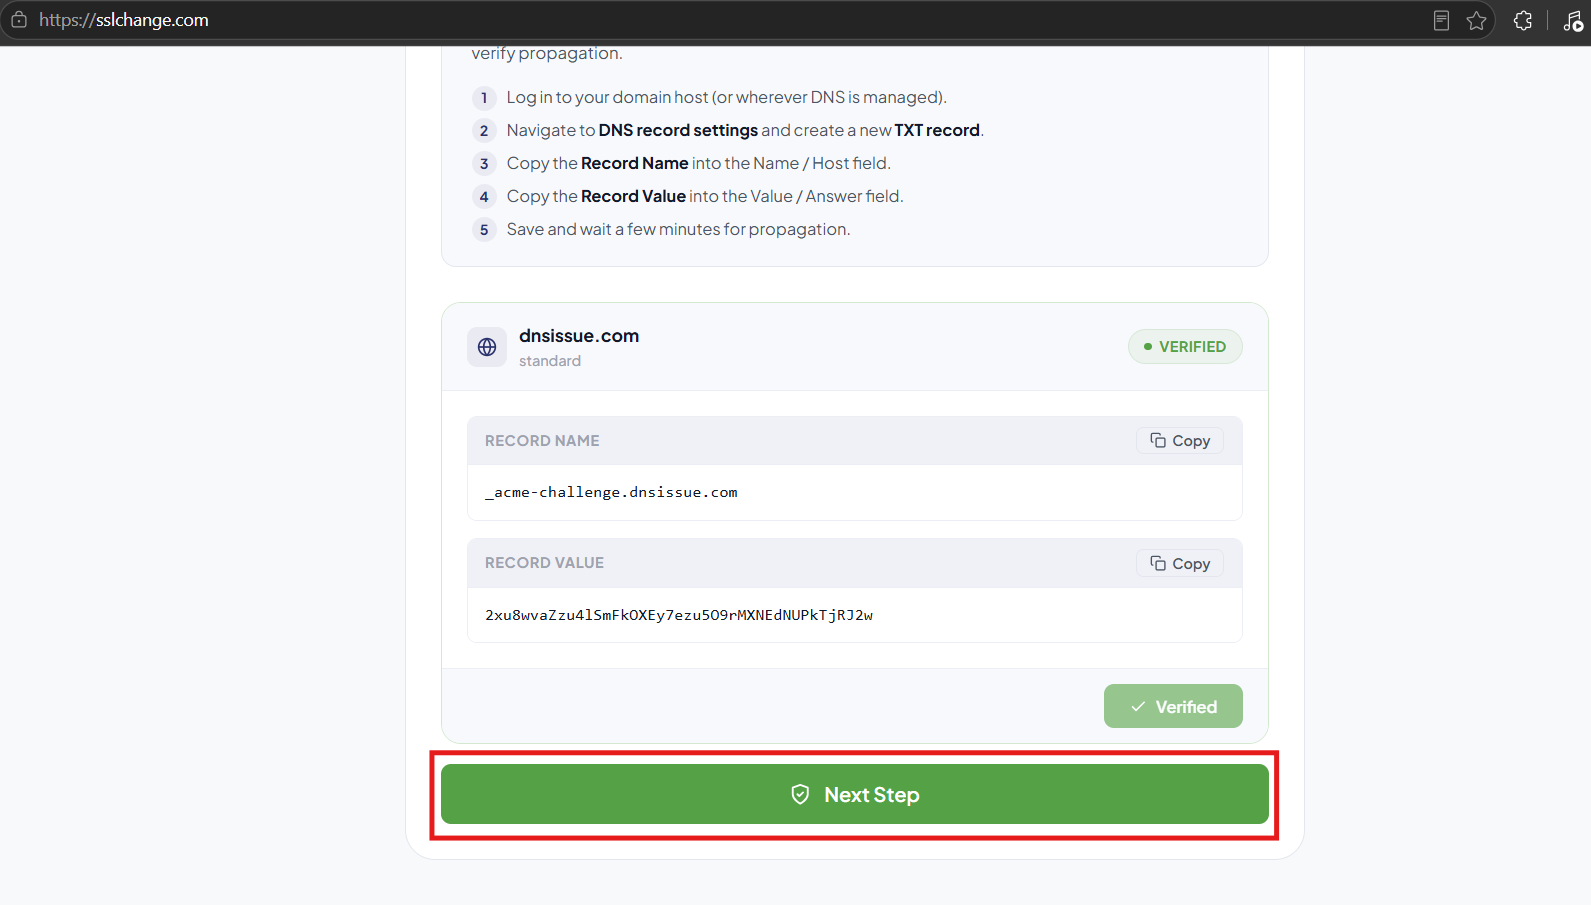
If it works, click the Next Step button.
If it says the record was not found, do not panic. It almost always means one of three things:
The DNS change has not spread yet, so wait five more minutes and try again
The Name field has the domain doubled up, for example _acme-challenge.yoursite.com.yoursite.com
A character was missed when copying the value, so delete the record and paste it again
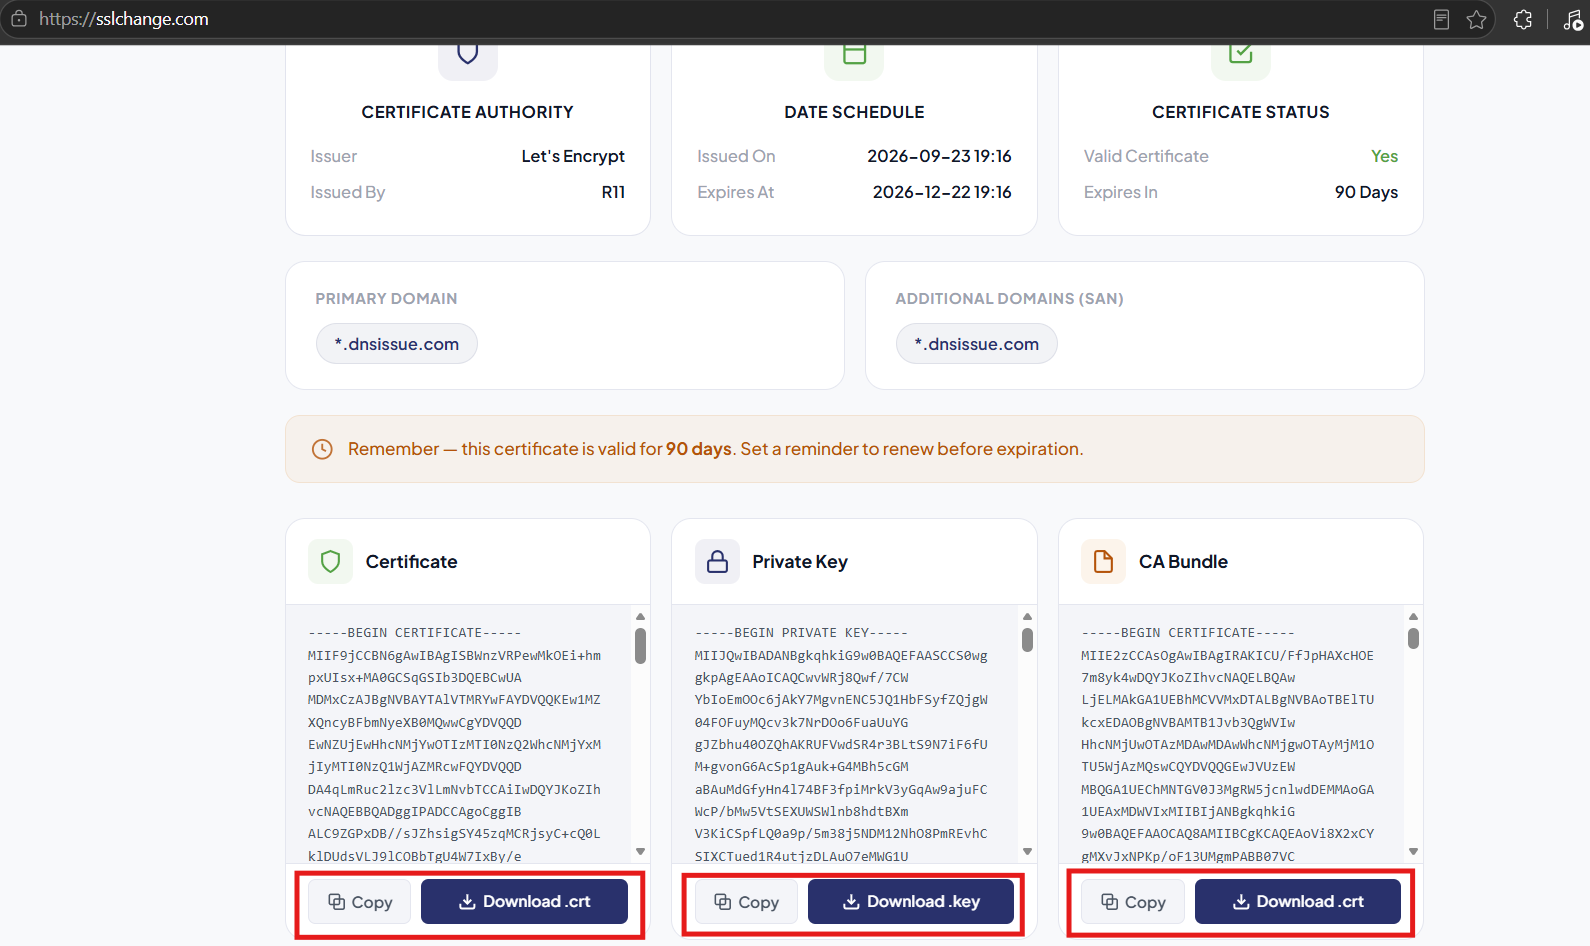
Step 8: Download your certificate files
Once verification passes, your certificate is generated. You will be given three files:
cert.pem is your certificate, the actual proof of security
privkey.pem is your private key, which must stay secret and should never be emailed or posted publicly
chain.pem is the CA bundle, which tells browsers your certificate comes from a trusted source
Download or copy all three files and keep them somewhere safe on your computer.
Step 9: Install the certificate on your hosting
Now log in to your hosting control panel, which is often cPanel, Plesk, or a custom dashboard provided by your hosting provider. In my case, I’m using cPanel.
Look for a section called SSL/TLS, SSL Certificates, or Security. Inside it you will find an option to install or manage a certificate for your domain.
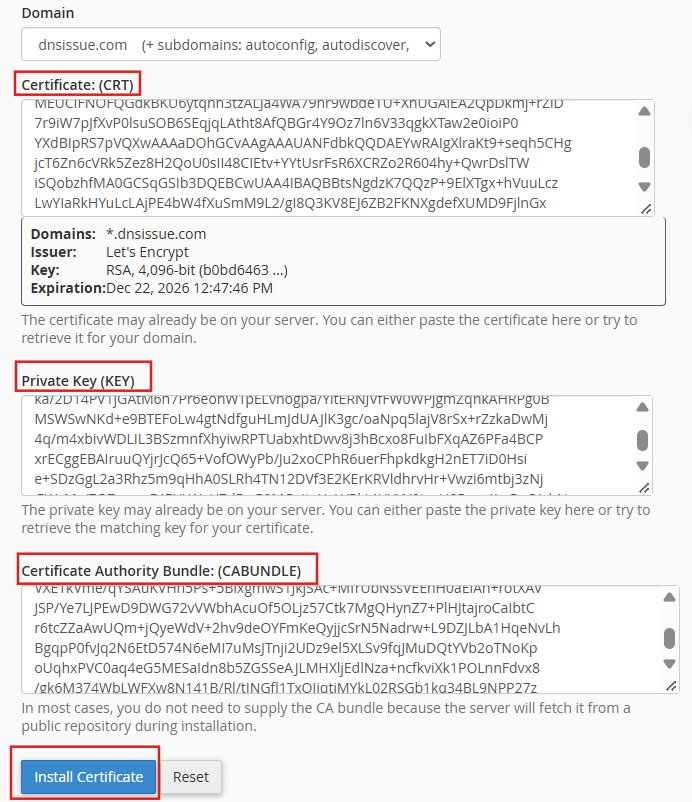
You will see three boxes to fill in. Match them like this:
Certificate or CRT: paste the contents of cert.pem
Private Key or KEY: paste the contents of privkey.pem
Certificate Authority Bundle or CABUNDLE: paste the contents of chain.pem
To see the contents of a file, open it with any plain text editor such as Notepad or TextEdit. Copy everything, including the lines that begin with BEGIN and END.
Then click Install Certificate.
Step 10: Check that it worked
Two easy ways to confirm everything is running properly:
Visit your site using https://yoursite.com and look for the padlock icon in the address bar
Run a free check at ssllookup.com, which will confirm your certificate is installed correctly and show its expiry date
A few things worth knowing
Certificates expire. Let's Encrypt certificates last 90 days. Put a reminder in your calendar for day 75 so you have time to renew without a rush. When the time comes, repeat this process with a fresh TXT record.
You can delete the old TXT record. Once your certificate is issued, the _acme-challenge record has done its job. You can leave it or remove it, though you will need a new one at renewal either way.
Update your website links. After installing, make sure your site redirects visitors from http to https. Most hosting panels have a "Force HTTPS" toggle that handles this in one click.