

Introduction
In today’s threat landscape, Secure Shell (SSH) is one of the most common entry points for attackers. Threat actors and automated botnets constantly scan the internet for exposed SSH ports, attempting brute-force attacks to gain unauthorized access to critical servers.
As a cybersecurity professional or SOC analyst, being able to detect and respond to these attacks is a fundamental skill. In this blog post, we will walk through a hands-on lab on how to detect SSH brute-force attacks using Wazuh, a powerful open-source Security Information and Event Management (SIEM) and Extended Detection and Response (XDR) platform.
By the end of this guide, you will understand how Wazuh monitors system logs, how to create custom correlation rules, how to simulate an SSH brute-force attack, and how to analyze the resulting security alerts in the Wazuh dashboard.
🛠️ Prerequisites
To follow along with this lab in your own environment, you will need the following setup:
Wazuh Server: A functional Wazuh Manager and Dashboard installed (e.g., on an Ubuntu VM).
Target Machine (Wazuh Agent): A Linux virtual machine (Ubuntu/Debian) with the Wazuh agent installed and enrolled in the manager. SSH must be enabled on this machine.
Attacker Machine: A Kali Linux VM to simulate the brute-force attack.
Tools Used:
Hydra(Pre-installed on Kali Linux) and a wordlist (likerockyou.txt).
🚀 Step-by-Step Guide
Phase 1: Deploying the Wazuh Agent
To detect attacks on our target server, we first need to ensure the Wazuh agent is actively monitoring it.
Log in to your Wazuh Dashboard.
Navigate to Wazuh > Agents > Deploy new agent.
Select your target operating system (e.g., Debian/Ubuntu), specify the Wazuh Manager’s IP address, and assign an agent name.
Run the generated command on your Target Machine to install the agent.
Start and enable the Wazuh service on the target machine:
sudo systemctl daemon-reload
sudo systemctl enable wazuh-agent
sudo systemctl start wazuh-agent
Phase 2: Configuring Log Collection
Wazuh detects SSH anomalies by parsing the Linux authentication logs. We need to verify that the Wazuh agent is configured to monitor these logs.
On the Target Machine, open the Wazuh agent configuration file:
sudo nano /var/ossec/etc/ossec.confScroll down to the
section. Ensure that/var/log/auth.log(or/var/log/securefor RHEL/CentOS) is being actively monitored:
<localfile>
  <log_format>syslog</log_format>
  <location>/var/log/auth.log</location>
</localfile>
If you made any changes, restart the agent:
sudo systemctl restart wazuh-agentPhase 3: Creating a Custom Correlation Rule
While Wazuh has excellent out-of-the-box rules, writing a custom correlation rule allows us to define exactly what constitutes a high-severity brute-force attack in our specific environment. We are going to create a rule that triggers a Level 12 alert if it detects 8 failed logins within 60 seconds from the exact same IP address.
On your Wazuh Manager (not the agent), open the local rules configuration file:
sudo nano /var/ossec/etc/rules/local_rules.xmlAdd the following custom XML block to the file:
<group name="ssh_bruteforce,">
  <!-- Fast brute force: 8 failed logins in 60 seconds from same IP -->
  <rule id="100500" level="12">
    <if_matched_sid>5710</if_matched_sid>
    <frequency>8</frequency>
    <timeframe>60</timeframe>
    <same_source_ip />
    <description>SSH brute force detected - 8 failures in 60 seconds from same IP</description>
    <mitre>
      <id>T1110</id>
      <tactic>Credential Access</tactic>
    </mitre>
  </rule>
</group>
Save the file and restart the Wazuh Manager to apply the new rule:
sudo systemctl restart wazuh-managerPhase 4: Attack Simulation (The Red Team Phase)
Now that our defenses and custom rules are active, let’s switch to our Kali Linux machine and simulate a brute-force attack using Hydra.
Hydra is a powerful network logon cracker. We will use a dummy username and a password list to bombard the target’s SSH service.
Run the following command on your Kali Linux VM:
hydra -l admin -P /usr/share/wordlists/rockyou.txt ssh://<TARGET_IP_ADDRESS>(Note: Replace with the IP of your Ubuntu target machine).
Hydra will immediately begin sending multiple login requests to the target server. Because the passwords in the list are incorrect, the target server will register these as rapid, failed login attempts.
Phase 5: Threat Detection (The Blue Team Phase)
With the attack underway, let’s switch back to our Wazuh Dashboard to see how the SIEM handles this malicious activity.
Open the Wazuh Dashboard and navigate to the Security events module.
Filter the events by the agent’s name.
You will immediately notice a spike in alerts.
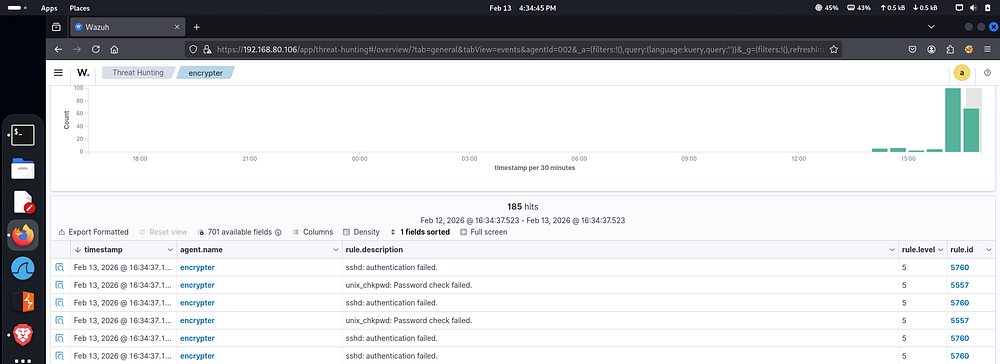
Look closely at the logs. You will see the standard rules firing, culminating in our new custom alert:
Rule 5716 (Level 5):
SSHD: authentication failed.— This triggers for every individual wrong password guess.Rule 5710 (Level 5):
Attempt to login using a non-existent user— This triggers if the username we used in Hydra doesn't exist on the system.Rule 100500 (Level 12):
SSH brute force detected - 8 failures in 60 seconds from same IP— This is our custom rule in action. Wazuh successfully correlated the rapid succession of failed attempts and mapped it directly to the MITRE ATT&CK framework (T1110 - Credential Access).
🎯 Testing & Validation Summary
To validate that your detection pipeline works flawlessly:
Verify Log Ingestion: Check
/var/log/auth.logon the target machine manually usingtail -f /var/log/auth.logwhile running Hydra. You should see the failed SSH attempts flooding the file.Verify Correlation: Ensure that Rule
100500fires in Wazuh. If you only see isolated5710or5716rules but no Level 12 alert, verify that there are no typos in yourlocal_rules.xmlfile and that you restarted the manager.Analyze the Payload: Expand the JSON payload of the alert in Wazuh. You should clearly see the srcip (your Kali VM’s IP) and the targeted port (22), giving you the exact intelligence needed to block the attacker in a real-world scenario.
In this project, we successfully configured Wazuh SIEM to monitor Linux authentication logs, authored a custom correlation rule mapping to the MITRE ATT&CK framework, and validated the system against a real-world SSH brute-force attack using Hydra.
For SOC analysts, establishing this kind of visibility is step one. The logical next step (and a great follow-up project!) is configuring Wazuh Active Response to automatically execute a firewall rule to drop the attacker’s IP address as soon as Rule 100500 is triggered.
Want to check out the project files or replicate this in your own lab?
Head over to my GitHub repository for the full details:
🔗 SSH Bruteforce Detection Using Wazuh SIEM
Other Digital Presence
Medium: https://medium.com/@jaseervk321
GitHub: github.com/jaseervk
Portfolio: www.jaseervk.com
Blog: blog.jaseervk.com
LinkedIn: linkedin.com/in/jaseer-vk-