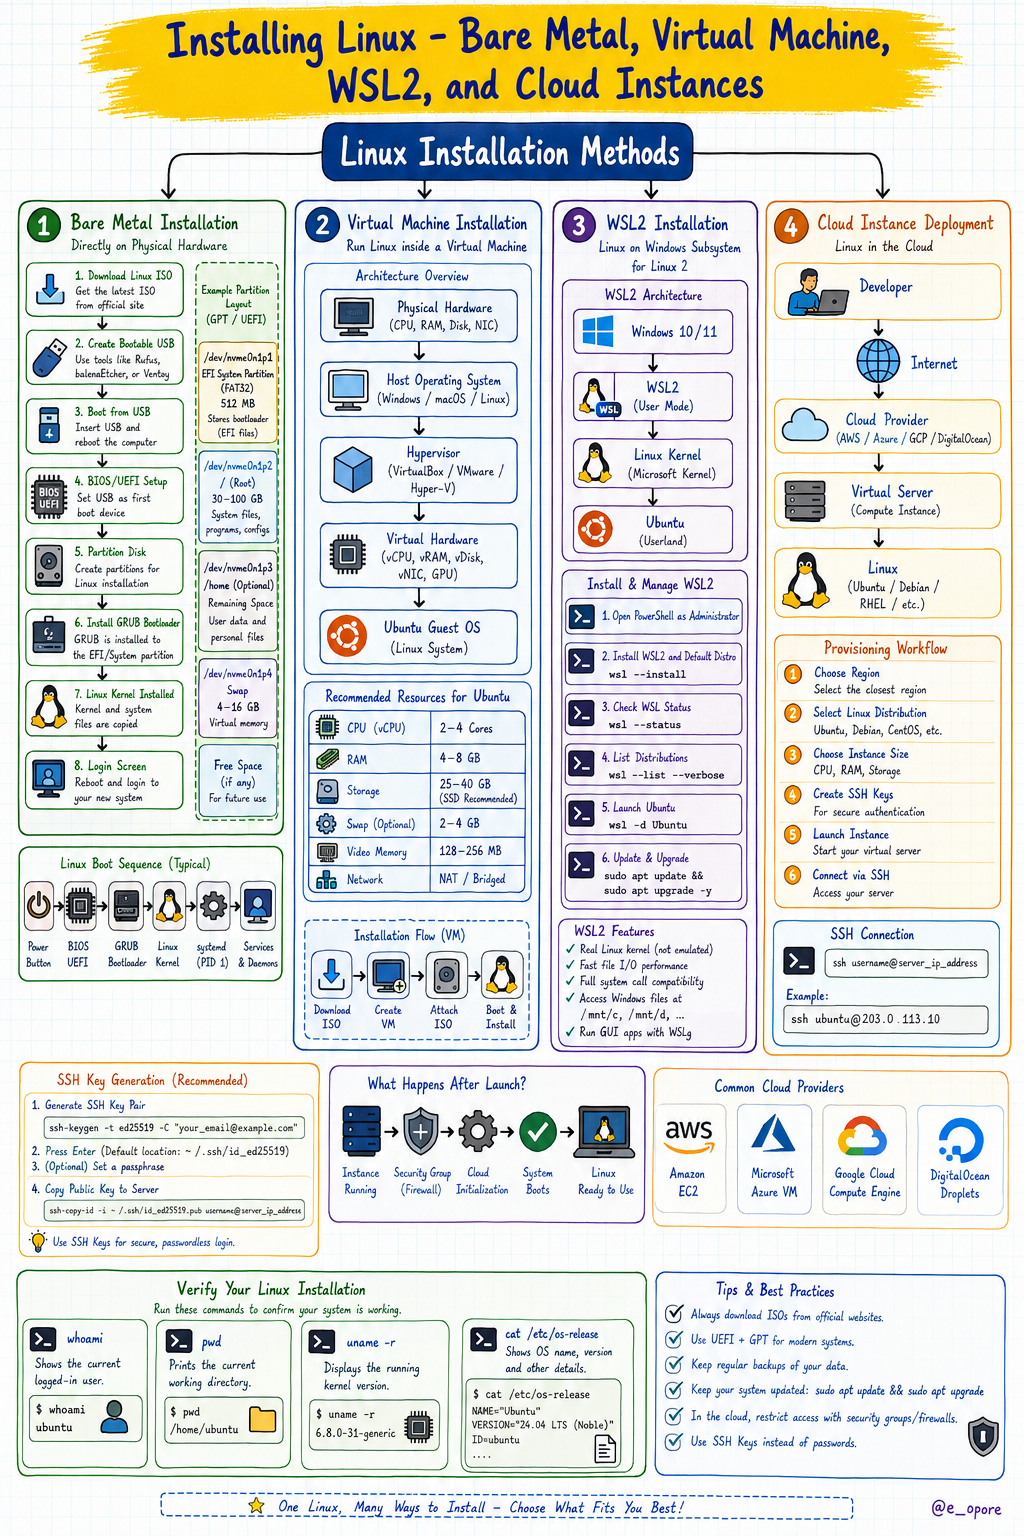

Installing Linux is one of the most important skills for every developer, system administrator, DevOps engineer, cybersecurity professional, and cloud engineer. Understanding different installation methods allows you to choose the right environment depending on your hardware, workflow, and project requirements.
Linux can run directly on physical hardware, inside virtual machines, alongside Windows, inside the Windows Subsystem for Linux, or on remote cloud servers. Although every installation eventually provides the same Linux operating system, the installation process, performance, hardware access, and use cases differ significantly.
This tutorial explores every major installation method in depth, explains when each should be used, and demonstrates how to install Linux correctly.
Understanding Linux Installation Methods
Before installing Linux, it's important to understand that there are multiple ways to run it.
Installation MethodRuns OnPerformanceBest ForBare Metal InstallationPhysical ComputerNative PerformanceDaily use, servers, developersVirtual MachineExisting Operating SystemSlight OverheadLearning, testing, experimentationWSL2WindowsNear NativeWindows developersCloud InstanceRemote ServerNative Server HardwareHosting applications and production systems
Each method serves a different purpose.
Method 1: Installing Linux on Bare Metal
A Bare Metal Installation means Linux is installed directly onto the physical hard drive of a computer.
Instead of running inside another operating system, Linux becomes the primary operating system controlling all hardware.
+----------------------------------+
|           Applications           |
+----------------------------------+
|             Linux                |
+----------------------------------+
|             Kernel               |
+----------------------------------+
|             Hardware             |
+----------------------------------+
This provides:
Maximum Performance
Direct Hardware Access
Best Battery Efficiency
Full Graphics Acceleration
Complete Driver Support
Requirements
Before installation, prepare the following:
USB Flash Drive (8GB or larger)
Linux ISO Image
Stable Internet Connection
Backup of Important Files
Computer supporting UEFI or Legacy BIOS
Downloading a Linux Distribution
A Linux installation begins with downloading an ISO image.
An ISO is a complete copy of an operating system installation disc.
Example:
ubuntu-24.04-desktop-amd64.iso
Inside the ISO are:
Bootloader
Linux Kernel
Installation Program
Drivers
Software Packages
Recovery Tools
Creating a Bootable USB
The ISO cannot simply be copied onto a USB drive.
It must be written as a bootable image.
The process looks like:
ISO File
     │
     ▼
Writing Software
     │
     ▼
Bootable USB
Popular USB writing tools create:
Boot Sector
EFI Partition
Linux Filesystem
Installation Media
Changing Boot Order
When the computer starts, the BIOS or UEFI Firmware determines which device boots first.
Typical boot order:
1. SSD
2. HDD
3. USB
4. Network
During installation you temporarily boot from:
USB Flash Drive
instead of
Internal SSD
Linux Installation Wizard
Most Linux installers follow similar steps.
Choose Language
       │
       ▼
Choose Keyboard
       │
       ▼
Connect Network
       │
       ▼
Select Installation Type
       │
       ▼
Partition Disk
       │
       ▼
Create User
       │
       ▼
Install Bootloader
       │
       ▼
Finish Installation
Understanding Disk Partitioning
A Partition divides one physical disk into logical sections.
Example:
500 GB SSD

+-------------------------------+
| EFI        512 MB             |
+-------------------------------+
| Root /      80 GB             |
+-------------------------------+
| Home       380 GB             |
+-------------------------------+
| Swap        40 GB             |
+-------------------------------+
Important Linux Partitions
EFI Partition
Stores bootloader files.
Usually:
/boot/efi
Typical size:
512 MB
Root Partition
Contains:
Kernel
System Files
Applications
Libraries
Mounted as:
/
Home Partition
Stores user files.
Mounted as:
/home
Example:
/home/alice
/home/john
Keeping /home separate allows reinstalling Linux without deleting personal files.
Swap Partition
Used as virtual memory.
When RAM becomes full:
RAM
 ↓
Swap
Creating a User Account
During installation you'll create:
Username
Password
Computer Name
Example:
Username:
developer

Hostname:
linux-pc
Installing the Bootloader
The Bootloader starts Linux after the computer powers on.
Most distributions install:
GRUB
Boot process:
Power On
    │
    ▼
UEFI
    │
    ▼
GRUB
    │
    ▼
Linux Kernel
    │
    ▼
System Services
    │
    ▼
Login Screen
Method 2: Installing Linux Inside a Virtual Machine
A Virtual Machine (VM) simulates a complete computer inside another operating system.
Example:
Windows
    │
    ▼
VirtualBox
    │
    ▼
Ubuntu
or
macOS
    │
    ▼
VMware
    │
    ▼
Debian
Why Use a Virtual Machine?
Advantages include:
Safe experimentation
No changes to physical disks
Multiple Linux distributions simultaneously
Easy snapshots
Fast recovery
Virtual Machine Architecture
+-------------------------+
| Ubuntu Guest OS         |
+-------------------------+
| Virtual Hardware        |
+-------------------------+
| Hypervisor              |
+-------------------------+
| Windows Host            |
+-------------------------+
| Physical Hardware       |
+-------------------------+
Essential Virtual Machine Resources
Typical allocation:
CPU:
2–4 Cores

RAM:
4–8 GB

Disk:
40–80 GB

Video Memory:
128 MB
Method 3: Installing Linux Using WSL2
Windows Subsystem for Linux Version 2 (WSL2) allows Linux to run inside Windows without traditional virtualization.
Architecture:
Windows
      │
      ▼
WSL2
      │
      ▼
Linux Kernel
      │
      ▼
Ubuntu
Unlike WSL1, WSL2 uses a real Linux kernel.
Checking Whether WSL Is Installed
Open PowerShell as Administrator.
wsl --status
Example output:
Default Distribution: Ubuntu

Default Version: 2

Kernel Version:
6.x.x
Installing WSL2
wsl --install
This command automatically:
Enables required Windows features
Downloads the Linux kernel
Installs Ubuntu
Sets WSL Version 2 as default
Viewing Installed Distributions
wsl --list --verbose
Example:
NAME       STATE    VERSION

Ubuntu     Running      2
Starting Linux
wsl
or
ubuntu
Updating Linux Inside WSL
sudo apt update
Explanation:
sudo — Executes the command with administrative privileges.
apt — Ubuntu's package management tool.
update — Downloads the latest package index from configured software repositories. It does not upgrade installed software; it refreshes the list of available packages.
Then upgrade installed packages:
sudo apt upgrade
Explanation:
upgrade — Installs newer versions of already installed packages after the package index has been updated.
Method 4: Launching a Linux Cloud Instance
Cloud providers allow Linux to run remotely on enterprise-grade infrastructure.
Instead of installing Linux on your local machine, you create a virtual server in a data center.
Typical architecture:
Developer

      │

Internet

      │

Cloud Provider

      │

Virtual Server

      │

Linux
A cloud server is commonly referred to as a Virtual Machine (VM), Virtual Private Server (VPS), Compute Instance, or Cloud Instance, depending on the provider.
Typical Cloud Deployment Steps
The general process is:
Choose Region

↓

Choose Linux Distribution

↓

Choose Instance Size

↓

Create SSH Key Pair

↓

Launch Instance

↓

Connect Through SSH
Connecting to a Cloud Server with SSH
The general SSH command is:
ssh username@server_ip_address
Example:
ssh [email protected]
Explanation:
ssh — Starts a Secure Shell session.
ubuntu — The remote user account.
203.0.113.15 — The IP address of the remote Linux server.
Using SSH Key Authentication
Generate a new SSH key pair:
ssh-keygen -t ed25519
Example output:
Generating public/private ed25519 key pair.
Explanation:
ssh-keygen — Creates a new SSH key pair.
-t — Specifies the key algorithm.
ed25519 — A modern, secure, and efficient public-key algorithm recommended for SSH.
After generation:
Private Key

~/.ssh/id_ed25519
Public Key

~/.ssh/id_ed25519.pub
Only the public key is uploaded to the server. The private key must remain on your local machine and should never be shared.
Verifying the Linux Installation
After installation, verify the operating system.
Display the current user:
whoami
Example:
developer
Display the current working directory:
pwd
Example:
/home/developer
Display kernel information:
uname -r
Example:
6.8.0-60-generic
Explanation:
uname — Prints system information.
-r — Displays the kernel release version currently running.
Display operating system information:
cat /etc/os-release
Example:
NAME="Ubuntu"
VERSION="24.04 LTS"
ID=ubuntu
Explanation:
cat — Prints the contents of a file.
/etc/os-release — Stores identification details for the installed Linux distribution.
Understanding the Linux Boot Sequence
Every installation follows the same fundamental startup process.
Power Button
      │
      ▼
BIOS / UEFI Firmware
      │
      ▼
Bootloader (GRUB)
      │
      ▼
Linux Kernel
      │
      ▼
Init System (systemd)
      │
      ▼
System Services
      │
      ▼
Login Manager or Terminal
      │
      ▼
User Session
Each stage is responsible for preparing the system for the next, ensuring hardware is initialized, the kernel is loaded, essential services start correctly, and the user is presented with a working Linux environment.
Project: Install Linux on Your Preferred Platform and Access the Terminal
Choose one installation method:
Bare Metal Installation
Virtual Machine
WSL2
Cloud Instance
Complete the installation and verify it by running the following commands:
whoami
pwd
uname -r
cat /etc/os-release
If each command executes successfully and displays valid information about your system, your Linux environment is correctly installed and ready for practical system administration tasks.
Grab Linux Ebook
https://codewithdhanian.gumroad.com/l/hqtbxt