

Next.js provides a default caching feature called unstablecache that allows you to cache pages, API routes, and even specific components. In this tutorial, you'll learn how to implement caching in Next.js using unstablecache. We'll build an e-commerce application with products data for the demonstration.
Prerequisites
Before you get started with this tutorial, ensure you have meet the following requirements:
Node.js and npm installed.
A code editor or IDE.
Basic understanding of Next.js.
Basic understanding of caching concepts.
Created a new Next.js project:
npx create-next-app@latest my-ecommerce-app.
What is unstable_cache?
The Next.js unstable_cache is a low-level caching API used to cache results of heavy operations like, database queries and reuses these across multiple requests. The reason it's called "unstable" is because it's still an experimental feature; which means its API may change in the future. This feature is enabled by default in Next.js.
Setting Up a Mock Database
First, let’s define a Mock database that will contain some of the products we are going to have in this application. Create a new folder named lib in the src folder. Inside the lib folder, create a new file called db.js and add the following code snippets:
class MockDB {
  constructor() {
    this.products = new Map();
    this.categories = new Map();
    this.users = new Map();
  }

  async getProduct(id) {
    return this.products.get(id);
  }

  async getCategory(id) {
    return this.categories.get(id);
  }

  async getUser(id) {
    return this.users.get(id);
  }

  initialize() {
    this.products.set('1', { id: '1', name: 'Laptop', price: 999.99, category: '1' });
    this.products.set('2', { id: '2', name: 'Smartphone', price: 499.99, category: '1' });
    this.categories.set('1', { id: '1', name: 'Electronics' });
    this.users.set('1', { id: '1', name: 'John Doe', email: '[email protected]' });
  }
}

const db = new MockDB();
db.initialize();
export { db };
Here, we have defined a class called MockDB that imitates the idea of a simple in-memory database by using JavaScript's Map object to hold mock data. It has three collections – products, categories, and users, all created with Map. The collections are accessed by asynchronous methods: getProduct, getCategory, and getUser, which let us get respective data by ID. It then uses the initialized method to put some sample data into the database.
In this setup, we directly set the data within the
initializemethod. This way, the application testing is faster without a database or external API. This should be changing for production because such data will be pulled from an external database or API. For instance these real wolrdinitializemethods would actually be where data is pulled from the back-end service or pulled locally from a database, something like the following:async initialize() { const products = await fetchProductsFromAPI(); const categories = await fetchCategoriesFromAPI(); const users = await fetchUsersFromAPI(); products.forEach(product => this.products.set(product.id, product)); categories.forEach(category => this.categories.set(category.id, category)); users.forEach(user => this.users.set(user.id, user)); }
Next, create a new file called data.js in the lib folder. In this file we're going to declare three asynchronous functions: getProduct, getCategory, and getUser. All of these functions will introduce some network latency using setTimeout, then call the method on the db instance to retrieve the needed data. Add the following code in the data.js file.:
import { db } from './db';

export async function getProduct(id) {
  // Simulate network latency
  await new Promise(resolve => setTimeout(resolve, 100));
  return db.getProduct(id);
}

export async function getCategory(id) {
  await new Promise(resolve => setTimeout(resolve, 100));
  return db.getCategory(id);
}

export async function getUser(id) {
  await new Promise(resolve => setTimeout(resolve, 100));
  return db.getUser(id);
}
Implementing Caching with unstable_cache
Now, let's use unstable_cache to reduce lag on data fetching and take the performance of our application to a whole new level. Next, update lib/data.js so it adds cached versions of the functions we defined above:
import { unstable_cache } from 'next/cache';
import { db } from './db';

// ... the previous functions goes here

export const getCachedProduct = unstable_cache(
  async (id) => {
    console.log(`Fetching product ${id} from database`);
    return getProduct(id);
  },
  ["product"],
  { revalidate: 60 }
);

export const getCachedCategory = unstable_cache(
  async (id) => {
    console.log(`Fetching category ${id} from database`);
    return getCategory(id);
  },
  ["category"],
  { revalidate: 300 }
);

export const getCachedUser = unstable_cache(
  async (id) => {
    console.log(`Fetching user ${id} from database`);
    return getUser(id);
  },
  ["user"],
  { revalidate: 3600 }
);
In the above code snippet, we created getProduct, getCategory, and getUser functions that uses unstable_cache from Next.js. This puts the results from these in the cache, and if the same data is requested once more, it retrieves it from the cache. We added console logs for testing purposes (to know when data is from the database or cache).
Now, each cached function is set for a certain period of revalidation using revalidate, which configures how long it will remain in the cache before refreshing it. We use 60 seconds for products, 5 minutes for categories, and 60 minutes for users. You can use any number you want.
Creating E-commerce Components
Now let's create a Product component to use the cached functions. Create a component folder in the src directory. In Component folder, create a new file named Product.js and add the code snippets below:
import { getCachedProduct } from '../lib/data';

export default async function Product({ id }) {
  const product = await getCachedProduct(id);

  if (!product) {
    return <div>Product not found</div>;
  }

  return (
    <div>
      <h2>{product.name}</h2>
      <p>Price: ${product.price}</p>
    </div>
  );
}
This code imports and initializes the getCachedProduct to get a product from the database. It checks if a product is found for that specified id is available, Then renders the product details.
Next, create a components/Category.js file and add the code snippet below:
import { getCachedCategory } from '../lib/data';

export default async function Category({ id }) {
  const category = await getCachedCategory(id);

  if (!category) {
    return <div>Category not found</div>;
  }

  return (
    <div>
      <h2>{category.name}</h2>
    </div>
  );
}
This component will render the product category for the specified id.
Finally, create a components/User.js for the User component to render the user details. Add the code snippet below:
import { getCachedUser } from '../lib/data';

export default async function User({ id }) {
  const user = await getCachedUser(id);

  if (!user) {
    return <div>User not found</div>;
  }

  return (
    <div>
      <h2>{user.name}</h2>
      <p>Email: {user.email}</p>
    </div>
  );
}
Creating Pages to Test Caching
We'll need to create pages to use the components we defined earlier to render the products to the end users. Update the app/page.js file to use the components we created:
import Product from '../components/Product';
import Category from '../components/Category';
import User from '../components/User';

export default function Home() {
  return (
    <main>
      <h1>E-commerce App with Caching</h1>
      <Product id="1" />
      <Category id="1" />
      <User id="1" />
    </main>
  );
}
Testing the Cache
To test the cache functionality, change directory into the project folder and run the application with the command below:
npm run devWhen you run the application for the first time, it will fetch the data from the database by showing the logs as shown in the screenshot below:
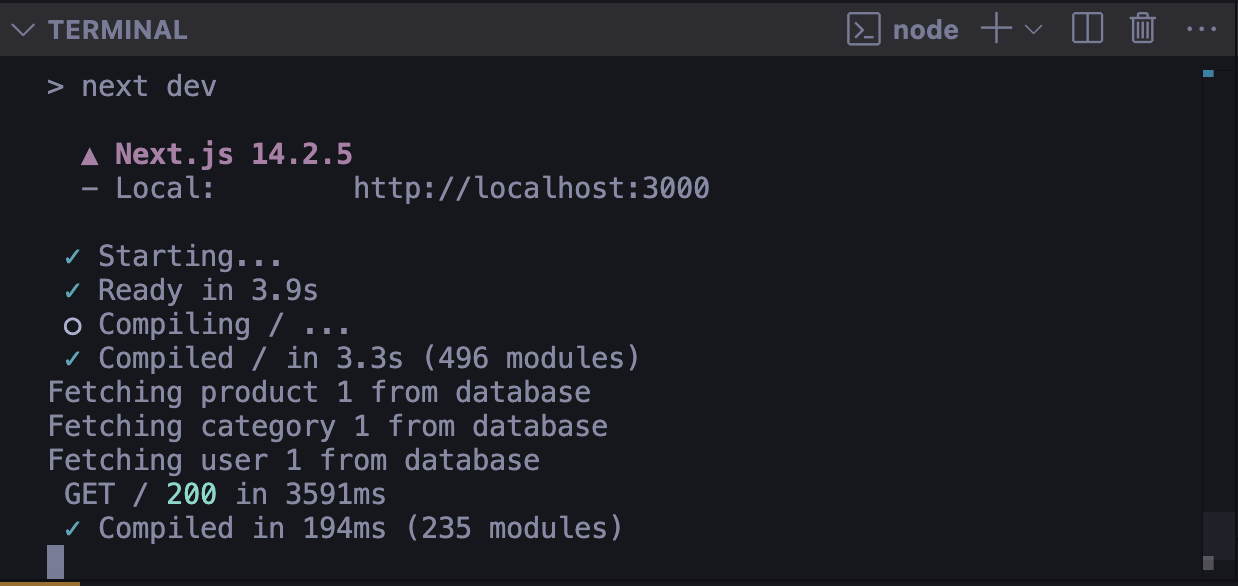
Then when you make another request by refreshing the browser, it will fetch from the cache for the next 60 seconds depending on the time you specified. This time the log will not show again because the data is now from the cache.

Best Practices
Here are some best practices to keep in mind when using unstable_cache:
The revalidate intervals should be changed depending on how often the data, on which the form is based, is changed. For example, the revalidate interval for dynamic data needs to be less compared to relatively less dynamic data to stay up-to-date and fast.
Store data in the cache when it involves access to large databases or frequently called APIs. This helps to reduce additional database calls and enhances performance.
Set the expiry time or cache time. Set this depending on how frequently the content is changed.
Testing caching should include network delay to have more realistic life conditions in the test. That way, one can control the caching logic to cope with the problem of delay and the best handling of data in production.
Avoid embedding the caching logic into business logic by calling
getCachedProductas a helper function. Not only is the code more manageable, but any change in caching technique can also be made easier.
Conclusion
Next.js caching with unstable_cache provides a high performance boost by saving your application from many server requests, ensuring a good user experience. By caching results of heavy database queries and reusing them across multiple requests, you will avoid redundant database queries, thereby ensuring the fast rendering of data to the user.
To learn more about the unstable_cache visit the the Next.js documentation.