
NOTE: there are now downloadable PDF device-specific user guides hosted here.
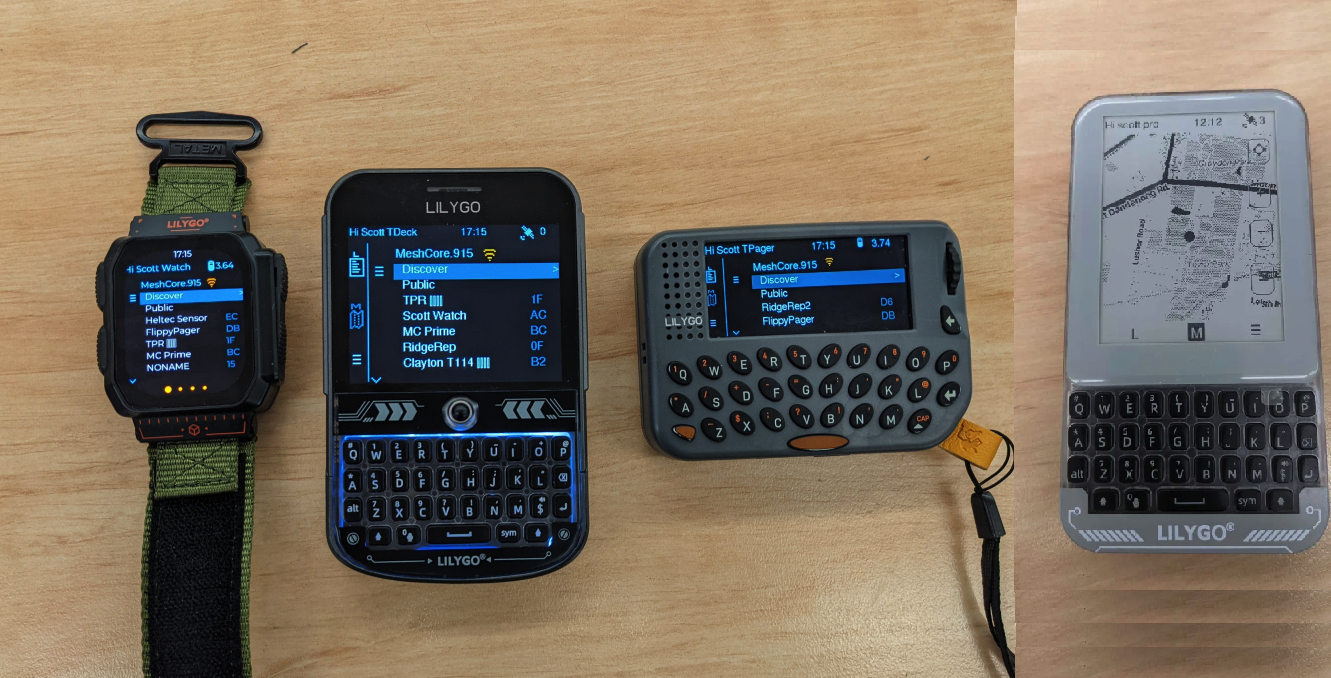
The Ultra firmware (now for T-Deck, T-Deck Pro, T-Pager, T-Watch, and T-Display Pro) has gone through a lot of updates, and once again I'm realising there isn't any single guide that has all the current tips and tricks all in the once place.
Download and Flashing
By far the easiest way to get the firmware and install (ie. flash), is to do so via the webflasher at flasher.meshcore.io
You can also download from here (via the links above), and flash using any ESP32 flasher if you know how they work.
Just be aware that there are different firmware types:
There is a '-merged' variant typically for first-time installs (or for recovering corrupted devices), and a non-merged for updating
There is also an '-SD' variant for use with a micro-SD card, which stores all config on SD, and a normal variant which stores all config on internal flash memory.
Initial Help Wizard
The first time you boot up the device, after the splash screen, you should be taken through a quick help wizard which attempts to introduce you to some of the basics of the UI navigation.
For the T-Deck and T-Watch devices, most navigation can be done via taps in the four quadrants (imagine a large X on the screen, and the 4 triangles that makes). Tap in the top or bottom triangles to move current selection up/down. Tap on the left side to navigate back to previous screen, and tap right side to select currently selected item.
For T-Deck Pro, you just tap directly on menu or list items. To scroll up/down a page at a time you do vertical swipe gestures. The navigate back, you tap on the the '<' on the titlebar.
T-Deck also has a trackball, and this can be used for the up/down, back/select navigation. Pressing in the trackball is also the same as select (scroll right).
For T-Pager, you long-press the backspace key to navigate back to previous screen, and use scroll wheel to move selection up down, and click in the scroll wheel to selection currently selected item.
Some screens require the use of an ENTER operation, like to send a message, or to finalise the changes in some setting screen, for instance. For T-Deck and T-Pager, this is simply the Enter key on keyboard. For other devices, like the T-Watch, there is an orange 'O' rendered on screen, which is for ENTER.
Screen On/Off
The screen will automatically turn off after inactivity. (there is a setting to adjust the duration) To turn screen on (or off):
T-Deck: press trackball in (when screen is off). Long-press trackball to turn screen off.
T-Deck Pro*: press the top button on the right edge of the device.
T-Pager: press the middle button on the bottom edge of device.
T-Watch: press the lower-left button.
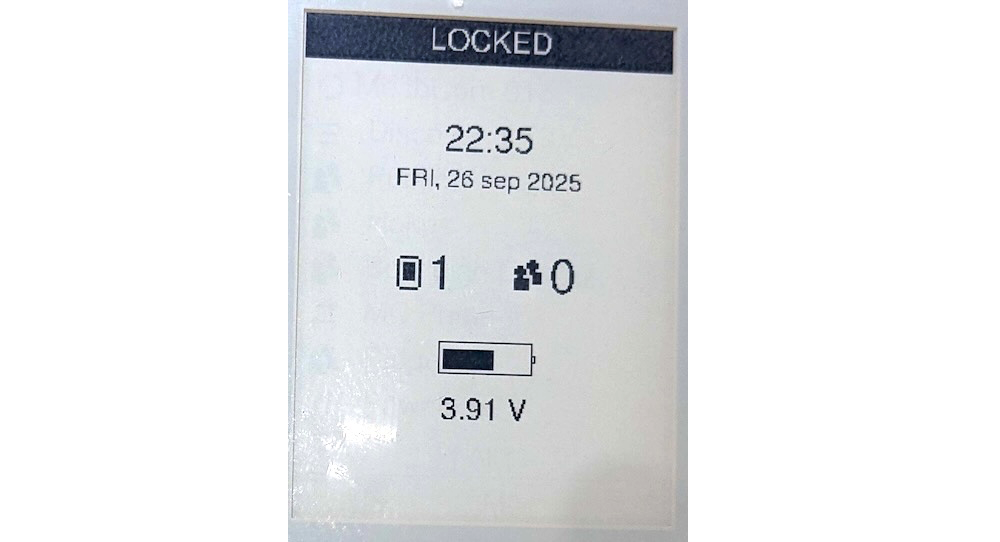
For T-Deck Pro, because it uses an e-paper display, the screen does not turn off, and instead shows a Locked screen:
Turn Device Off
To turn device completely off:
T-Deck: power switch on right side
T-Deck Pro: from home menu, scroll to the bottom and select the 'Shutdown'.
T-Pager: long press the middle button on the bottom edge
T-Watch: long press (about 7 seconds) the top-left button
Home Screen
The home screen has a number of pages it presents, with your main contact list and map as the main two. These vary slightly among the different devices. T-Deck:
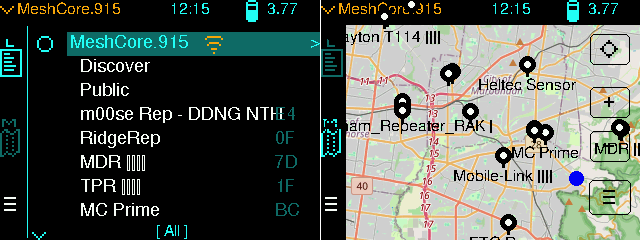 to switch between pages you either tap on the tabs on the left-hand side, or you can press the space key to toggle between them.
T-Watch:
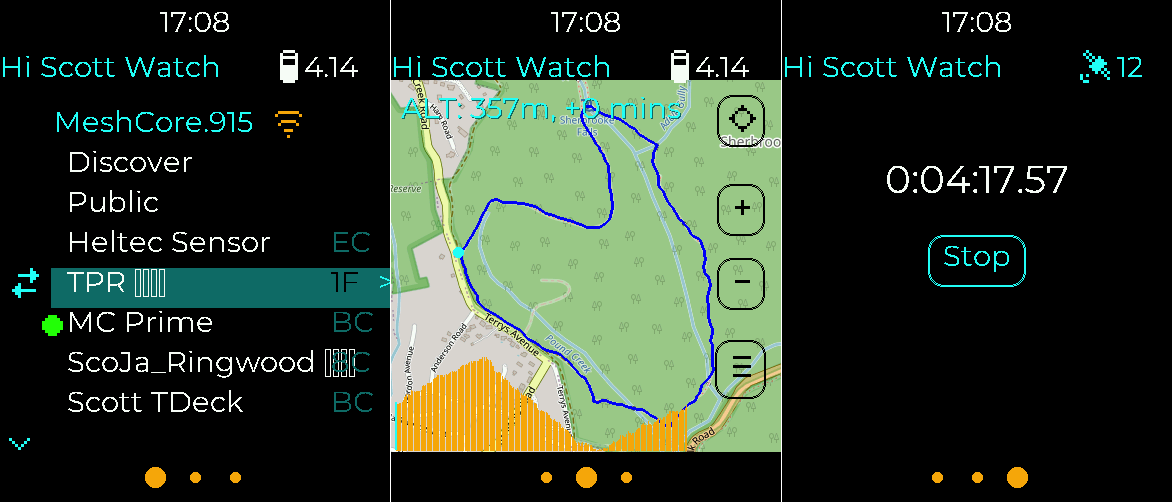 to switch between pages you swipe left/right along the bottom strip (where the orange dots are).
T-Pager:
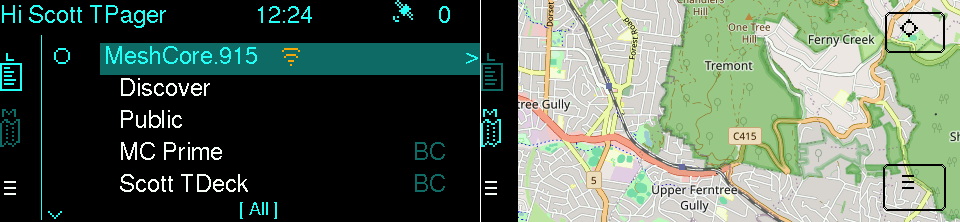 to switch between the pages just press the space key.
T-Deck Pro:
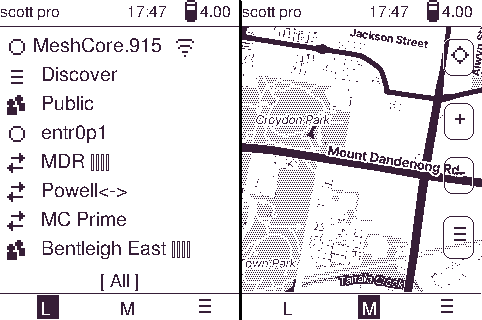 to switch between pages you either tap on the tabs at the bottom, or you can press the space key to toggle between them.
Home - Contact List Page
This shows all the contacts you have added (typically from the Discover screen), all listed below the network profile (eg. the 'MeshCore.915'). There are some fixed items there also, like Discover and items for up to two supported group channels (like the Public one that is auto-created for you).
The cyan label at the bottom (eg. "[ All ]") is the current filter. You can cycle through the various filters, which show just particular contact types, eg. "Clients", "Repeaters", etc. To cycle through the filters:
T-Deck or T-Deck Pro: swipe left/right
T-Pager: use the '.' and ',' keys
T-Watch: swipe left/right (but near middle of screen, not along the bottom strip)
You can also quickly move the selection by pressing keys A-Z (T-Deck or T-Pager). This will select the next contact with name starting with that letter, wrapping around to top of list.
Like any list-based screen, on touch devices, you can swipe up/down to scroll a whole page at a time.
Select or ENTER is then used to navigate into the conversation screen for that contact.
Home - Map Page
This renders map tiles from your SD card, at various fixed zoom levels, also rendering pins showing locations of known contacts/nodes:
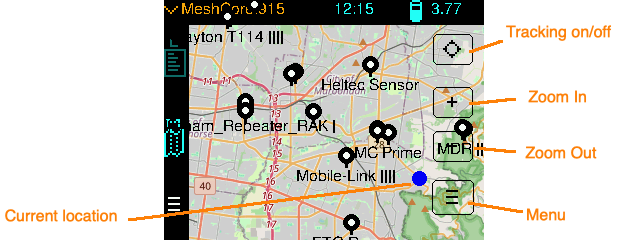
Panning the map:
T-Deck: swipe left/right/up/down
T-Pager: keys: A, D (left, right) W, S (up down)
T-Watch: swipe left/right/up/down (but not along bottom or top strip)
Zooming:
T-Deck/T-Watch: tap on-screen buttons
T-Pager: scroll wheel
The menu button is now for two things, which you select from an on-screen popup: Tracks or to Set Advert Location. For T-Pager, you use the 'T' key to select this.
Home Menu
(NOTE: Tap on the hamburger icon on the home screen to open to home screen menu)
The home screen menu has various settings which you can cycle through by selecting the item (has current value rendered in cyan, at right-hand side), and it has items which take you to various settings screen, like for setting your timezone:
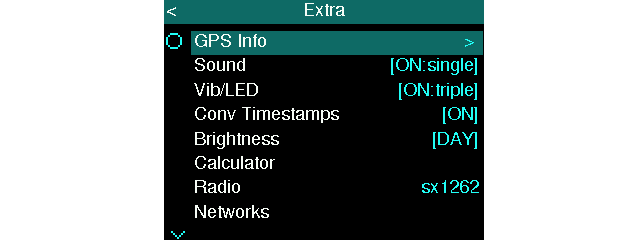 You bring up the home screen menu either with a long-press in the middle section of the screen (for touch devices), or tapping on the hamburger menu in the bottom-left, or for T-Pager long-press the ENTER key.
Networks
The firmware is multi-profile, so you can potentially configure the device for use in multiple mesh networks. The startup wizard will walk you through the setup of the first/main network profile. If you ever need to modify your mesh network config (freq, sf, etc) just open the Networks menu from the home screen menu.
This will list each network profile the device has configured. If you select one, the network profile details screen comes up:
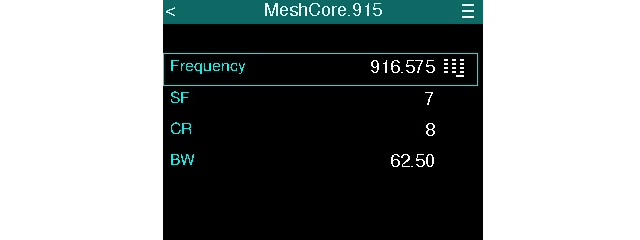 NOTE: you must press the ENTER key to save any changes you make. (and will then need to reboot)
Identity
One of the first things you should do is setup your device identity. Select the network profile (ie. the top of the contacts list) to enter the MeshCore network profile menu:
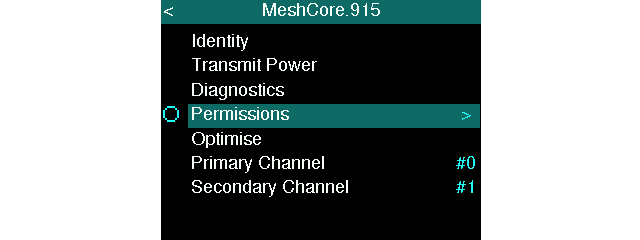 Then select Identity to enter that screen:
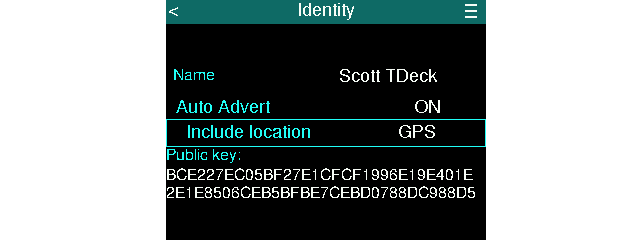 Use the up/down actions to move the focus to the different fields (the cyan box will move, showing selected field). Set some display name you'd like, which others will see when your device sends out adverts.
Auto Advert is a setting, when ON it will broadcast an advert shortly after your device is booted up, and then every 3 hours.
Include location is a setting with one of: None, Manual, or GPS. This is to control how your device location is embedded into advert broadcasts.
Press ENTER to save these details.
Telemetry Permissions
MeshCore supports a feature called telemetry which enables one node to request data about the state of another device. There are currently three broad categories of data Base, Location and Environment.
Base data is usually just the device's battery voltage. Some nodes, like sensors or repeaters, also have environment sensors, and these can be queried remotely.
For the devices like T-Deck, there is just Base and Location data. You can think of Base as just 'hey, are you online?' Obviously, you don't want just anyone to be able to pull this data off your device, so you can set the permissions by selecting the Permissions menu:
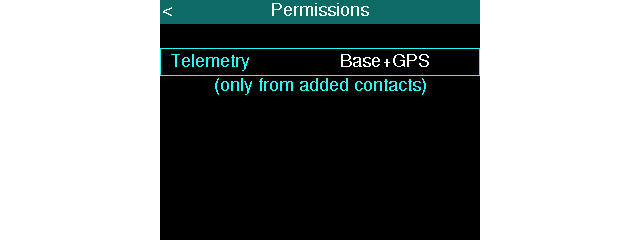 The Telemetry setting has three options: Deny, Base, and Base+GPS. Note that only contacts you have added to your home screen contact list are allowed to request telemetry (all others effectively get the Deny option). But, for your contacts, you can either turn off telemetry responses altogether with Deny, or if you just want your contacts to be able to tell if you are online/reachable then select Base, or select Base+GPS if you also want them to be able to query your GPS location.
Optimisations
Select the Optimise menu for this screen:
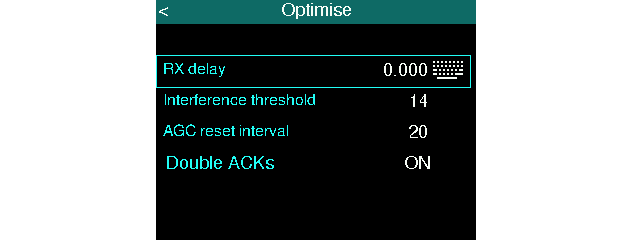
RX delay: this is still an experimental feature, which tries to pick stronger paths over long/weak hop paths. There is still not definitive data on whether this feature is effective yet.
Interference threshold: (db) this is used to try to detect interference in your band, either from other LoRa transmissions or other RF, and causes your packet transmissions to be delayed while the channel is considered busy. The current noise floor is used here, and this value is added. If the current RSSI is greater than this value, the channel is considered busy.
AGC reset interval: (seconds) some LoRa radios have been found to lock up when strong off-band transmissions are received from nearby. This is a workaround for this, and attempts to reset the radio's AGC periodically on this time interval.
Double ACKs: It's quite common to receive a direct message from a contact, but for their device to not receive the ACK(nowledgement). This option will make your device send two ACK packets in rapid fire, in the hope it will increase the chances of it making it back to the sender.
NEW (v7.14+): Contact Tags
This screen is for setting up the custom tags which your contacts can now have attached.
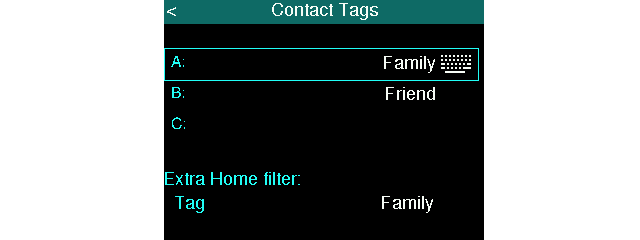 Up to 3 different tags can be defined with a custom label (each label max 9 chars). At the bottom, you can also optionally nominate one tag which will be used to create an extra home screen filter page. In the example above, an extra page will be added that just shows contacts tagged with the "Family" tag.
NOTE: this custom filter is also used for Kid Mode, to select which contacts will feature in the 4 tiles on the home screen.
Discover Contacts
From home, select the Discover item to enter the Discover screen:
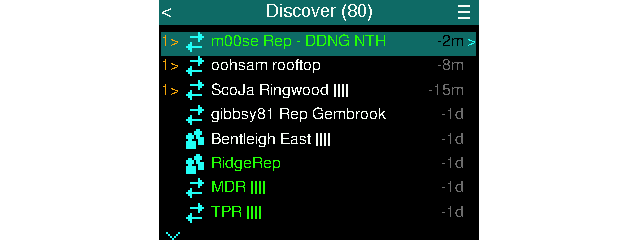 This lists all the devices which your device has heard, via advert packets. The items in green are the ones you have added to your contacts (and will appear on home screen). They are listed in order of most recently heard, and the time since last heard is displayed to the right (eg. -15m is 15 minutes ago).
For adverts heard since your device was rebooted, there is also some extra path information, with the hop count displayed in orange on the left. This additional path info is only held in volatile memory, so is lost when you reboot.
To let others know about your device, you select either the Send ID Local context menu item (which sends zero hop advert), or Send ID Broadcast which sends advert flood mode.
TIP: If you press any of keys A-Z, the selection will jump to the next item with name starting with that letter, wrapping to top if the end is reached.
TIP: you can also swipe up/down to scroll a whole page at a time.
TIP: press space bar to toggle the right-hand column between time last heard, and the node's path hash. (useful for checking if a path hash is already being used in your vicinity)
Select any of the items to get the Node Details:
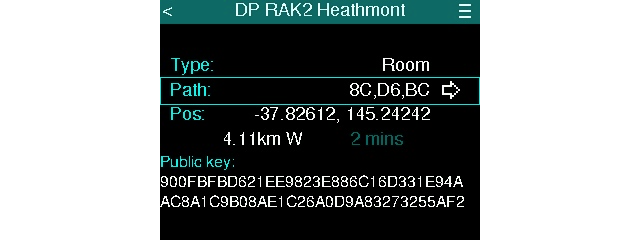 Open the context menu, and select Add to contacts (or 'Remove...' if already in your contacts) if you want this device in your contacts. You can also share this device with another device, typically, if you are with a friend who didn't receive the advert packet, but wants this contact. Select the Share menu, and this will re-transmit the original advert packet, but just to devices in immediate vicinity (called a zero hop transmit). The entry should come up at the top of their Discover screen.
NOTE: the advert may be discarded by devices, if they already have that device in their list and the timestamp encoded in the advert is older than the timestamp already recorded.
You can select (via up/down) either the Path or Pos. Selecting path, will show the path details (ie. which repeaters the advert packet went via to get to your device):
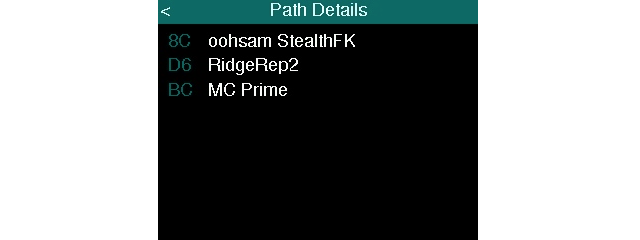 If you select the Pos item (back in the Node Details screen), you will be taken to the Map page with the map centred on the device's advertised position.
NEW (v7.14+): Tags/Notes
There is a new context menu "Tags/Notes..." which brings up this screen:
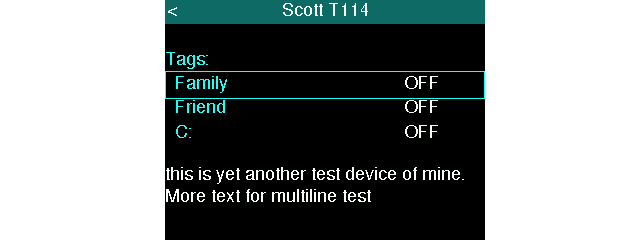 Here you can associate custom tags with this contact, and can edit some free-form notes, which is just saved to this device. (is not transmitted)
Conversations
Select a contact from the home screen to enter the Conversation screens:
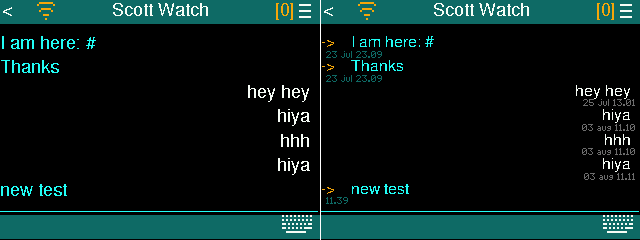 The messages can be rendered in these two modes: with timestamps off, or on. This setting is toggled in the home screen menu, with the Timestamps item. With timestamps on, there is also extra path info rendered in orange for incoming messages. For direct mode messages, the '->' is shown. Otherwise the messages was received flood mode, and the hop count is shown, eg. '4>'
The number in brackets on the top-right is an indicator of the current out-path you have saved for this contact. Eg. [2] means you have a direct path to this contact, and it is 2 hops away. If you have no out-path to this contact (or it has been reset by you), then you will see [?]
TIP: for long messages received, scroll up to the message, and it will automatically be horizontally scrolled.
TIP: use swipe up/down gestures to scroll the messages a page at a time.
PAID FEATURE: When you navigate into the conversation screen, a telemetry request is automatically sent, and if a response is received, the WiFi icon is shown on the top-left, so you can quickly see if they are online and reachable. Also, if they have allowed GPS telemetry permission, their location is recorded and you will see a direction/distance estimation (from your location) rendered in titlebar. You can also select the Show on Map context menu item.
To send a message, just type in the text and press ENTER. You should then see the sending dialog:
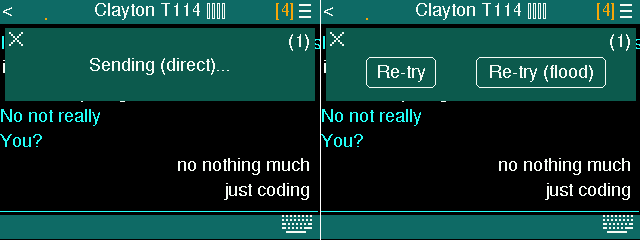 If you currently have a direct out-path to this contact, then it will be attempting a direct path transmit. If the attempt fails, you will see the Re-try options above. You can either re-try the same direct path, or you can opt to Re-try flood mode (which is a short-cut for selecting Reset Path, then trying the send again). The attempt number is in brackets at the top-right, eg. (1). Up to 4 attempts are supported.
If you scroll up to and select a message in the conversation, you will see the message details screen:
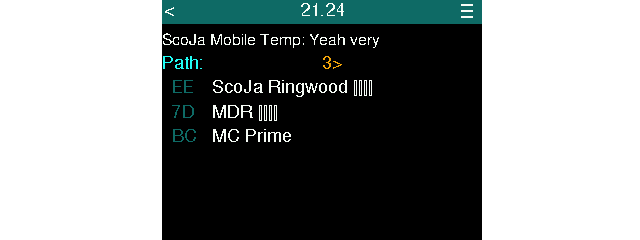 The message timestamp is shown in titlebar, and if the message arrived flood-mode, you can also see the path. If the message text contains a GPS coordinate, there will also be a Show on Map menu.
Group Channels
You can configure up to 4* group channels, from the network profile menu. The Public one is auto-enabled for you, and is configured with a widely known Pre-Shared Key. So, even though all group channel messages are symmetrically encrypted, consider all Public channel activity to be insecure. There is also no way (at present) to authenticate senders in the group channels, so beware. It is just an easy way to interact with others out there.
NEW (v7.14+): you can now configure up to 6 group channels.
You can, however, setup your own custom group channels, with a key that only you and your friends know. This is much more secure, but note that there is still no sender authentication. From the profile menu, select one of the Channel menus, then select Enable from the context menu:
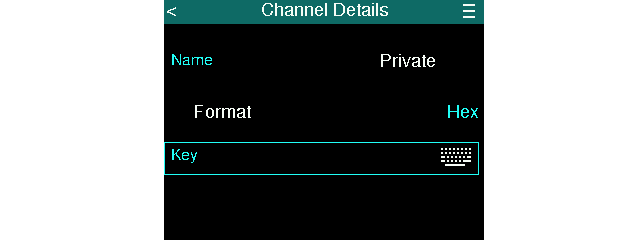 Just give it a name, then enter a key (either in Hex or Base64). If you want a new, random key created for you, just select from the context menu New 128-bit key (or a longer 256-bit one if you prefer). You then share this key with others in your group.
NEW: If you start the channel name with a '#' character, the channel key is generated automatically. These are new hashtag channels, and are an easy way to setup alternatives to the public channel, where they have some specific topic. These are still public channels, and thus insecure, as they will be using a well-known key.
From the home screen, you should then see your private channel listed (under Discover). Just select to go into the group chat screen. One difference with group messages is there are no ACKs sent by recipients, and there is no guarantee that anyone will receive your message! There is a confirmations feature, though, to help indicate if your message did, indeed, get out there. If a repeater forwards your message, and your device hears this re-transmission, then a counter will be displayed in a cyan box:
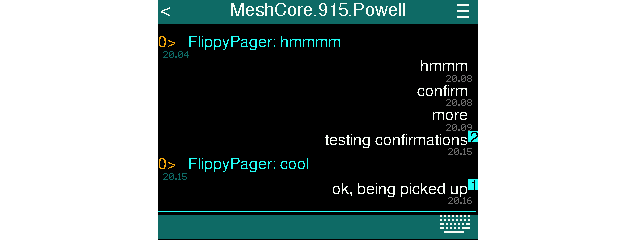 The counter is the number of re-transmissions heard.
NEW: from v7.12 onwards, if you select your message (with the confirmations counter) and navigate to the message details screen, the list will show a "Heard By" list (instead of Path, for incoming messages). ie. it shows the hashes of the repeaters which re-transmitted your message, and the likely matching name of the repeater.
Clipboard Features
From v7.10 onwards, there are now some clipboard operations that are possible. You can copy text to the clipboard from: map tab, identity screen, channel details (key), or message details. You can then paste text from clipboard to: conversation textbox, or channel details (key).
For touch screen devices you just do a long-tap on the text to copy to clipboard (or long-tap on map location, to copy coordinates). For the T-Pager there are extra menu items.
In the conversation screens, you can paste clipboard text to the textbox. For touch devices, you just long-tap on the textbox at the bottom. For T-Pager, when the textbox is selected, long-press the scroll wheel.
Remote Admin and 'Kid Mode'
From v7.11 onwards you can now lock down a device, typically for a child, so that unknown devices cannot contact it. See this article for details.
NEW: Regions and channel message Scope
From v8.2 onwards, you can now set a region Scope on various group chat channels, to limit how far messages you send will flood to. Please see this article for more details.
NEW: Off-grid (client repeat) mode
From v9.1 onwards you can now define an 'off grid' region which will enable client-repeat. See this article for more details.
Rooms
There is a node type called a Room Server, which is a very simple bulletin board system, where you can post messages and others can read them at a later time. Is a very useful store-and-forward system, for leaving messages for others who may be offline. When you select a Room from home screen, you will initially be prompted to enter either the admin or guest password:
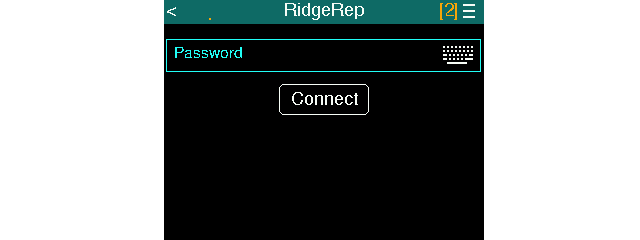 The same out-path rules apply, as with other contacts. So, if you are in a new location, you may need to select the Path menu, then select Reset Path. After tapping Connect (or press ENTER), and login is successful, the screen then changes to the usual conversation UI. (see above)
The room server will then typically be attempting to push unsynced messages to your device. This is quite a slow process, so be patient.
Posting a message is simply a matter of typing and pressing ENTER, like with a contact. If the room server successfully receives and queues the message, it sends an ACK like a client would, and your post will scroll up into the conversation list.
NOTE: at present the room server only holds the last 32 posts, so your device will only receive up to the last 32 missed messages.
PAID FEATURE: if you are the admin of the room server, and you entered the admin password here, you will also be able to enter a second, reserved, area via the Admin CLI menu item. The CLI screen is then entered, where you can instead type CLI commands, like 'ver' or 'set ... ', etc. The command messages are slightly different in that the server does not send ACKs, instead sending a reply message. If no reply comes back, then you just have to re-try sending the command. It's a fairly basic, but powerful feature for doing remote admin on your node.
Repeater Admin - PAID FEATURE
Similar to above, you can login to repeaters remotely. They also support guest and admin passwords, where guests can only get telemetry or request the current stats via the Get Stats menu item. The CLI commands are (mostly) the same as for room servers. See the CLI Reference Document here.
Similar to client contacts, when you navigate into repeater screen (or room server, actually) the same automatic telemetry request is sent. This is really handy and convenient way to quickly check if the repeater is healthy/online, and to get the current battery voltage, which is then displayed in the titlebar.
NEW (v7.13+) - Some CLI commands are now intercepted and a binary request/response is used instead, with the result converted to a nice human-readable format. These include: setperm, neighbors, get, get acl
Sensor Admin - PAID FEATURE
Sensor nodes have a firmware similar to repeater and room server, but specialised for using various sensor hardware attached (like temperature sensor, for instance). Sensor nodes are not intended to be public, however, and instead use a persisted ACL (Access Control List). Initially, this list is empty and the admin must perform a Login using the pre-configured admin password (like with a repeater). After selecting the sensor and navigating into the sensor screen, you initially need to select the Admin Sign Up menu, and enter admin password. If successful you are then shown a command-line interface:
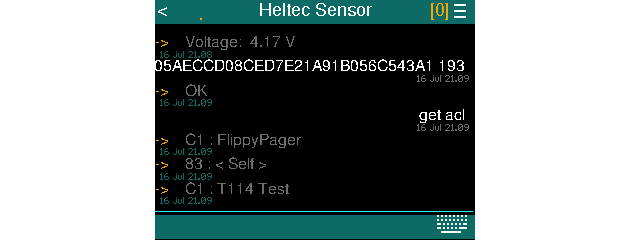 Sensor nodes support the common CLI Commands, but also have extra, sensor-specific commands, which you can get quick info on with the Help menu:
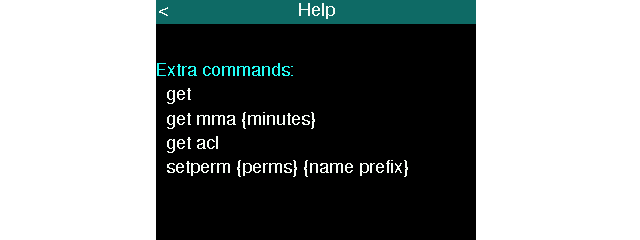 The get command, simply sends telemetry request. (the response is parsed, and sensor values displayed as a text reply).
The get mma command is for min-max-average queries, for the last x minutes.
The get acl command is for showing who currently has access to this node. The list returned will have {permission-bits} : {name}
The setperm command is for adding/updating/removing an entry from the ACL. {perms} is either the numeric permission bits, or for convenience can be letters: a (for Admin), w (for Write), l (want Low pri alerts), h (want High pri alerts)
Permission-bits are:
lower 2 bits: role (1: read_only, 2: write, 3: admin)
middle 4 bits: unused
Bit 6: wants Low pri alerts
Bit 7: wants High pri alerts
To remove a node from ACL, use setperm 0 {name prefix}
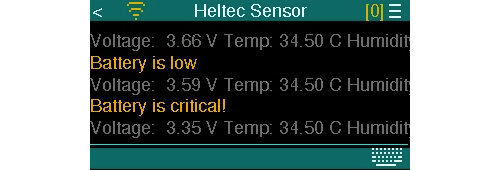
When a sensor node detects some alert condition, it will send alert messages to all devices in its ACL which have the needed Alert permission (Lo or Hi). Low priority alerts will only make 1 send attempt per node, but High priority alerts will wait for an ACK from each node, and re-try. Alerts are also rendered in a special orange so they stand out:
Custom Paths
Each of the conversation/detail screens (for clients, repeaters, rooms, or sensors) should have a Path... menu. Here you can modify the current out-path for this node:
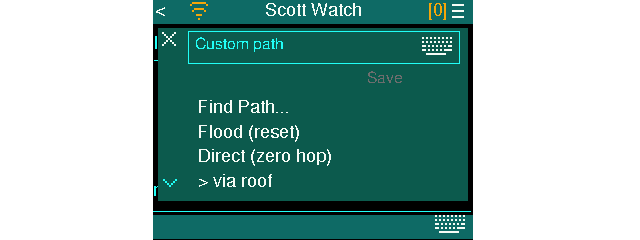 In the custom path textbox you can enter a comma-separated path hash list for completely custom path to use (you need to know the 2-letter path hashes). To save having to re-type you can scroll down to the Save button and assign a name for this path, eg. 'Via roof'. Once saved, you can then re-use them at later times, or for other contacts.
The other quick actions you can do are:
Flood (reset) - this resets the out-path, forcing next sends to be done flood-mode
Direct (zero hop) - sets the out-path to direct, ie. expects node to be in immediate area
Other items in the list will be the various named paths which you have saved, starting with a ">". Select these to re-use a named path.
Map Tiles
You need to obtain raster map tiles, and place them on properly formatted (should be FAT32, max 32Gb) micro SD card. Most problems people have with maps are usually related to the SD card not being compatible, or properly formatted.
There are two tile sets sold here:
The tile sets can be downloaded in a variety of ways, but it is not exactly straight forward. The most popular are the Open Street Maps (OSM) tiles. There is a Python downloader here:
https://github.com/fistulareffigy/MTD-Script
The map tiles must be saved in a popular folder scheme. From the root directory there should be a folder named tiles, and inside this folder should be the various zoom folders, and other folders/files with this scheme:
/tiles/{zoom}/{x}/{y}.png
PAID FEATURE: only map zoom levels 1..9 are rendered on locked devices. The more detailed zoom levels are rendered when unlocked.
For the T-Deck Pro, you need to source black and white map tiles. Refer to this article for help. The T-Deck Pro will first look for map tiles in the /tiles-bw folder of the SD card, and if that doesn't exist then it falls back to looking in the /tiles folder.
GPS Tracks
You can now record and play back GPS tracks, which get rendered on the map page. The dark blue is the track, and the orange graph at the bottom shows the record elevation over time (from left-to-right). You can select any point by tapping on the elevation graph (ie the timeline) and the point is highlighted in cyan on the track and also on the elevation graph. Some point details are also displayed at the top.
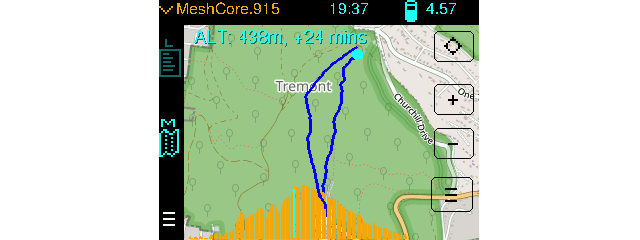 Select the menu button on the bottom-right (or press the T key on T-Pager), then select Tracks from popup. You will then see the Tracks screen, which lists all the saved tracks:
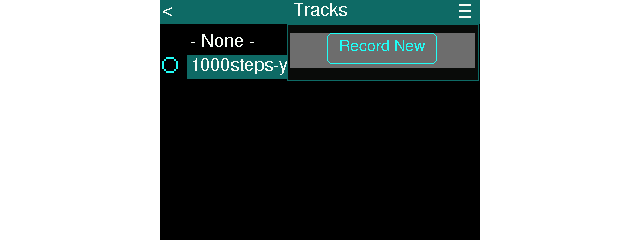 To record a new track just select the menu above. The map page will then be shown, with the blue dot flashing to indicate a track recording is in progress. As you move around, the GPS lat/lon/altitude data is recorded, along with timestamps. You can safely navigate to other screens, and the track recording will be done in the background.
NOTE: the tracks will capture a GPS lat/lon/alt when you have moved at least 15 meters and at least 10 seconds has elapsed since last capture. This is hard-coded for now, but may be configurable in the future.
To stop the recording, just tap the menu button in the bottom-right of map, then select Stop Track from the popup. If you navigate into the Tracks screen again, you should see the new track file listed. The filename will just be the date/time of the recording. If you scroll down and select the file, you should see the track details screen:
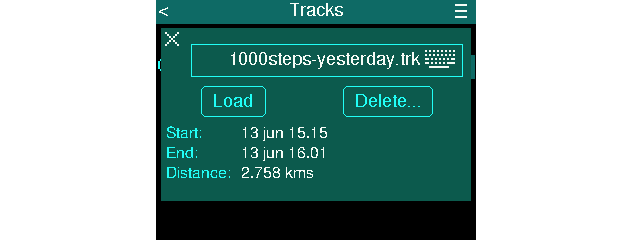 You can rename the file by typing into the textbox at the top, then pressing ENTER.
To view the track, just tap the Load button. And Delete button to delete the track.
If you want to remove the loaded track from being displayed on the map tab, just navigate back into the Tracks screen, and select the top - None - item.
PAID FEATURE: locked devices will only record up to 64 GPS points, so you can see how it works. But, for much larger tracks you will need to unlock.
Currently, you need to be using the '-SD' variant of the firmware (the one which stores all config on the SD card) if you want to share or import/export tracks. If you remove the SD card, and access using your computer, just go to the /ripple/trk folder of the card, and the files are there.
A contributor has written an online converter, so you can convert the .trk files to KML.
Custom Sounds (T-Deck Only)
You can put custom .mp3 files onto the micro-SD card (must be in the root folder!), and these will be played instead of the stock sounds. They must be named as so:
alert.mp3 - for new message alerts
startup.mp3 - for the sound played on bootup
new-advert.mp3 - played when an advert is received from a new node
existing-advert.mp3 - played when advert is received from a node you already know
Trouble Shooting
GPS: One common issue is the GPS module not having the correct baud rate setting. If you are not getting any satellites (ie. showing '0' on top-right of home screen), then go into the home screen menu, then select GPS Config and try setting the baud rate to either 38400, or 9600. These are the two most common. If you go into the GPS Info screen, you should see the Sentences counter increasing if the GPS module is now successfully getting data. (It still may take a while, though, until it acquires satellites)
Other: There is an FAQ on the github site, which may be of help:
https://github.com/meshcore-dev/MeshCore/blob/main/docs/faq.md