

 🇪🇸
🇪🇸 ⚠️ Legal disclaimer: This content is for educational purposes only. Modifying firmware on telecommunications devices may violate your ISP contract and local regulations. Check applicable laws before replicating this process. The author assumes no responsibility for equipment damage or legal and contractual consequences.
Entel Chile has a reasonably decent business internet plan. Static IP included, stable latency — things that Movistar's residential plans treat as luxury features. The catch: the Huawei ONT the technician brought to install is, technically speaking, a black box that answers to the ISP and nobody else.
I asked the technician to put it in bridge mode. He looked at me like I'd asked him to make espresso. I called Entel support. They sounded professional until I mentioned bridge mode, at which point the conversation shifted to the friendly tone of "that feature isn't available for business or residential customers."
Right. If the official path is blocked, there's always the other one.
The discovery: SFP GPON transceivers
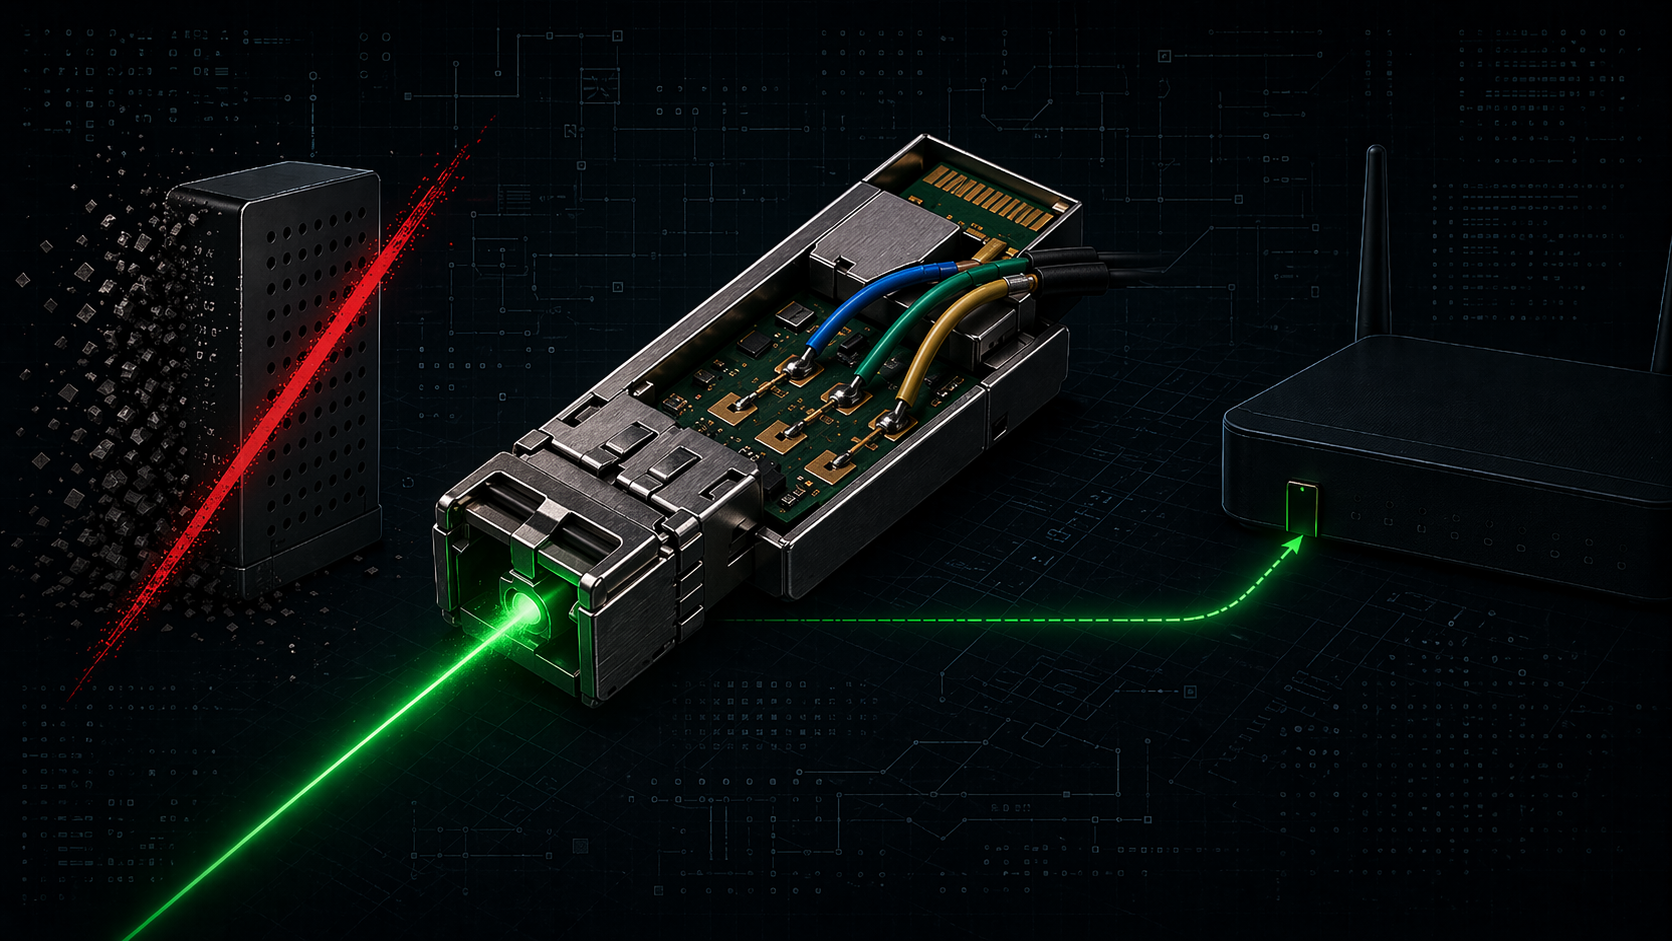
Researching alternatives, I found SFP transceivers that function as miniONTs: compact SFP-form-factor devices you insert directly into your router's slot that negotiate with the ISP's OLT without a separate ONT.
The candidate: Ubiquiti UFiber UF-Instant. An SFP miniONT based on the Realtek RTL9601CI chipset. Out of the box it only works with Ubiquiti's UFiber infrastructure — vendor lock-in inside vendor lock-in, charming — but the hack-gpon.org community had already documented how to liberate these devices. stich86's repository had a modified rootfs built specifically for this stick. The task was to install it correctly and configure the GPON identity so Entel's OLT would accept it as if it were the original Huawei ONT.
Required hardware
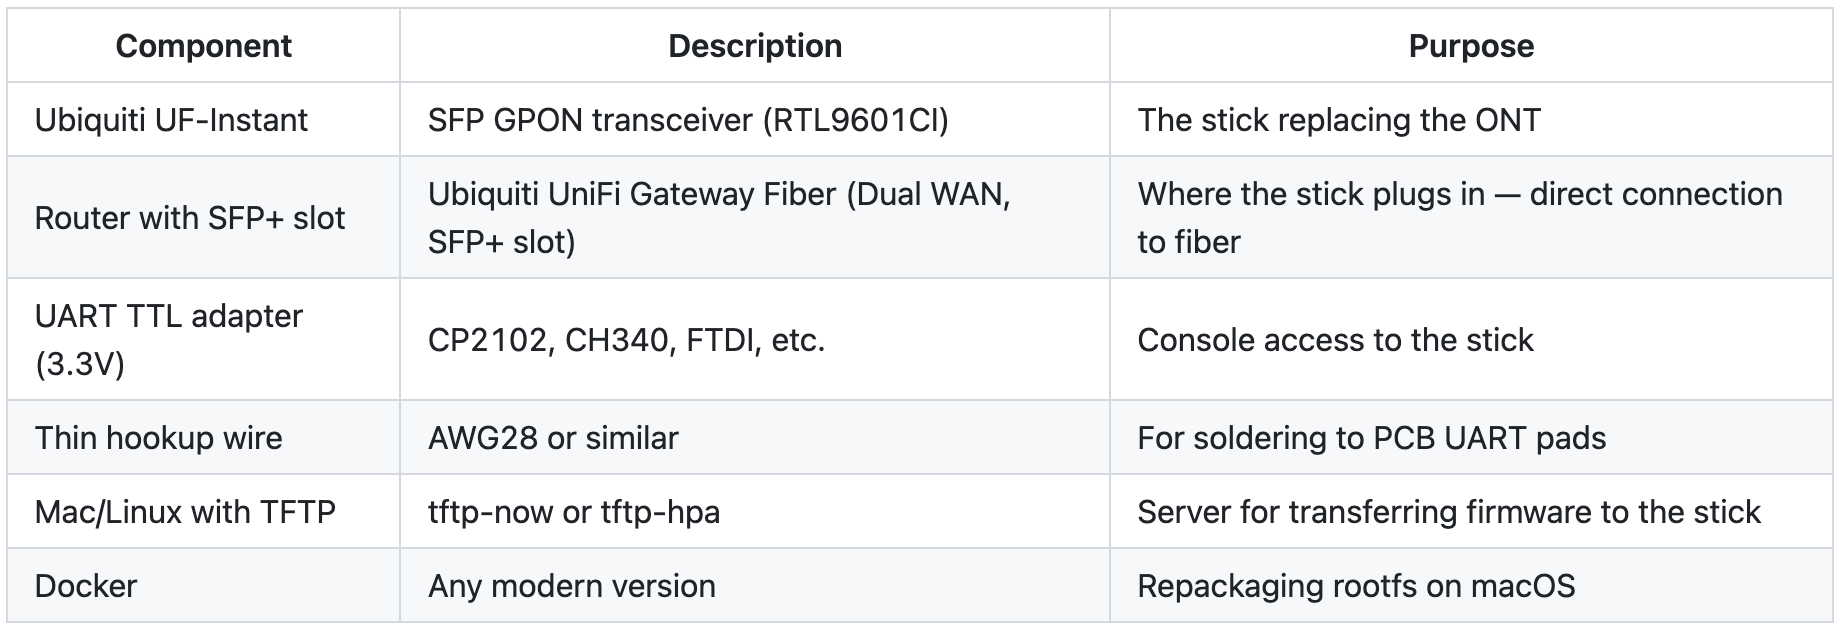 ⚠️ The UART TTL adapter must be 3.3V — non-negotiable. The UF-Instant hardware doesn't tolerate 5V. 5V burns it.
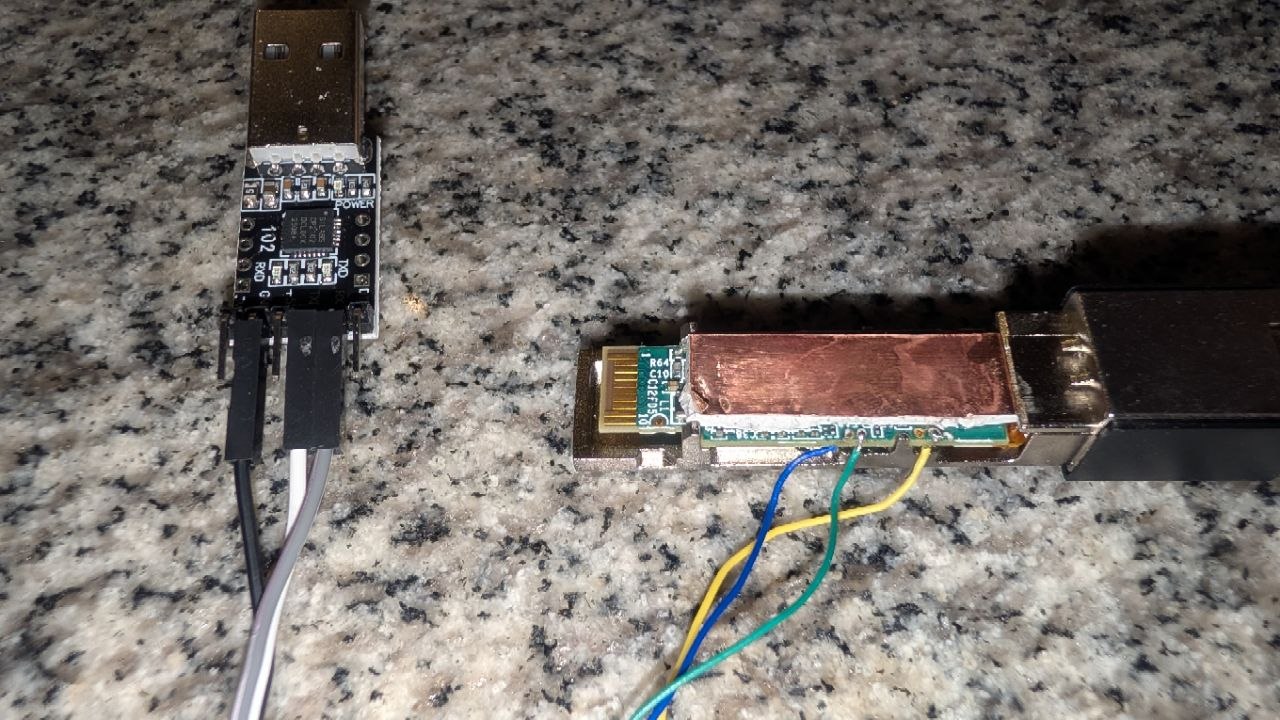
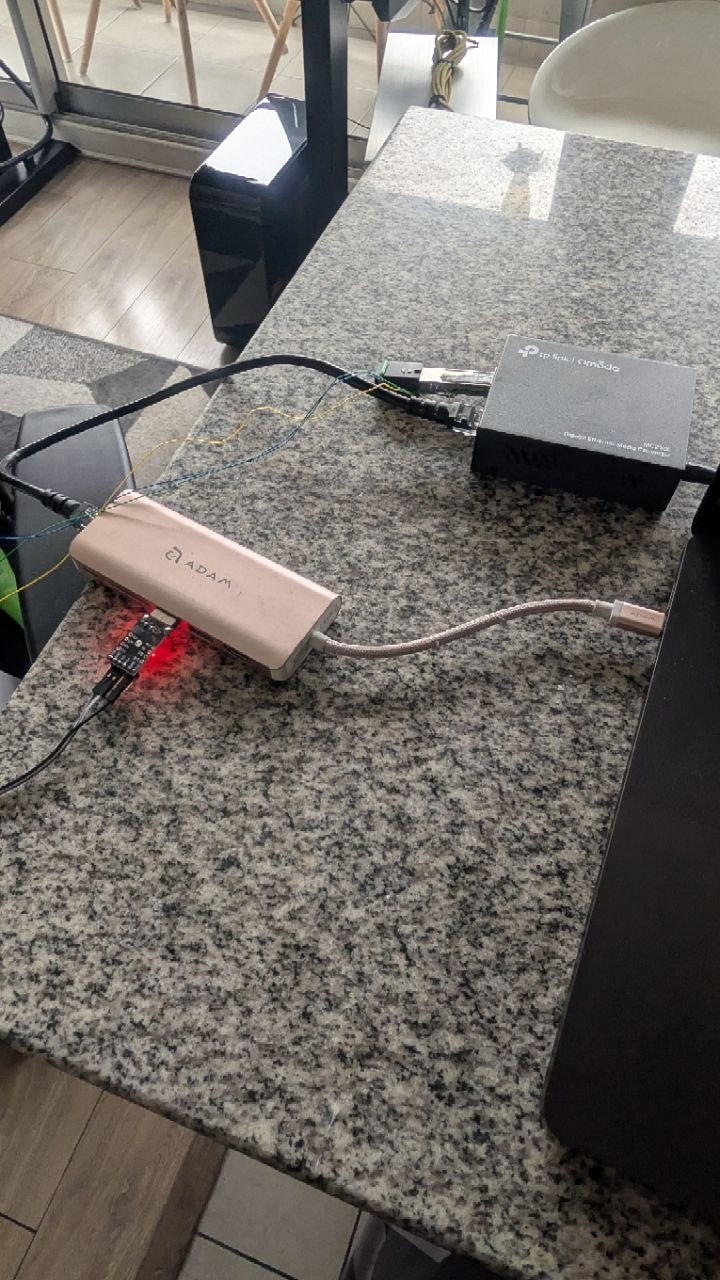
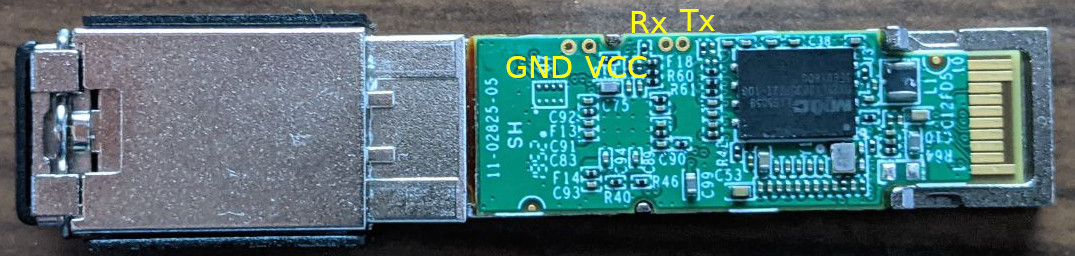 Source: stich86/UF-Instant-Mod — all credits to the original author.
UF-Instant internals: the map before you touch anything
The UF-Instant runs Linux on the RTL9601CI chipset. Its SPI flash has ten partitions, but these are the ones that matter:
mtd0  →  U-Boot (256KB)      — Bootloader. Never touch this.
mtd1  →  U-Boot env 1 (8KB)  — Boot variables (sw_active, sw_commit, bootlimit)
mtd2  →  U-Boot env 2 (8KB)  — Variable backup
mtd3  →  /var/config (240KB) — Persistent config ⚠️ erased when flashing a new image
mtd4  →  kernel0 / k0 (3MB)  — Image 0 kernel — original Ubiquiti, our fallback
mtd5  →  rootfs0 / r0 (6MB)  — Image 0 rootfs — original Ubiquiti firmware
mtd6  →  kernel1 / k1 (3MB)  — Image 1 kernel — where the cloned kernel goes
mtd7  →  rootfs1 / r1 (4.5MB)— Image 1 rootfs — where stich86's MOD goes
mtd8  →  europa.data         — Laser calibration ⚠️ DEVICE-UNIQUE, NEVER TOUCH
mtd9  →  sec                 — Original Ubiquiti firmware parameters
The dual boot system:
nv getenv sw_active sw_commit   ← check which image is active

sw_active=0 + sw_commit=0  →  boots mtd4 (kernel0) + mtd5 (rootfs0)
sw_active=1 + sw_commit=1  →  boots mtd6 (kernel1) + mtd7 (rootfs1)
The strategy: image 0 stays untouched as an emergency fallback. Everything goes into image 1. If something goes wrong, a setenv sw_active 0 from U-Boot brings the stick back to life.
⚠️ Never touch mtd8. It holds the laser calibration data, written at the factory, unique to each device. Erasing it permanently bricks the stick with no recovery path.
UART access: the console for everything
Everything runs over UART. No web interface, no app, no workaround.
The UF-Instant exposes UART pads on the PCB:
UART TTL adapter (3.3V)   →   UF-Instant PCB
Adapter TX                →   Stick RX pad (marked RX or R)
Adapter RX                →   Stick TX pad (marked TX or T)
Adapter GND               →   Stick GND pad (marked GND or G)
Serial port setup on the host:
# macOS
screen /dev/tty.usbserial-XXXXX 115200

# Linux
screen /dev/ttyUSB0 115200

# With minicom (more stable for long sessions)
minicom -D /dev/ttyUSB0 -b 115200 -8 --noinit
Parameters: 115200 baud, 8 data bits, no parity, 1 stop bit (8N1).
When you power on the stick with UART connected, the terminal shows the full U-Boot output. Press any key in the first few seconds to interrupt boot and land at the U-Boot prompt (9601C#). From there you can flash partitions directly using sf (SPI Flash) commands.
The execution: flash, spoofing, and O5
Everything runs over UART. No web interfaces, no apps, no magic. A serial terminal, the U-Boot bootloader, and Linux commands.
What to prepare on the host before starting
You need these files ready in the TFTP server directory:
The MOD rootfs downloaded directly from stich86/UF-Instant-Mod — the squashfs binary as-is, unmodified
uImage_ubiquiti_v4.4.2— the original Ubiquiti v4.4.2 kernel (in theOriginal Firmwares/v4.4.2.1248folder in the same repo)
And a TFTP server running on the host. On macOS:
# With tftp-now (simpler)
sudo tftp-now

# Or with macOS native TFTP
sudo launchctl load -F /System/Library/LaunchDaemons/tftp.plist
# Files must be in /private/tftpboot/
The stick and host must be on the same network. The host IP is what you'll use in U-Boot's tftpboot commands.
When do you need Docker? Only if you're modifying the rootfs: extracting it with
unsquashfs, making changes, and repacking. On macOS,mksquashfscan't recreate device nodes (/dev/console,/dev/null, etc.) without explicit parameters, which leaves the rootfs unbootable. If you're using stich86's binary as downloaded, flash it directly — no Docker needed.
Step 1: Flash kernel and rootfs via UART (U-Boot)
Connect UART. Power on the stick. Interrupt the boot as soon as U-Boot's countdown appears (press any key). You'll land at the 9601C# prompt.
Initialize the SPI flash controller:
sf probe 0Flash the kernel to image 1 (mtd6 — address 0x4e0000, size 3MB):
The Ubiquiti v4.4.2 kernel is already in image 0 (mtd4). You can clone it directly to image 1 without TFTP:
# Read kernel0 entirely into RAM (3MB from 0x50000)
sf read 0x81000000 0x50000 0x300000

# Erase kernel1 and write the clone
sf erase 0x4e0000 0x300000
sf write 0x81000000 0x4e0000 0x300000
Alternatively, transfer it via TFTP:
tftpboot 0x81000000 [HOST_IP]:uImage_ubiquiti_v4.4.2
sf erase 0x4e0000 0x300000
sf write 0x81000000 0x4e0000 ${filesize}
Flash the MOD rootfs to image 1 (mtd7 — address 0x7e0000, size 4.5MB):
# Transfer the rootfs directly from TFTP server
tftpboot 0x81000000 [HOST_IP]:[stich86_rootfs_filename]

# Erase rootfs1 and write the MOD
sf erase 0x7e0000 0x480000
sf write 0x81000000 0x7e0000 ${filesize}
Activate image 1 as the boot image:
setenv sw_active 1
setenv sw_commit 1
saveenv
boot
The stick boots with stich86's MOD on image 1. If boot fails, return to U-Boot and run setenv sw_active 0 && setenv sw_commit 0 && saveenv && boot to fall back to image 0 with the original firmware intact.
Step 2: Configure GPON identity from Linux (UART)
Once the stick boots with the MOD, connect UART to the Linux system (credentials: admin/admin — some builds use ubnt/ubnt). Configure identity spoofing using the data from your original Huawei ONT:
# === GPON IDENTITY — replace with your actual Huawei ONT data ===

# GPON serial format is HWTC + 8 hex characters
# Find it on the ONT label or in its web interface under "GPON SN"
flash set GPON_SN HWTC[XXXXXXXX]

# Vendor ID is always HWTC for Huawei equipment
flash set PON_VENDOR_ID HWTC

# OMCI mode: 1 = compatible with Huawei OLT
flash set OMCI_OLT_MODE 1

# OMCI_FAKE_OK: stick responds OK to OLT OMCI messages
flash set OMCI_FAKE_OK 1

# ONT software version — "SW Version" field in ONT interface
flash set OMCI_SW_VER1 [ONT_SW_VERSION]
flash set OMCI_SW_VER2 [ONT_SW_VERSION]

# ONT hardware version — "HW Version" field
flash set HW_HWVER [ONT_HW_VERSION]

# ONT model — "Device Model" or "Product Model" field
flash set GPON_ONU_MODEL [ONT_MODEL]

# ONT MAC — no colons, all uppercase (e.g. 803C2089B104)
flash set ELAN_MAC_ADDR [ONT_MAC_NO_COLONS]
Step 3: Neutralize the bootlimit
The original Ubiquiti firmware in image 0 has bootlimit=10 by default. This variable causes U-Boot to erase mtd3 and attempt TFTP recovery if the stick fails to boot 10 times in a row. Prevent it from interfering:
nv setenv bootcount 0
nv setenv bootlimit 0
Step 4: Reboot and verify GPON state
rebootAfter reboot, from UART (Linux):
# Target: O5 = Operation State = OLT accepted the stick as a valid ONT
diag gpon get onu-state
# Expected: ONU state: Operation State(O5)

# Confirm OLT recognized the correct vendor
omcicli mib get 131
# OltVendorId: 0x48575443  ← HWTC in ASCII = Huawei/Entel Chile ✓

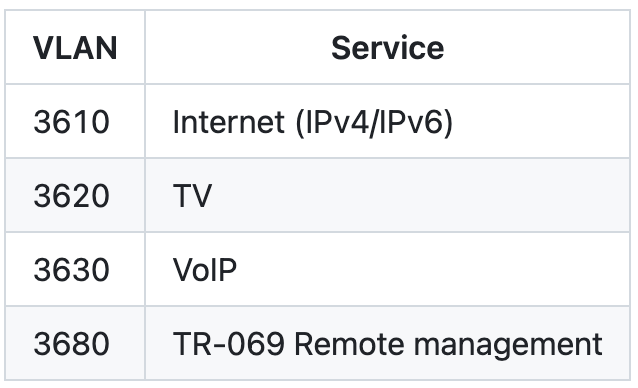
# VLANs automatically provisioned by the OLT
omcicli mib get 84
VLANs provisioned by Entel Chile's OLT:
Step 5: Configure the Ubiquiti UniFi Fiber router
With the stick at O5 and the OLT recognizing it:
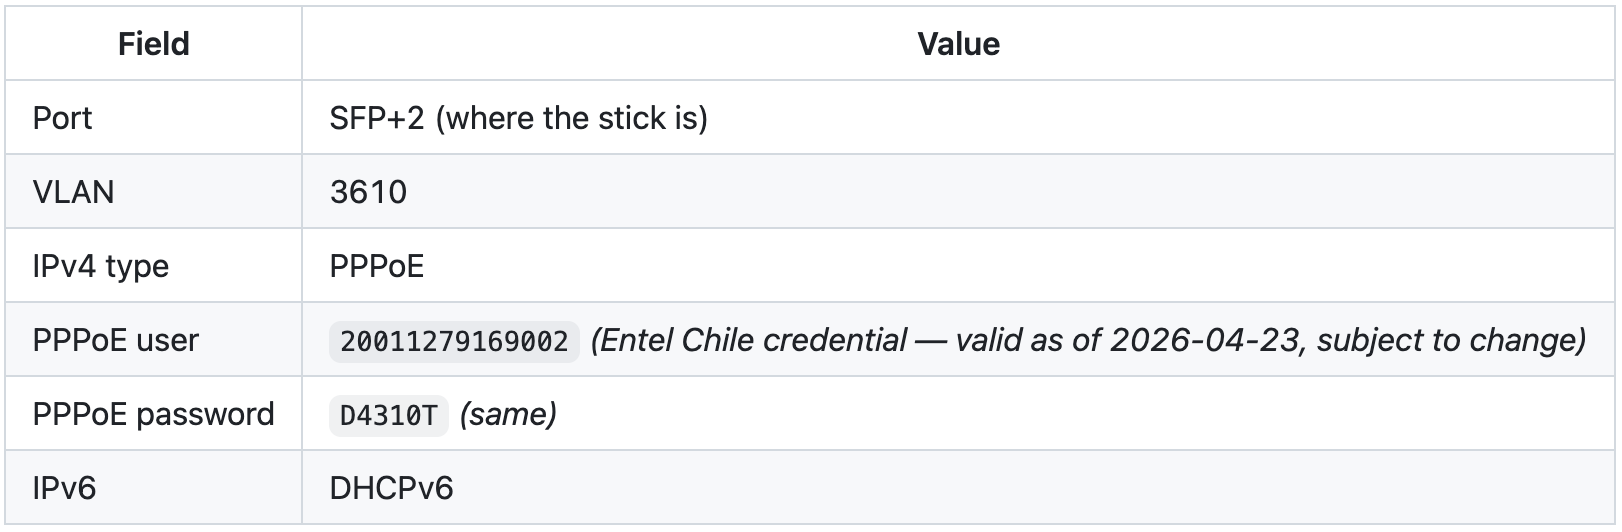 Where did these come from? From the kind of corner where installation data surfaces for those who know where to look. Tested on 2026-04-23. Worked. Entel can rotate them whenever.
🎥 The official Entel modem farewell ceremony
The road to get here: the mistakes that cost days
This section isn't necessary to replicate the process. It's an honest record of how I arrived at the solution and why it took longer than it should have.
The first mistake: reading instructions halfway
stich86's documentation said to flash the MOD rootfs to mtd5 (rootfs0). What I did was also flash mtd4 (kernel0), leaving image 0 without a valid kernel.
The result:
Wrong Image Format for bootm command
ERROR: can't get kernel image!
TFTP recovery: From U-Boot (accessible via UART even with a corrupted image), I configured the TFTP server on the Mac and restored the original binaries from the Original Firmwares/v4.4.2.1248-550.220304.1317/extracted/ directory in stich86's repo:
# In U-Boot via UART
sf probe 0

tftpboot 0x81000000 [HOST_IP]:uImage     # original kernel
sf erase 0x50000 0x300000
sf write 0x81000000 0x50000 0x300000

tftpboot 0x81000000 [HOST_IP]:rootfs     # original rootfs
sf erase 0x1e0000 0x4b0000
sf write 0x81000000 0x1e0000 0x4b0000

setenv sw_active 0
setenv sw_commit 0
saveenv
reset
UF-Instant's predefined U-Boot commands simplify this:
run upk   # flashes uImage to mtd4
run upr   # flashes rootfs to mtd5
Stick came back to life. Lesson: read everything before executing anything.
Attempt 1: stich86 MOD + MC220L = kernel panic
The stich86 MOD rootfs installed on image 1. Stick booted. But when I plugged ethernet into the TP-Link MC220L (which I was using as a media converter for ethernet access), kernel panic:
Modules linked in: europa_drv(P) igmp_drv pf_rtk omcidrv
Kernel panic - not syncing: Fatal exception in interrupt
The europa_drv (the optical laser driver) crashed when receiving link-up interrupts from the MC220L. Bug documented in issue #24.
Attempt 2: V-SOL V2801F rootfs
The V-SOL V2801F is another RTL960x device with a more open firmware. In theory, its rootfs should be hardware-compatible with the UF-Instant.
In practice:
cat /proc/kmsg | grep -i pon    # nothing
lsmod | grep europa             # empty
cat /proc/lan_sds/lan_sds_ident # empty serial, OUI 0:0:0
europa_drv wouldn't load. The V2801F's librtk.so wasn't compatible with UF-Instant hardware. GPON never made it past O1.
Attempt 3: hybrid firmware V2801F + Ubiquiti binaries
The idea: take the V2801F rootfs (with more flexible OMCI configuration) and replace critical binaries with Ubiquiti originals (europa_drv.ko, librtk.so, sfpapp). The process required repackaging with mksquashfs on macOS (hence the Docker step that's still needed) and using gtar instead of macOS's native tar because the V2801F script wasn't compatible.
The result:
startup: can't resolve symbol 'getConfigurationMac'
insmod: cannot insert 'europa_drv.ko': unknown symbol in module
ABI mismatch between Ubiquiti binaries and V2801F libraries. The approach was wrong at its foundation.
The frustration of the middle
There was a stretch of several days where the stick booted, the firmware didn't explode, but GPON never reached O5. Each diagnostic cycle: power on the stick, wait for boot, connect UART, run commands, read logs, fail in a slightly different way.
This doesn't resolve with more hours. It resolves by stopping, documenting everything you know, and coming back fresh.
The answer was in an old issue thread: the europa_drv kernel panic with the MC220L was specific to that hardware's interface. Connected directly to the Ubiquiti's SFP+ slot, no intermediary, the driver initialized without a problem.
I'd been diagnosing the wrong problem. The MC220L was never compatible with stich86's MOD. The kernel panic masked everything else.
Advantages and trade-offs: the unfiltered version
✓ Advantages
No double NAT: The router handles PPPoE directly. Full control over traffic, QoS, and VLANs.
No ISP hardware: Entel's ONT disappears from the equation, physically and logically.
Native dual WAN: The Ubiquiti's SFP+ slot works as WAN with the stick, no additional hardware.
IPv4 + IPv6: Both functional from the first OLT handshake.
No extra overhead: No additional NAT layer, no extra latency from a second hop.
✗ Disadvantages and risks
Requires UART and U-Boot commands: No graphical interface. If you have no experience with serial console and bootloaders, the entry curve is real.
A misdirected flash can brick the stick: Recovery exists (TFTP from U-Boot) but requires U-Boot to still respond.
Identity spoofing: The stick impersonates a device it isn't. Entel doesn't detect this currently, but that's what's happening technically.
No ISP support: If you report connection issues, Entel has no visibility into the actual ONT. You diagnose it yourself.
Requires SFP+ slot on the router: If your router doesn't have SFP+, this approach doesn't apply directly.
ISP firmware updates: Entel can remotely update active Huawei ONTs. If the model or version you're cloning falls behind, future authentication might fail.
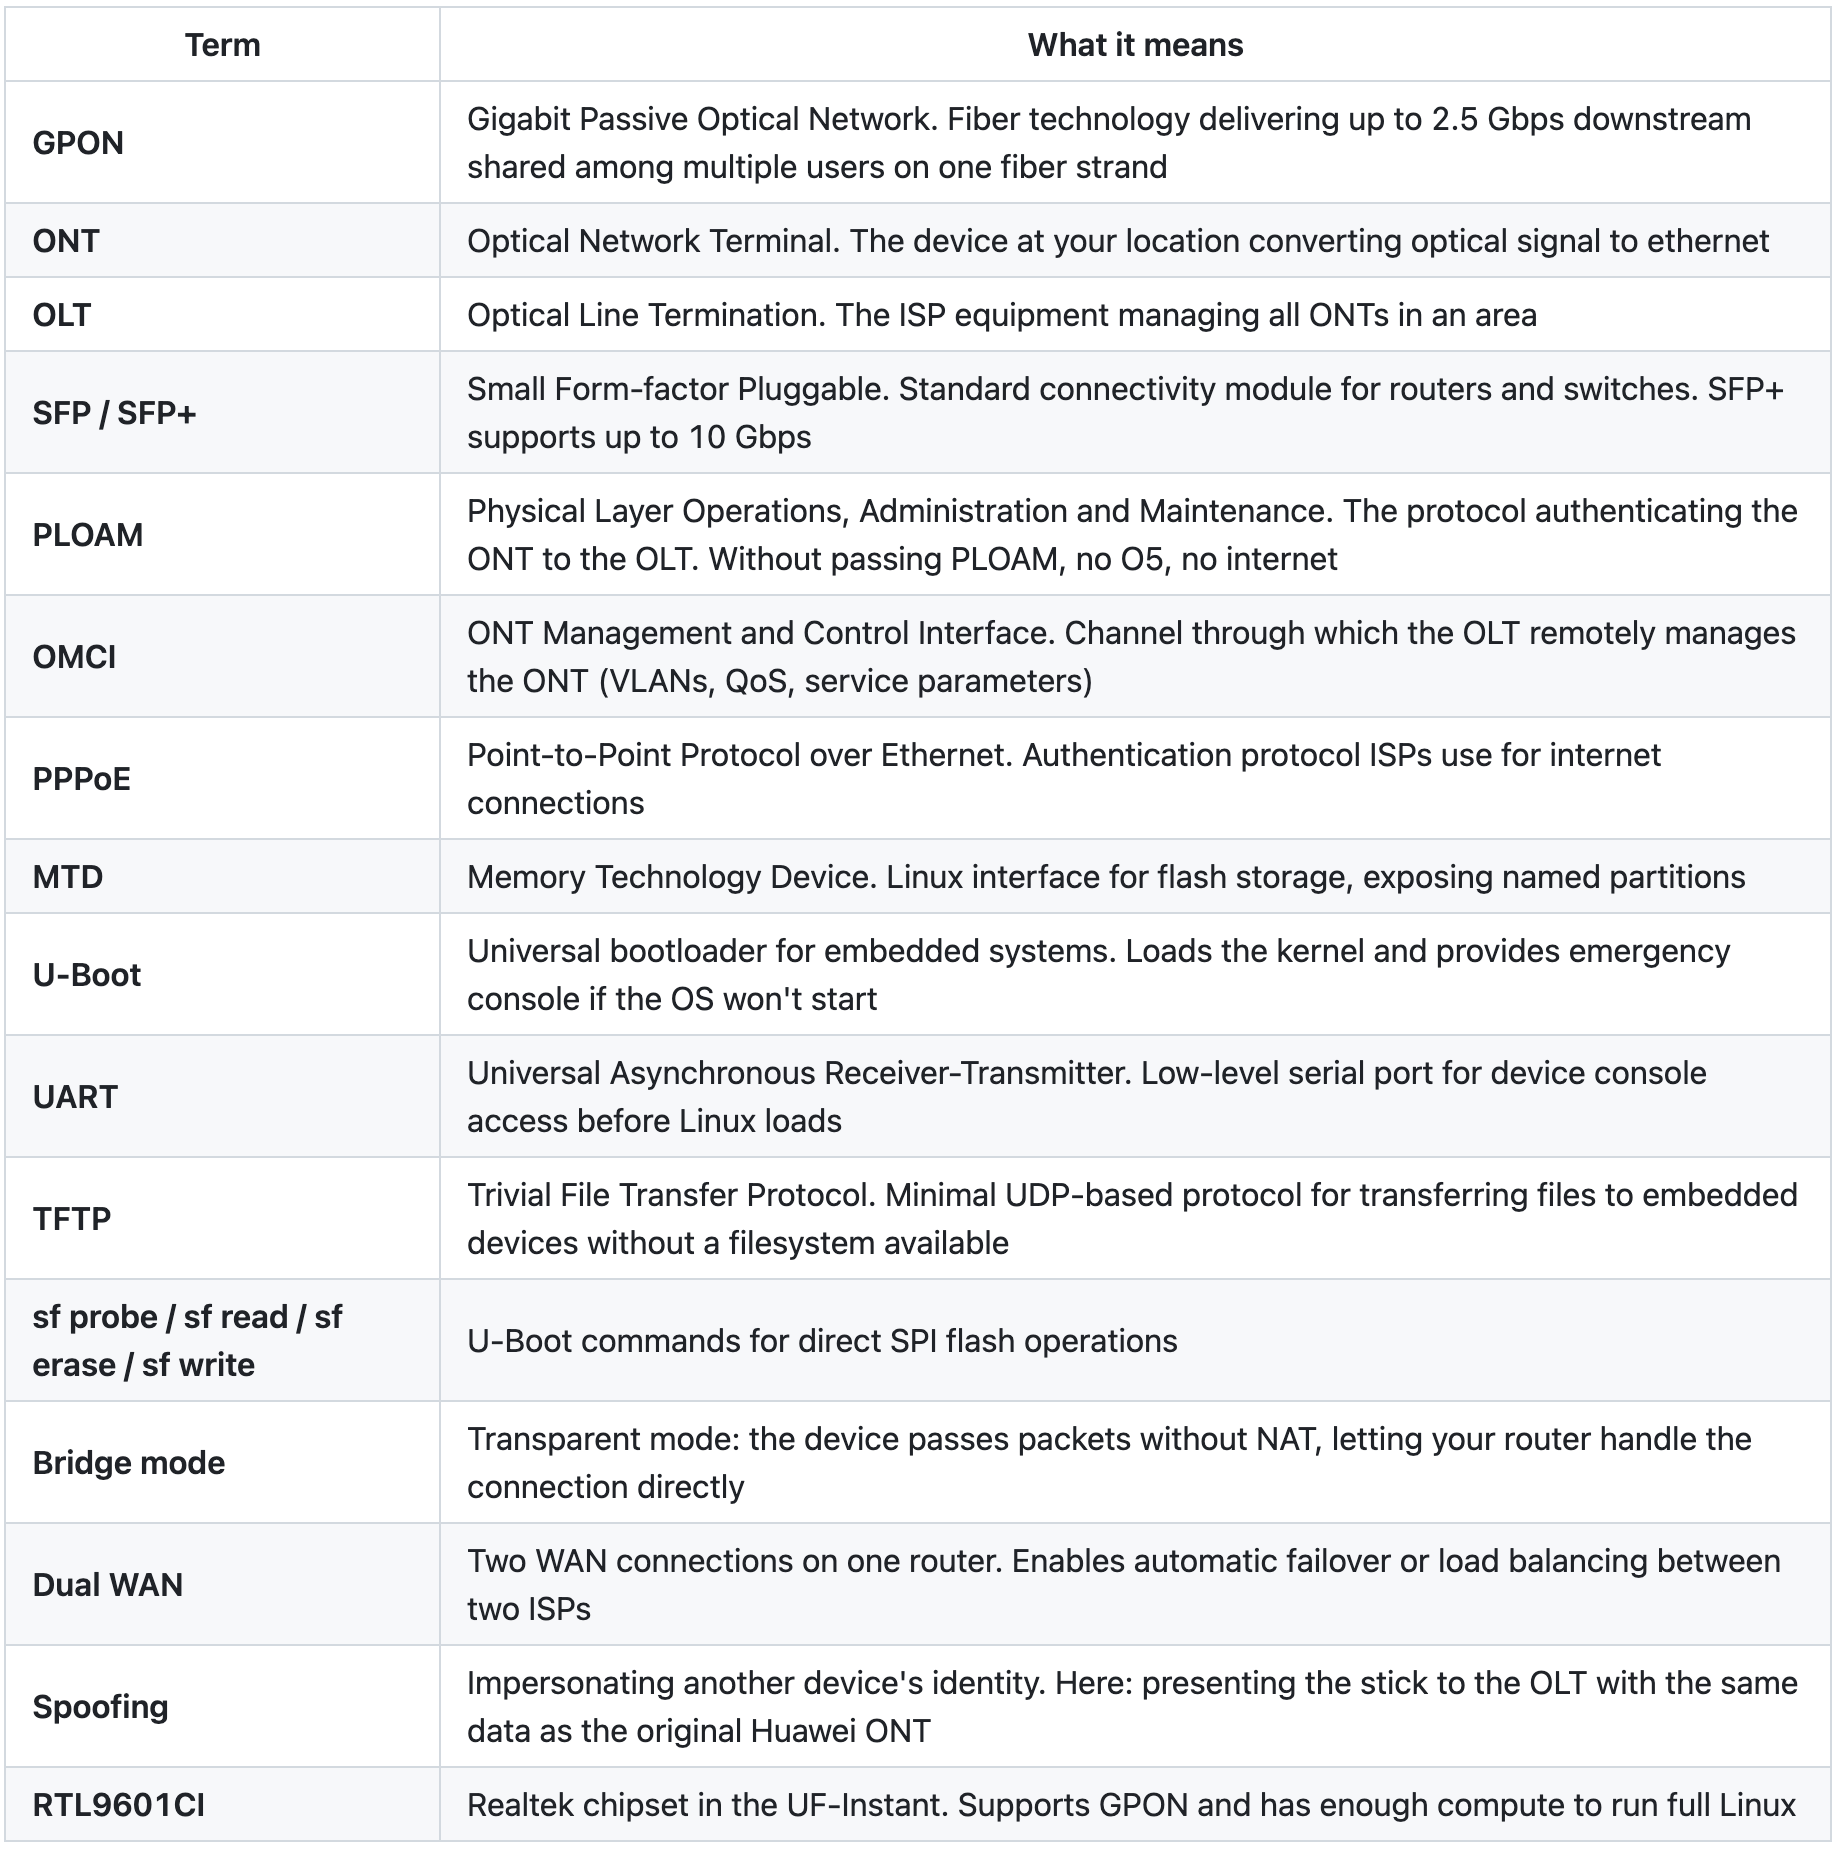
Glossary
Next steps (work in progress)
The solution works. The process is manual and requires UART. Plans to improve that:
Dedicated firmware for the UF-Instant: A WebUI where you can edit the SN, MAC, OMCI parameters, and VLANs directly, without UART. Goal: 10-minute browser-based setup.
Document more ISPs: Entel Chile works. Movistar Chile uses a different OLT (possibly ZTE). Spoofing parameters change between vendors. Work to be done.
If you want to collaborate, review the code, or discuss the process, the Discord is open.
Interested in a pre-modified stick?
If you'd like a UF-Instant with stich86's firmware already installed and ready for GPON parameter configuration, let me know in the comments. I have some available. No immediate reply guaranteed, but I will reply.
💌 Special Acknowledgments
To a girl who, without knowing it, pushed me to keep creating and programming in my free time. To the one who was once my spark: for "YLP", with gratitude... and with scars that also teach.
☕ If this was useful and you want to support more work like this: buymeacoffee.com/alpha018
Did your ISP also refuse bridge mode? Did you find another way around it, or is their modem still squatting in your rack?
For those who also refused "it can't be done" as a final answer: this post exists because I was told I wouldn't get it working. And because fiber now reaches my router without passing through any hardware I didn't choose. Nobody decides that for me.
🖕 Fuck you, Entel. Your bargain-bin devs don't get to decide what I plug into my own network. And you, Movistar — don't get comfortable. I know you run ZTE and you're next on the list.