One of the most important things to consider when creating an image is to make sure that the container image does not contain unnecessary software packages. When we want to create a simple container image for our application, we use a base image that has been previously prepared by someone else in the Dockerfile. The base image we use comes with many packages, and we need additional software packages for our application to be compiled and run. These required software packages must be included in the container image we create. But do we really need all the software packages in the container image we create?
We usually don’t ask this question when we turn our developed application into a container image, but it is a critical issue for security. Unused unnecessary packages in the application can contain security vulnerabilities. The fewer software packages we have in the container image, the fewer packages we need to keep track of its security.
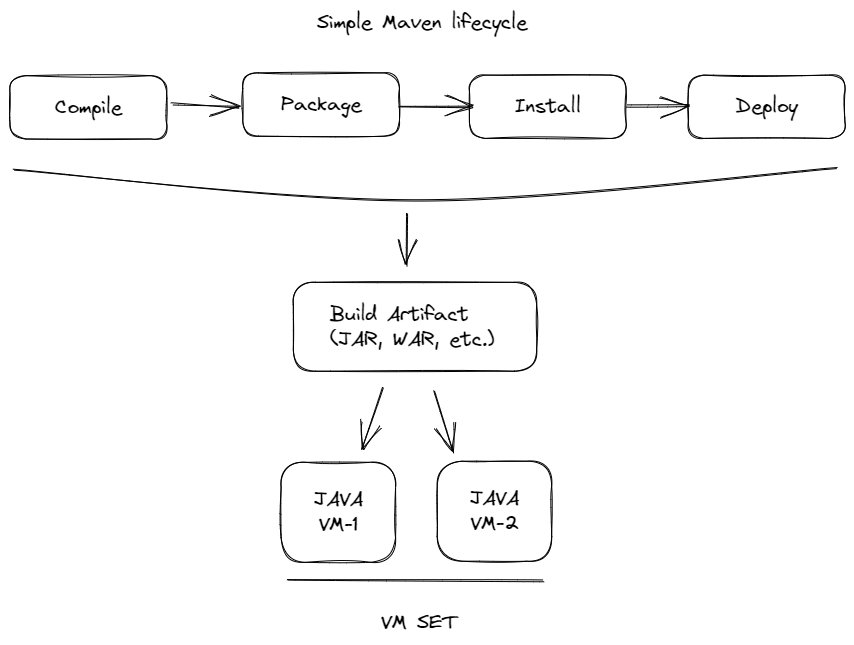
In the classic software life cycle, we first compile our application and then distribute the compiled product (war, jar, ear, etc.) to the servers that will run it at runtime.

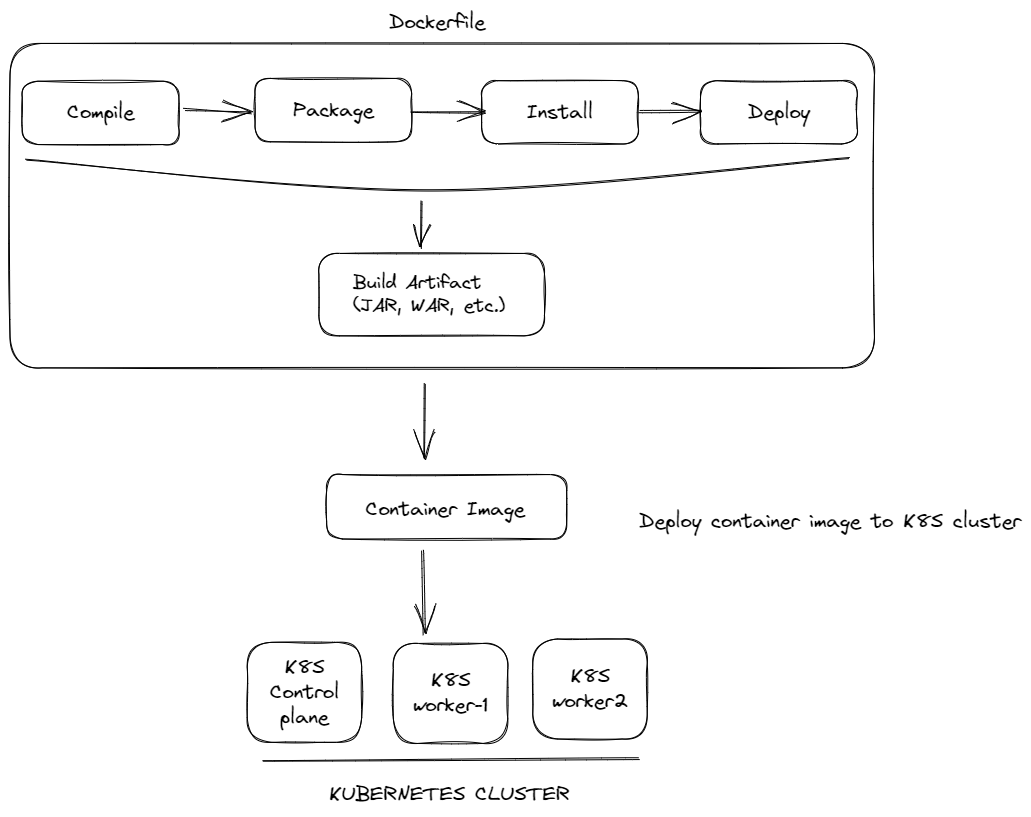
However, in a container structure, we must operate the software life cycle in a secure and effective manner. Build and test frameworks and test cases should not be included in the container image. Since we will directly use the image we created in the production environment, only the necessary packages required at runtime should be included in the image.

We can use the multi-stage build method to implement this approach.
You can turn your Java application into a container image and distribute it to environments with a simple Dockerfile. In the example Dockerfile below, we create a folder named “project” in the container image, copy the project files, and compile the project with Maven. In the final step, we run the application with the CMD command.
FROM maven:3.8-jdk-11
RUN mkdir /project
COPY . /project
WORKDIR /project
RUN mvn clean package
CMD ["java", "-jar", "target/demo-0.0.1-SNAPSHOT.jar"]
In the Dockerfile above, we created the product sequentially, but the final image included both build and runtime packages. Actually, only the runtime package required for the application to run should be present. Also, when we want to run the application tests in the project, the test packages will also be included in the image.
We can divide the creation of the application into multiple stages in a single Dockerfile using multi-stage builds. The first stage creates the application base, the second stage runs the tests, the third stage packages the application, and the final stage runs the Java container image. The most important feature of multi-stage builds is to ensure that the final image contains only the necessary packages. In addition, since the final image contains only the necessary packages, its size will be much smaller than a normal build.
FROM maven:3.8.5 as base
WORKDIR /project
COPY .mvn/ .mvn
COPY mvnw pom.xml ./
RUN ./mvnw dependency:resolve
COPY src ./src
FROM base as test
RUN ./mvnw test
FROM base as build
RUN ./mvnw package
FROM registry.access.redhat.com/ubi8/openjdk-11-runtime as production
EXPOSE 8080
COPY --from=build /project/target/demo-*.jar /demo.jar
CMD ["java", "-jar", "/demo.jar"]
Both simple and multi-stage methods will provide an image that runs at runtime. However, using multi-stage builds will be beneficial in your microservices transformations as it minimizes the risk and significantly reduces the image size.
